
Windows 8 is launched with lot of interesting and advanced features. Still most demanding feature for the Windows 8 operating system is start menu like Windows 7 or old versions. If you already start playing with Windows 8, you realize that Windows 8 packed with more features and easy access menus compare to old versions.

Windows 8 is powered with more menus that can access with left / right mouse clicks, left / right swipes on touch pad or tablet screen. Let us see most useful Windows 8 menus in this post that can be useful.
WinX Menu: If you click on right mouse button on left bottom corner, you can get most of the menu item such as Run, Task Manger, Device Manager, Programs and Features etc. You can also access this menu by using “Win+X” hotkey.
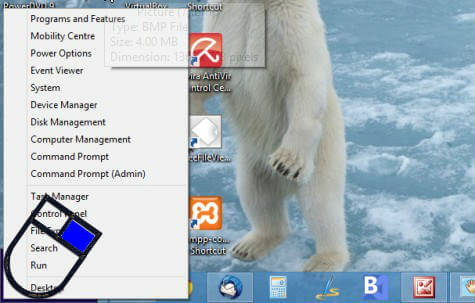
If you want to customize this menu you can easily add shortcuts or remove the lists from the group folders (top to bottom in menu) by going the location below.
C:\Users\user_name\AppData\LocalMicrosoft\Windows\WinX
You can easily reach into this location by typing ‘ appdata ‘ in RUN dialogue box and press Enter.
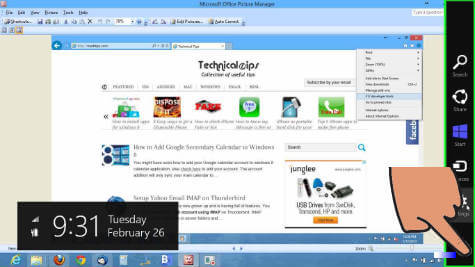
Charm Menu: Windows 8 Charms Menu shows you Settings, Devices, Start, Share and Search icons. You have to swipe your finger on the right bottom corner of the screen on touch screen or touch pad to bring up this menu. Or you can use Win+C to bring up the Windows 8 Charms menu.
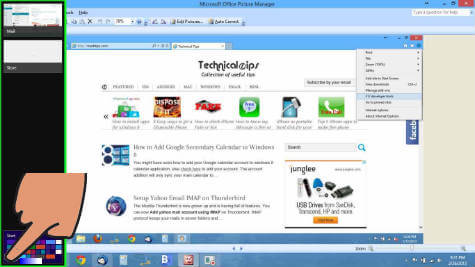
Running Apps: You can bring up the side bar in the left side that shows you the thumbnail of currently running apps. You have to drag your finger from the left edge of the touchscreen directly or by using touch pad to bring up this side bar. You can tap on any app to switch or tap the icon at the bottom to return to Start Screen. Use Win+D key combination to switch to the desktop app in Windows 8.
Screen Shots: Windows 8 introduced and easier way to save the screen shot to picture file. Hit the Windows button and PrtScrn at the same time and that will save your screen as a PNG file to Screenshots folder in the Pictures library.