
We all love to capture memories in the form of photos on our iPhones. But with time, the storage space on our devices can fill up fast, and we need to transfer these photos to our computers. I regularly transfer photos from my iPhone to my Windows laptop to clear storage on my iPhone. I use the Windows Photos app for importing photos from my iPhone to the laptop. Recently, I came across a new option on the Windows Photos app that allows you to view the iCloud photos. I found that feature very useful as I can see the photos on my Windows laptop automatically.
If you’re an iPhone user and a Windows PC owner, this article is for you. In this article, let’s see how to automatically sync iCloud photos from your iPhone to your Windows computer.
Table of contents
Step 1: Install iCloud App on Windows PC
Well, the iCloud app for Windows is a must as long as you carry the iPhone with you. This iCloud app will help you to back up your iPhone with Windows. If you haven’t, you need to install the iCloud app on the computer to automatically sync iCloud photos from your iPhone to the Windows PC.

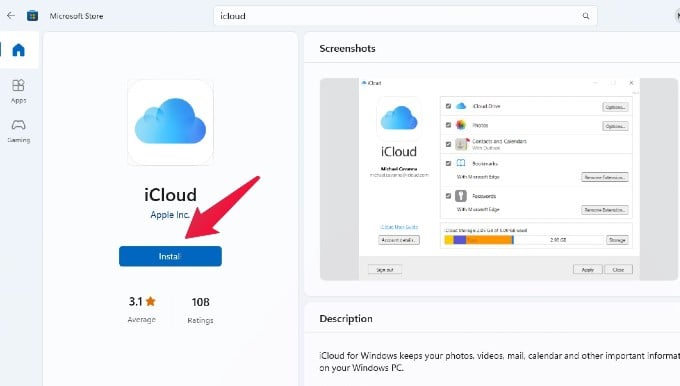
- Launch Microsoft Store on your computer and search for “iCloud”.
- In the search results screen, click the Install button to install the iCloud app on your PC.
- Or you can use this direct link to install the iCloud app for Windows.
Step 2: Sign In to iCloud App on Windows
After installing the iCloud app, you need to log on to your iCloud account (the same one you have on your iPhone) and configure some settings to sync iCloud Photos between your iPhone and PC automatically.
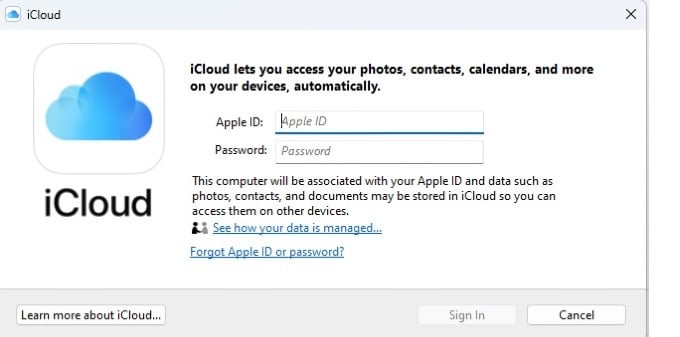
- Launch the iCloud app on your Windows computer.
- When you open the iCloud app for the first time, you need to enter your Apple ID and Password.
- After entering the data on the respective boxes, click the Sign In button.

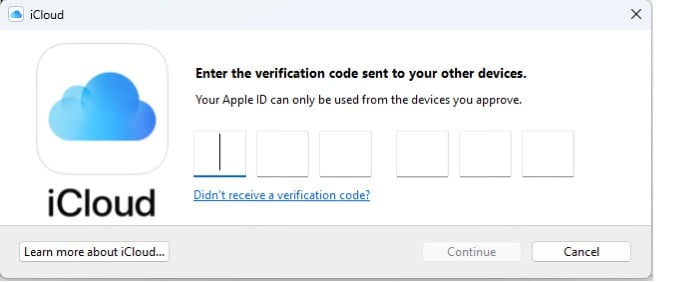
- A pop-up dialog will prompt you to enter a 6-digit verification code. Unlock your iPhone to make a note of the 6-digit code and enter the same on your Windows PC.

- After you enter the code, it will be validated. Then, you will see the iCloud app screen below on the successful validation of the code:

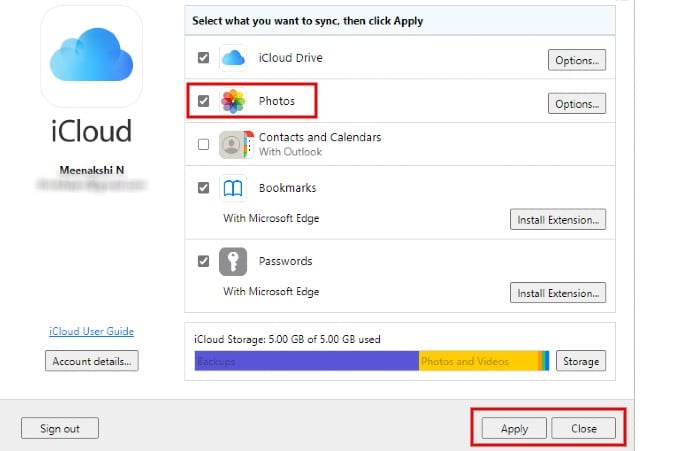
- By default, the sync option is enabled for iCloud Drive, iCloud Photos, Bookmarks, Contacts, Calendars and Passwords. If you don’t wish to sync all the data, you can uncheck all other options except iCloud Photos.
- Click Apply button at the bottom of the dialog to save the changes.
- Click the Close button to exit the iCloud app.
iCloud Storage Full? See How to Survive with 5GB iCloud Storage on iPhone Without Paying
Step 3: Launch Windows Photos App
First, make sure you are running the latest version of Windows 11 and that the Windows Photos app is updated. If not, you can go to the Microsoft Store and manually update the Photos app.
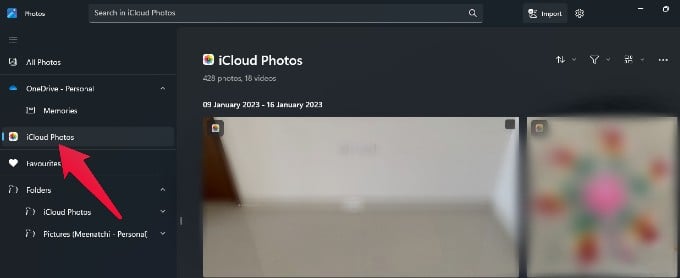
- Open the Photos app on your Windows computer.
- On the left pane, click on the new option iCloud Photos.
- On the right side pane, you can view all the photos stored on your iCloud.

If required, you can move or copy all or selected iCloud Photos to your OneDrive folder. However, I don’t see any direct option to move or copy the photos to an external hard drive or to an internal folder in the Windows computer.
How to Transfer Photos from iCloud to Google Photos Quickly
Open iCloud Photos on Windows Browser (Alternative Option)
Well, you don’t need to spend on the Windows photos app. You can directly log in and open iCloud Photos on any windows web browser.
- Open any Windows Browser
- Launch iCloud Photos link.
- You will land into the photos directly that sync from your iPhone.
- You can download any photos right from here.
Choose Your iPhone Photos to Sync
Well, Apple is offering only very limited free iCloud storage, that is, 5GB of space. You can only sync all your photos with this free memory space if you pay for more iCloud space. However, there are other options than syncing all the photos to iCloud to get on Windows.
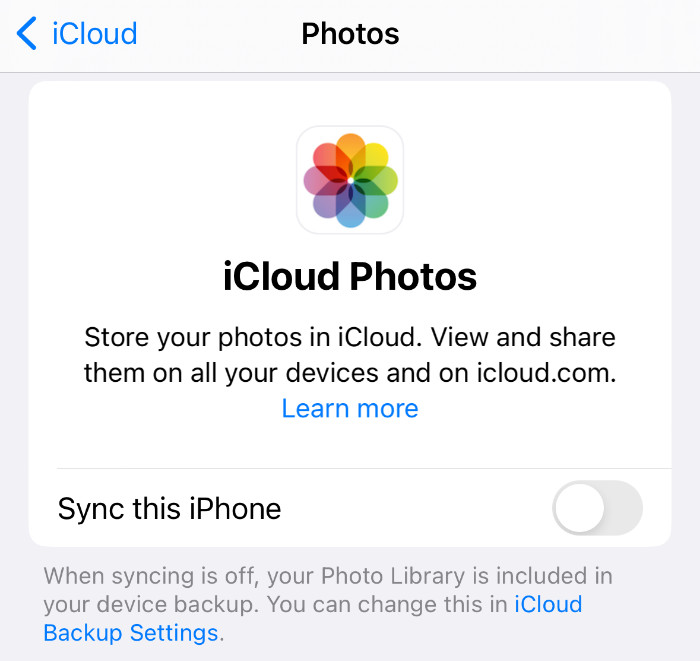
- Open iPhone Settings
- Tap on Apple ID > iCloud
- Tap on Photos from next screen (assume you turned off photo syncing)
- Sync this phone (Syncing all the photos)

- My Photo Stream (This is to upload the last 30 days of photos)

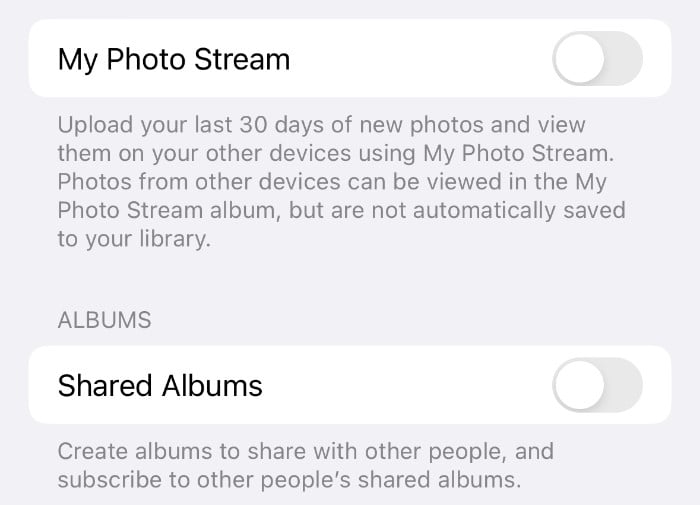
- Shared Album (Create an album and share it on iCloud for others)

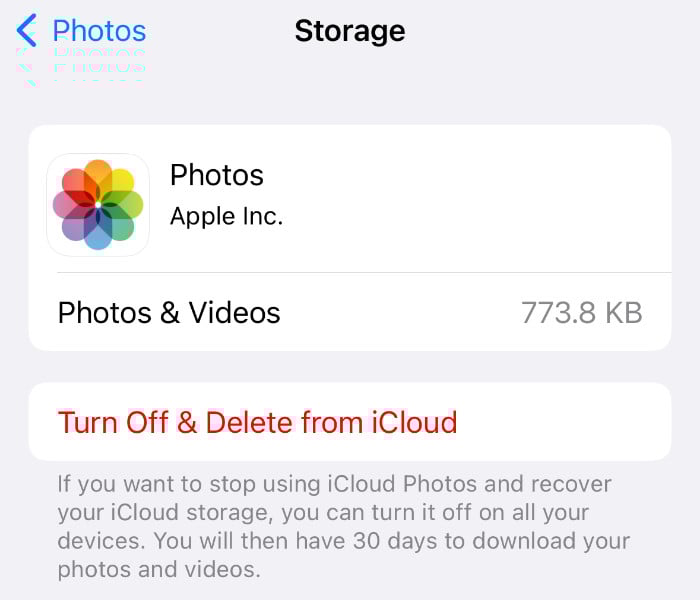
There is a Manage Storage option to delete the photos already synced with iCloud. These are the sync option to sync your iPhone photos to iCloud and thereby access from Windows iCloud App or other devices that access the iCloud photos.
How to Copy Files from iCloud Drive to Google Drive on iPhone
Troubleshooting: iCloud Sync Between iPhone and Windows Not Working?
For some reason, if you are not able to view the iCloud photos on your Windows PC, you can try out the below steps to resolve the issue.
- Make sure you have enabled iCloud backup on your iPhone for the photos.
- Double-check if you are logging into the same iCloud account on Windows and iPhone.
- If your iCloud storage is full, your iPhone photos will not be stored on iCloud anymore. And, the latest photos won’t appear on the Windows Photos app as there is no iCloud backup.
I found this feature very handy as I can automatically view all the iCloud photos on my Windows laptop. It will be really good if Microsoft adds an option to move the photos to external storage devices from the Windows Photos app.
It explains how you can “Automatically Sync iPhone Photos to Windows and Download” your photos with ease. With simple steps, you’ll be able to transfer your precious memories from your iPhone to your Windows PC and free up some space on your device. Whether you want to manually select photos or set up automatic transfer, this article covers everything you need to know.


