
One of the most powerful features baked into Windows 10 is native support for hardware virtualization. This is via a virtualization platform called Hyper-V. Once you enable virtualization on Windows 10, it opens the door to creating a virtual machine on your system. This machine is completely separate from your main system. You can thus go crazy with it. If you want, install anything you want on it without worrying about messing up with the main system.
Before you can do that though, you’d have to enable hardware virtualization on Windows 10.
Hardware Virtualization System Requirements
- Windows 10 Pro or Enterprise
- 64-bit processor with Second Level Address Translation (SLAT)
- 4GB system RAM at minimum
- BIOS-level Hardware Virtualization support
Check Hardware Virtualization support
First of all, make sure your device supports hardware virtualization. You can also check that it is enabled in the BIOS or UEFI firmware settings.
- Launch a command prompt or Windows PowerShell window.
- Enter the command given below.
systeminfo.exe
- Wait few seconds (It takes a few seconds to gather information about your system but then gives you a result)
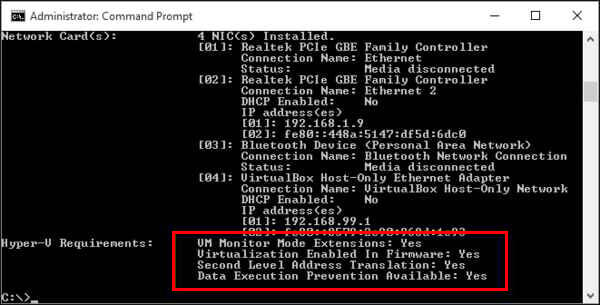
- Look under Hyper-V Requirements.
- See that Virtualization Enabled In Firmware reads Yes. (If it does, then you can use Windows Sandbox.)

Alternatively, you can also see if Virtualization is enabled under the Performance tab of the Task manager.
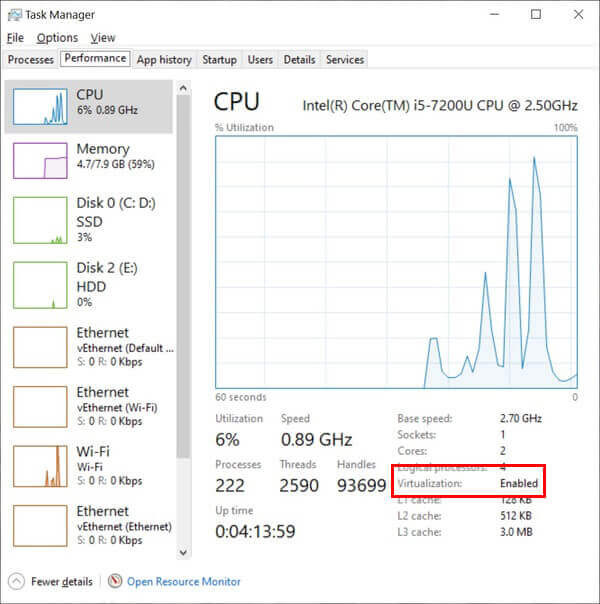

The virtualization status will be in enabled mode if you check on the CPU performance screen. If it’s not, you’ll have to enable this in the BIOS or UEFI settings.
Related: How to Setup Dual Display in Windows 10
Enable Virtualization on PC BIOS Setting
Every PC has a different version of BIOS screen and settings. Also, the steps to steps to enable virtualization from the BIOS depends on the PC manufacturer. Normally, BIOS settings can be accessed using the function keys (F1, F2, F3, F10, or F12) during boot. On some PCs, it’s the ESC, or Delete key.
Moreover, the keys are different from manufacturer to manufacturer and even among devices from the same manufacturer. Still, if you don’t already know the correct key for your machine, Google it. When you boot your PC, tap the key about twice per second as soon as the screen turns on. An easier and more universal way is to do this from the Windows 10 Settings.
- Go to Windows Settings
- Click on Update & Security
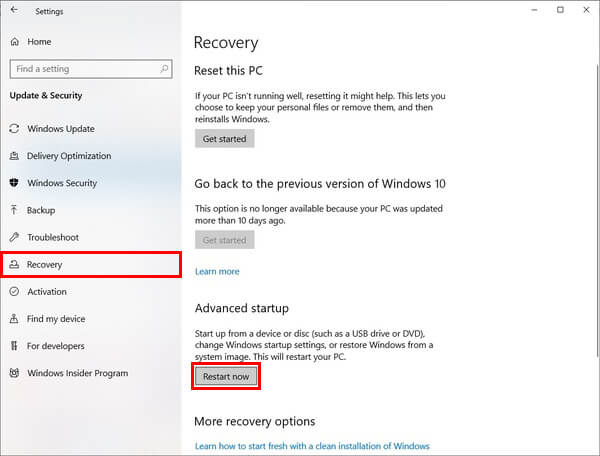
- Now click on Recovery
- Click Restart now under Advanced startup.
- Go to Troubleshoot
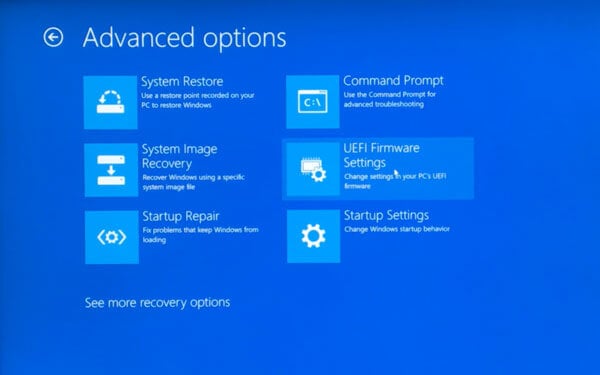
- Click on Advanced Options
- Now click on UEFI Firmware Settings
- Click Restart.


This method only works if you use UEFI-boot. And this is also a setting that can be changed from the BIOS. If you don’t know this, you don’t have to worry about it. All Windows PCs ship with UEFI boot enabled by default.
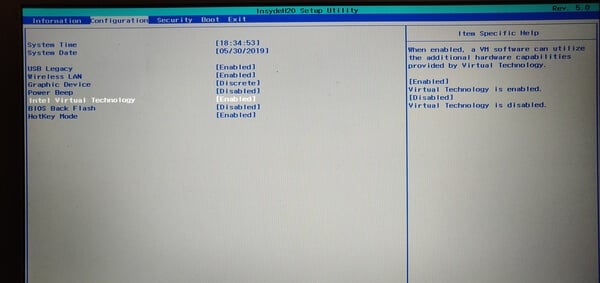

Look for something like an Advanced menu or tab. You’ll most likely find the setting you need to turn on under this. In addition to all the other things that can be different, this can also be labeled differently. It could be Advanced Mode, or simply Configuration like it is on my Lenovo Ideapad.
Finally, look for the setting which has Virtualization is its name and turn it on. Sometimes it’s named completely vaguely. For instance, Vanderloop. Depending upon your processor and other factors, these are the names commonly used.
- Intel Virtualization Technology,
- AMD-V,
- Hyper-V
- VT-X
- Vanderpool
- SVM
Related: How to Get Microsoft Edge with Chromium Engine on Windows 10?
Enable Hyper-V Virtualization in Windows 10
Now that virtualization support is enabled in the BIOS, enable it on Windows 10.
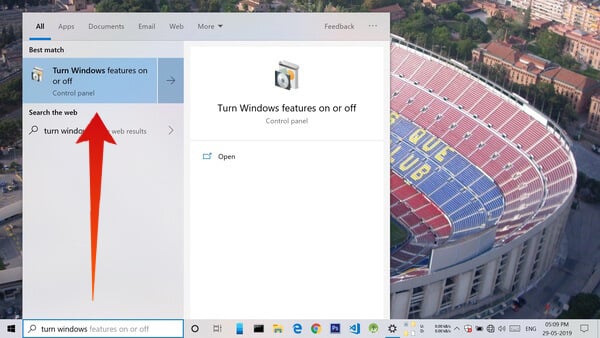
- Press the Windows key to get the Search box.
- Type “turn windows features on or off” and click on it to open it.
- Scroll down and check the box next to Hyper-V.
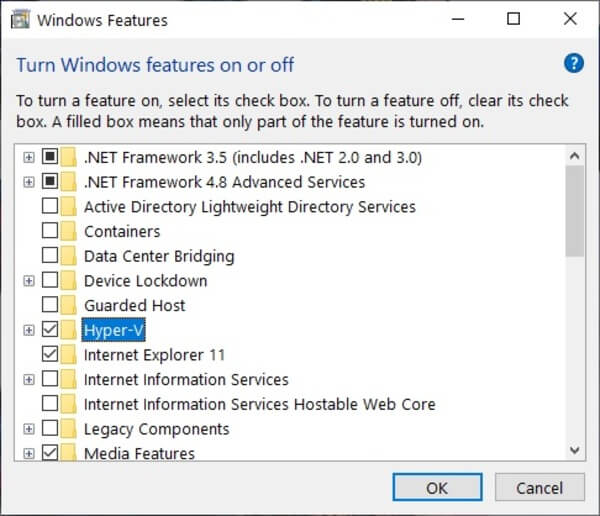
- Click OK.
- Windows will install the necessary files to enable virtualization.
- You’ll then be asked to reboot PC.
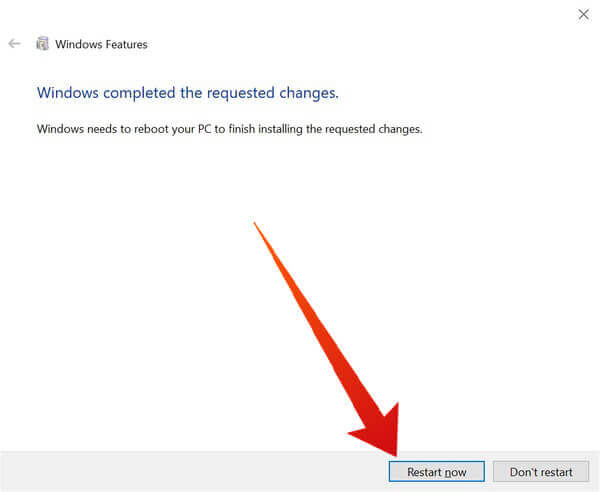
- Click Restart now.


Related: How to Recover Lost Space on SD Card with Windows 10?
Advantages of Windows Virtualization
Windows 8 was the first ever Windows version to natively support Hardware virtualization. Consequently, Windows 10 also supports it natively. But the platform has gained many features since then. This includes features like Enhanced Session Mode, high fidelity graphics, USB redirection, Linux secure boot, etc.
With Windows virtualization, you can test apps inside a virtual machine without compromising your main system. We’ve already mentioned that at the start. And the new Windows 10 May 2019 update actually has a built-in feature that lets you do that. They call it Windows Sandbox.
Virtualization also allows you to install a Linux shell on Windows. For instance, Ubuntu, Debian, Kali Linux, etc. are available from the Microsoft Store. Not only can you then use the powerful Linux terminal and commands but also the Linux GUI. One can even use a full-blown Linux desktop on Windows, although that’s not quite practical.


Total crap, wasted so much time
My Lenova Ideapad 330 niot applicable
Does it support virtualization?
It worked pretty well for me
On Hp windows 10
Thanks
Thanks! That helped me a lot!
cant see any hyper-v folder under windows features…any help
Hi Carl. As mentioned above, Hyper-V has certain requirements. Not all Windows machines support it. Are you sure your PC and Windows version support it?
My PC supports but still there’s no folder there.
Hyper-V only support on W10 pro and enterise
Your post helped me. Thanks a lot. I mean it, thanks.
Glad to have helped.
I enabled virtualization but cant find hyper v folder, if not supported, it won’t get enabled?
no
After typing systeminfo.exe I see that My PC supports virtualization but Does not have UEFI. It has only the BIOS settings. How can I get at the ENABLE VIRTUALIZATION option? There’s no UEFI in my system. Thank you
It’s the same thing, in this case. If you don’t have UEFI enable it in the BIOS setting. The process is the same as described above for UEFI firmware settings.
Mine doesn’t have Configuration, but it has ‘Main’ ?
It’s possible. As I mentioned above, the BIOS menu can be very different based on the manufacturer of the motherboard and the model.
The restart would take me to the startup menu. No matter what option I choose, I cant see the option to enable it. My system however have Hyper-V folder.
I find both hyper v and boot manager
After I successfully enabled by
Did you successfully enable Hyper V?
My system does not have any function like that.
What else should I do please.
Hi Samson. If your system does not have such a function then it probably lacks the hardware to support it. The only option in that case if you want this feature so bad would be to buy a new system.
Hi, in task manager it’s says Virtualization: Disabled, but right under that is says Hyper-V support: Yes. Do I still need to enable virtualization in bios?
yes
When im in advanced settings or troubleshoot i dont have the option “UEFI settings” or something along those lines help
I couldn’t find Hyper-V in the features but I did see Virtual Machine Platform so I clicked it.
Oh Thank you.That’s work ❤
Did it work?
what if the UEFI setting is not there?
If you can’t find the folder the guy has in the screen it is under Virtual Machine Platform, at least that is what I found it under
Kys liar
If you’re using win10 pro, press F10 after reset, security then boot.. you’ll find virtualization
For win10 pro, Restart your PC , Press F10, Security> System Security>Virtualization Technology
I can’t see the hyper-V folder after i enable the virtualization but according to command promt it is already enable my virtualization
does enabling the hyper-v using the command prompt enables the virtualization technology without entering in the bios?
You have to enable the virtualization from BIOS settings to run 64-bit Operating System in Virtual Environment.
I see ‘Windows Hypervisor Platform’ under ‘turn Windows features on or off’ is this same? Also if I use this option do I still have to do the BIOS option.
Thanks its work
I enabled visualization in my Bios, but I don’t have a hyper-v option in my windows features to turn on or off. Task manager does say I have visualization enabled, but does my windows 10 home edition lack something I’m missing?
It worked perfectly. Thanks
It worked perfectly. Thanks
In my bios settings there is no virtualization option what can I do please help me
All things i do what is needed for enable virtualization. But my windows operating system don’t start anything special download. what can i do now?? Please Answer me…..
I can’t find any virtualization in my bios. I have an Arsenal motherboard with amd cpu
THANK YOU VERY MUCH IT HELPS ME A LOT
I couldn’t find where in my BIOS I will enable the VT-x. Pretty sure it’s just under CPU configuration but it’s just not there, does this mean my mobo doesn’t support it? Im using A10-9700 in ecs a320am4-m3d.
Even if protocol didn’t helped Kevan, he could not call it crap. It would be a helpful experience for anyone who don’t know this area.
Thank you for taking time to post.
What part of computer science is entire thing we had to deal in here? Is it DOS, BIOS or else? Where I could read to learn in better details?
work perfectly thanks
Its worked for me, thank you