
Mac is offering a built-in feature to compress a folder or a set of files. However, when you want to zip files with a password to protect your data, there is no direct solution there. Either you have to depend on terminal commands or third party compressor apps for mac to zip a folder with a password.
In this article, we will discuss various methods and learn how to password protect a folder on Mac.
Content
- Create Password Protected Zip File Using Terminal
- Mount Folder As A Protected Drive on Mac
- Use Encrypto to Password Protect Files on Mac
- Password Protect A Folder on Mac Using Archiver Apps
Create Password Protected Zip File using Terminal
The macOS comes with a handy of a feature that lets you ensure data protection and security. However, the default folder that you can create on top of the macOS skin does not allow you to add any protection features. that means you cannot set passwords to folders by default on macOS.
Even though you can compress a folder into a single zip file, you cannot set password protection. If you are looking for how to lock a folder on Mac, here is a workaround. You can password protect a folder on Mac by compressing it into a zip file. Here is how to make a folder on Mac, convert it into password-protected Zip file using Terminal commands.

- On your Mac, create the folder on any location.
- Now, move all your confidential data into the folder you want to lock.
- Open Spotlight and search for “Terminal.”
- After opening the terminal enter the following commands.
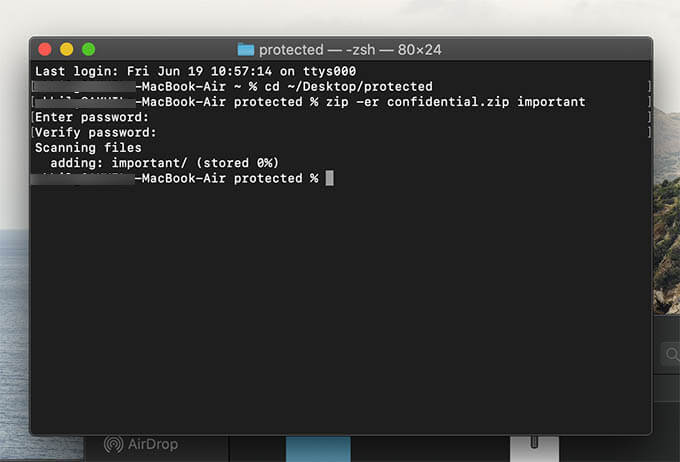
- Change the terminal directory to the location of the newly created folder. For example:
cd ~/Desktop/TargetFolder. - Type and enter
lsto see the files and folders containing in the location. - Enter the following command:
zip -er FilnameYouWant.zip FileORFolderNameToCompress. - Type the password to protect the file/folders and hit enter.
- After confirmation, you could find the protected zip file on the same destination.
- Double click on the zip file to open using the password you have set.
Once you protect the folder using a password on Mac by compressing it to zip by the above method, you can send it to anyone over mail or other means. Also, it can be opened with the password on any system including iPhone, Android devices, and even Windows 10 PCs.
Mount Folder as Protected Drive on Mac
Another, more secure, convenient way to protect your files and folder with password on Mac is to mount them as Disk Drives. You may not know about this feature. But yes, you can use a folder as a disk drive on your Mac. While creating the disk image, you can even set a password for it, with AES-128 bit as well as 256-bit encryption. Since it is a disk image, you can share the file with others and still keep it protected. Unlike Zip files, you do not have to extract the containing files whenever you want to access them. With a disk image, you can mount the folder when you want and unmount it after usage.
If you are handling highly confidential data, mounting the folder as a protected drive on Mac could be more suitable. See how to password protect folders on Mac by mounting it as a disk image.

- Create a folder and move the confidential files on your Mac.
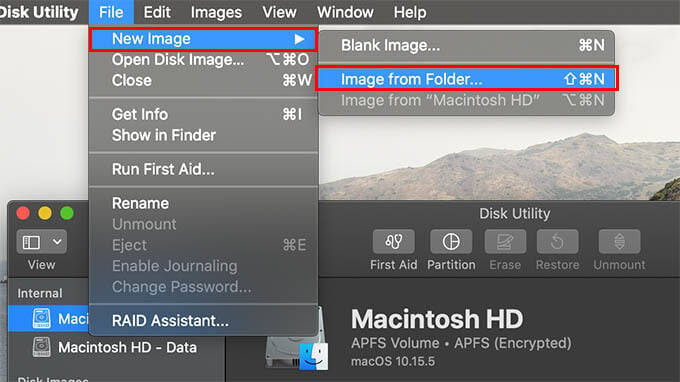
- Open Disk Utility app on Mac.
- Click on File from the menu bar.
- Choose New Image > Image from Folder.
- Choose the folder you have created with confidential data.
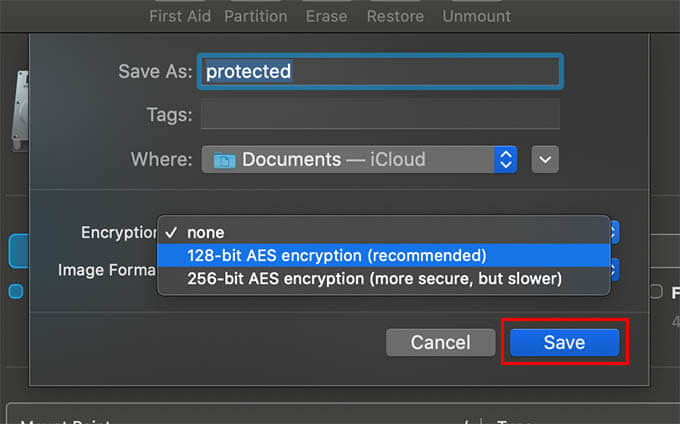
- From the next window, provide the disk image name.
- Set the target location.
- Click on the dropdown menu against Encryption and choose 128-bit AES Encryption.
- Click on Image Format and choose what you need accordingly. In case you are looking for a read-write disk, choose read/write.
- Click on Save.
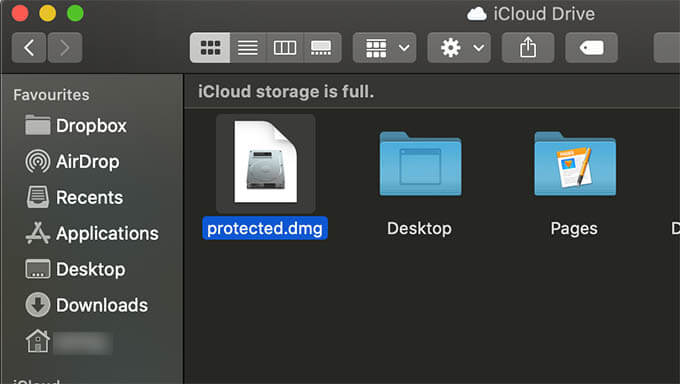
- Now close the Disk Utility window and go to the directory where the disk image is saved.
- Double click on the disk image (.dmg) file to mount as a disk drive by entering a password.
- Find the mounted disk drive from the sidebar on the Finder window.
- Click on the Unmount button to remove access to files until you mount it again.


Use Encrypto to Password Protect Files on Mac
Encrypto is a free-to-use utility tool for macOS users that lets you encrypt any file or folder using a password. the files that are encrypted using the Encrypto can be shared among your friends. However, it can only be opened using the Encrypto app on your PC or Mac. See how to use Encrypto to encrypt and password-protect files on mac.
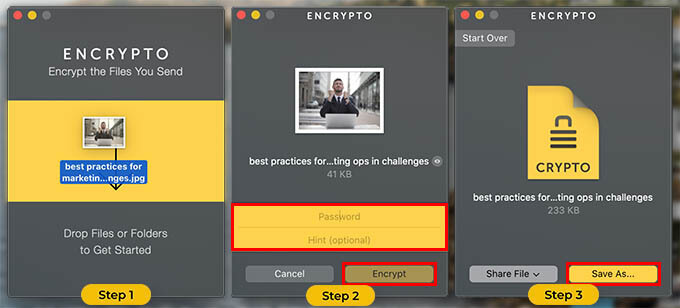

- Install and open Encrypto on your Mac.
- Drag and drop any file to the Encrypto app.
- Enter the password.
- Click Encrypt.
- After finishing, save the file on your desired location.
The encrypted files will be in .encrypt file format, which cannot be cracked by any tools unless you have the original password to access the file containing.
Also Read: How to Protect USB Drives with Password?
Password Protect A Folder on Mac Using Archiver Apps
Not everyone, of course, would find the above workaround as an interesting thing to do. Also, using commands on the Terminal window every single time you want to protect a folder or file using a password would be difficult for many of the users. Therefore, you must be looking for something quite easier and handy for everyday usage.
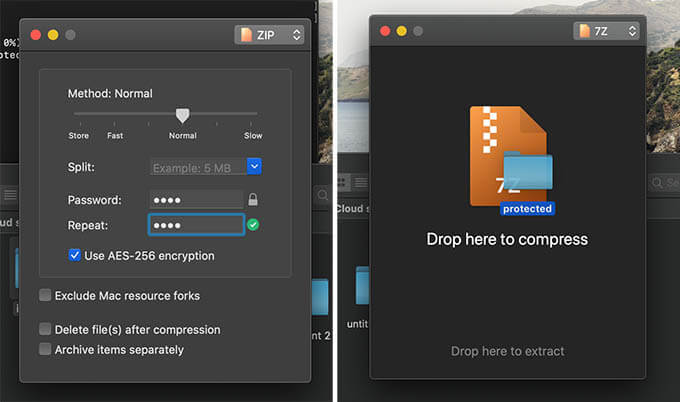
There are plenty of Archiver apps available for macOS that lets you archive or unarchive files and folder with or without a password. The Keka is an amazing free tool that you can use for free to password protect folders and files by archiving into protected Zip files.

- Download and Install Keka on your Mac.
- Launch the Keka app.
- Choose the compressed file format. Select Zip or 7zip for maximized compatibility and password protection.
- Enter the password and confirm.
- Drag and drop the file or folder you want to protect using a password to the Keka window.
- You will see the files are getting compressed after encryption.
After archiving the file using Keka, find it on the same directory. Thus, you can p[assword protect a folder on Mac or even a group of files without using the complex Terminal commands. The Keka also allows AES-256 bit encryption to the files you password protect on Mac.
Apart from Keka, there are several other apps to encrypt files and password protect zip files on Mac. In case you are looking for wider options in encrypting and compressing your files on Mac, make sure you have read our guide for you to choose the best archiving app for Mac.
Storing confidential data, whether it is personal or related to our business without proper protection is risky. Especially, if you usually leave your MacBook at work or home, chances of getting vulnerable are high. Therefore, to protect files and data from getting breached, all you can do is to password protect the folder or files on Mac.


