
Are you trying to watch your favorite movie/TV show, but it is geo-restricted and not available? Well, the most popular option to get unrestricted content on your Firestick/Fire TV is by using a reliable VPN service. However, using a VPN might reduce your streaming speed and will incur an additional cost.
Some people prefer the simple way of changing the DNS on their Firestick to watch their favorite content without any constraints. In this article, let’s take a look at how to change DNS on your Fire TV/Firestick.
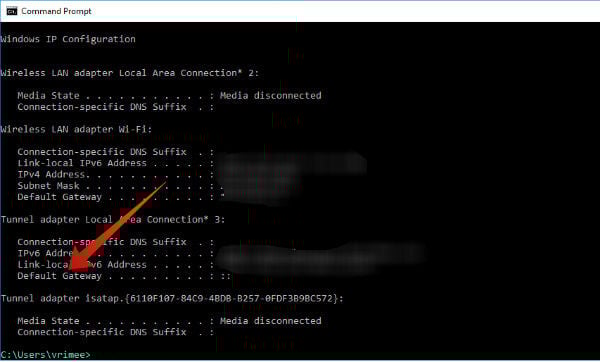
Step 1: Find Router IP Address
The first step is to find out the IP address of your router. Please be aware that the ISP provider IP and router IP, both are different. Let’s see how to find out the IP address of your router by following the below steps.

Windows
- Launch the command prompt app. (If you are using Windows 10, click Start/Windows icon and type “command” on the search bar and click Command Prompt app)
- Next, type the word ipconfig and press Enter.
- Look for the field Default Gateway. The numbers listed for that field is the IP address of your router.
Mac (OS X)
If you are using a Mac computer, then you can follow the below steps to find out the IP address of your router.
- Navigate to System Preferences->Network.
- Click Advanced->TCP/IP to find your router’s IP address.
Step 2: Note Down Firestick Settings
Before changing the DNS on your Fire TV, you need to make a note of your existing settings for future reference. Either you can use a piece of paper or take a picture with your smartphone to note down the settings.
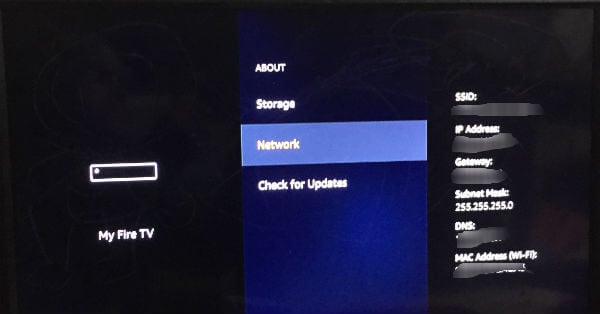

- Using your Firestick remote, go to Settings->My Fire TV.
- Next, navigate to About->Network.
- Then, select your Wi-Fi network and note down the following:
– SSD
– Gateway
– Subnet Mask
– DNS
– Mac Address (Wi-Fi)
This step is crucial as it helps to restore the DNS settings back to default. Therefore, double-check to make sure that you had noted the values correctly.
Step 3: Change Country
Are you unable to watch your favorite TV shows/movies as you are located outside the US? Before fiddling with the DNS settings on your Fire TV, first, you need to change the country to the United States.
- On your browser, go to Amazon’s official website and log in to your account.
- Scroll to the bottom and click Manage your Content and Devices.
- Select Country Settings and set your country to the United States.
This step will help you to bypass the location restrictions on your Firestick.
Step 4: Select DNS Server
There are two types of DNS servers: Commerical, Public. You don’t need to pay a penny for using public servers whereas Commerical DNS servers are not free to use. Some of the popular commercial ones are given below:
Well, if you don’t wish to spend money, then you can go for public DNS servers like Google public DNS, Quad9, OpenDNS and more.
Related: Public DNS, A Free Solution to Improve Internet Speed and Security
Step 5: Change DNS on Fire TV
By now, you should have selected the DNS server and took a backup of your Firestick settings. Now, it’s time to change the DNS settings on your Fire TV to bypass geo-restrictions and watch your favorite content.
- On your Firestick, navigate to Settings->Network.
- Next, click on your wireless network connection and select Forget Network.
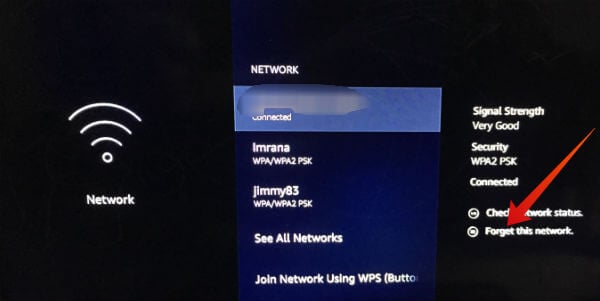
- Press the Select button on your remote to confirm the action.
- Next, scan for the available Wi-Fi networks and select your connection.
- Then, enter your Wi-Fi password.
- Here, instead of clicking Connect, click Advanced. Now, you need to manually enter the values for IP address, Gateway and Subnet masks which you have noted earlier.
- Enter your IP Address and click Next.
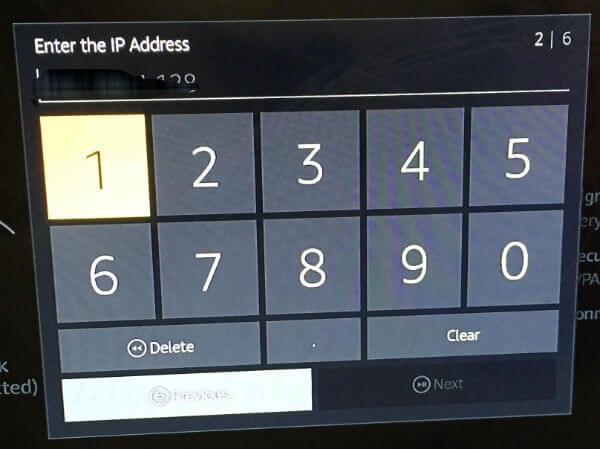
- Enter Gateway and click Next.
- Next, enter Network Prefix Length and click Next.
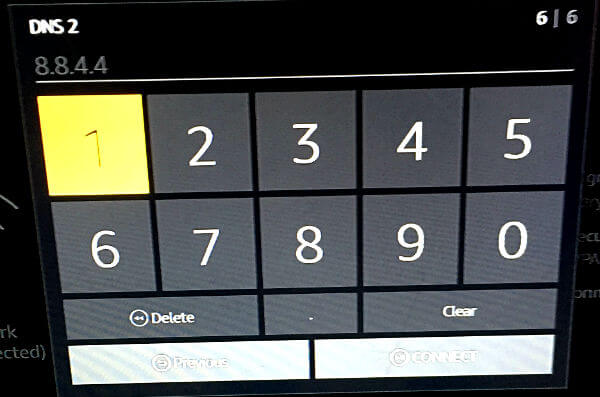
- Enter the DNS 1 server address and click Next. If you are using a commercial one like SmartDNS, then you can get the address from their website or by logging on that DNS server account. For public DNS servers, you can find the address by searching on the web. For example, the addresses for Google Public DNS service are 8.8.8.8 and 8.8.4.4.
- Enter the DNS 2 server address and click Connect.


That’s it. Now you have successfully changed the DNS on your Firestick. If you would like to go back to your default settings, you can do that by entering the old values you had noted. Sounds a lengthy procedure? Then, you can just restore your Firestick to factory defaults in order to revert to your old DNS settings.
List of Best SmartDNS + VPN Providers
These days many VPN service providers offer a SmartDNS service either separately or as a part of the VPN package. A SmartDNS service is one that replaces the DNS address provided by your ISP with one for a different server. For example, if you are connected to a DNS server in the US, then you will be to access geo-restricted content without changing your IP.
In a nutshell, a SmartDNS doesn’t modify your IP but changes how a website sees your IP address. Here is the list of some of the popular VPN service providers that provide smartDNS service as well:
- ExpressVPN (Download from Amazon)
- NordVPN (Download from Amazon | Nord VPN 50% Deal)
- PureVPN (Download from Amazon)
- TunnelBear ( Download from Amazon)
DNS vs VPN: Which is Better?
Generally, people use either DNS or VPN to bypass geo-restrictions and watch their favorite content. Both have its own advantages and disadvantages. While a VPN adds more privacy when compared to DNS, it reduces the streaming speed. Regarding the cost, DNS service is cheaper than VPN. Some of the VPN providers like NordVPN comes with a built-in DNS service as well.
Unlike VPN, DNS service doesn’t hide or change your IP address. So? If you are someone who is more concerned about hiding your IP address, then DNS might not be an ideal choice for you. DNS or SmartDNS is best for someone who just needs to bypass geo-restrictions in order to watch their favorite content.


Personally, I tried out using DNS and then got a VPN as well (I use Surfshark), and I found that for me using them both works best since I can switch between them according to what works better, although I do use a VPN way more often. My VPN provider had a link on how to install it on Fire Stick, but I wasn’t sure how to do it with DNS, so thanks a lot for these elaborate guidelines!
Changing the DNS server addresses may seem complicated for some people. I think it’s best to just have a VPN with secure DNS that are resolved after connecting to their servers. Atlas VPN does wonders for me, most popular streaming services are unblocked with it, no need to change DNS adresses.
right, but then I cannot loan the device to people using different subnetting