
HTML Signatures can make your mail eye-catching. Signatures are not just about making your mail look attractive; it can also help you know more about your customers. You can make simple and elegant email signature without any coding knowledge that can impress your clients.
Now let us go through some simple steps that help you to make Email Signatures for Gmail ID or any other Email client.
Enable HTML Signatures in Gmail
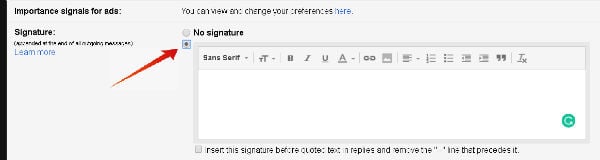
Before we head to email signatures. it is essential to enable the signatures from your Gmail settings. To do this, make sure you are logged into the Gmail account. Now, click the settings icon on the upper right corner and select settings. Scroll down to find the Signature and check the radio button to enable it.

This is where you can copy and paste the HTML code to generate the email signature. Now that you have enabled the signature on Gmail and let us see how to create one.
Related: How to Use Canned Responses (Templates) in Gmail?
Create HTML Signature for Emails
Signatures can be your digital business card which adds an essence of attraction to the viewer’s eye. There are different methods which you can follow to create HTML Signatures without any hassle. If you know the programing language, then you can code one to make it look however you want. We are explaining a code of HTML Signature as a demonstration to get the precise idea of structure, standard image size and other elements which you must use to get the desired output. One more tip is to use tables to structure the content of Signature.
Creating the Basic Structure of HTML Signature
This tutorial is in five parts which follow the creation of the table and adding Company Logo, Details, Social Media buttons, and the disclaimer text inside of it. The table needs to be inside a div block because it is considered a good practice to keep your stuff inside the <div> tags. Please note that the code works even if the <html> and <body> tags are not present.
<div>
 <table style="width: 480px; font-size: 10pt; font-family: Arial,
 sans-serif; line-height:normal;" cellpadding="0" cellspacing="0">
  <tbody>
<!-- Code Goes Here. Copy Paste all the code here -->
  <!-- Logo Start -->
  <!-- Logo End -->
  <!-- Details Start -->
     <!-- You may choose to exclude any of details you don't require -->
  <!-- Details End-->
  <!-- Social Media Button Starts -->
  <!-- Social Media Button Ends -->
  <!-- Disclaimer Start -->
  <!-- Disclaimer End -->
  </tbody>
 </table>
</div>
Furthermore, we define the styling in the in-line manner as we have no option to add an external style sheet. Here, width is of 480px, so it doesn’t take a lot of space and fonts are set to Arial as all the browser supports it by default.
Related: How to Auto-Delete Emails in Gmail and Reclaim Lost Space
Add Company Logo in the HTML Signature
You can add your Headshot image instead of the Company Logo; it depends on your requirement. Since we need to add an image, you have to host it somewhere on the internet. Make sure your image is available publicly. We are using imgur for the demonstration purpose. Go to imgur, click on New post on the upper left corner. Upload the image by clicking on the browse button. You can also use Google Drive, Dropbox, or any other platform you see fit as an alternative.
<!-- Logo Start -->
<tr>
 <td style="padding-top:10px; padding-bottom:12px; width:160px;
  vertical-align:top" valign="top">
<!-- Add Company Website URL in href -->
   <a href="https://www.mashtips.com" target="_blank"> <img border="0"
      alt="Logo" width="141" style="width:141px; height:auto; border:0;"
      src="https://i.imgur.com/pKU1lbk.png"></a> <!-- Add Image Source in src-->
 </td>
<!-- Logo End -->
You can edit the ‘href‘ link to take the user to your company website and the ‘src’ link to add the source link of the image which you hosted on the web.
Add Details in the HTML Signature
Next part is to add the details such as Name, Phone Number, Address, Email to the Signature. You can choose to add or remove any of the things by merely deleting that part of the code, or you can even change the sequence of details by rearranging the code. We have taken all the details into account for the demonstration purpose. Here we make a separate table which is inside of the main table and put all the details in table row as follows:
 <!-- Details Start-->
<td style="padding-top:6px; padding-bottom:6px; width:320px; ">
 <table cellpadding="0" cellspacing="0">
  <tbody>
   <tr> <!-- Name -->
    <td style="font-size: 12pt; font-family: Arial, sans-serif; font-weight:
     bold; color: #744545;"> <span>Kaivan Doshi</span></td>
   </tr>
   <tr> <!-- Designation -->
    <td style="padding-bottom:11px; font-size: 10pt; font-family: Arial,
     sans-serif; color: #3d3c3f;"><span>Content Creator</span></td>
   </tr>
   <tr> <!-- Phone -->
    <td style="font-size: 10pt; font-family: Arial, sans-serif;
     color: #9b9b9b;"><span>phone: +1 (929) 999-9999</span></td>
   </tr>
   <tr> <!-- Mobile -->
    <td style="font-size: 10pt; font-family: Arial, sans-serif;
     color: #9b9b9b;"><span>mobile: +1 (929) 999-9999</span></td>
   </tr>
   <tr> <!-- Email -->
    <td style="font-size: 10pt; font-family: Arial, sans-serif;
      color: #9b9b9b;"><span>email:</span>
      <span style="color:#1793d2;">me@kaivandoshi.online</span></td>
   </tr>
   <tr> <!-- Adress Line 1 -->
    <td style="font-size: 10pt; font-family: Arial,
    sans-serif; color: #9b9b9b;"><span>Address Line 1</span></td>
   </tr>
   <tr> <!-- Address Line 2 -->
    <td style="font-size: 10pt; font-family: Arial, sans-serif;
     color: #9b9b9b;"><span>Address Line 2</span></td>
   </tr>
<!-- Details End -->
Social Media Buttons in HTML Signature
Furthermore, you can use Customized social icons of your choice from IconFinder. There are many free icons to choose from. You can also purchase any of the premium icons if you like any of them. Search for the figure and select the size of 32*32 for a proper look. You can change to any size as per the presentation. Here we have defined 20*20 px size for all the social icons. Here all you need to change is the social media profile links, replace “#” with your profile in href.
<!-- Social Media Button Start -->
<tr>
<td style="padding-top:6px;"><span style="display:inline-block; height:22px;">
<!-- Facebook Icon -->
<span><a href="https://www.facebook.com/#" target="_blank">
<img alt="Facebook icon" style="border:0;height:20px; width:20px"
src="https://cdn2.iconfinder.com/data/icons/social-hand-drawn-icons/64/social_55-512.png">
</a> </span>
<!-- LinkedIn Icon -->
<span><a href="https://www.linkedin.com/#" target="_blank">
<img alt="LinkedIn icon" style="border:0; height:20px; width:20px"
src="https://cdn2.iconfinder.com/data/icons/social-hand-drawn-icons/64/social_48-512.png">
</a> </span>
<!-- Twitter Icon -->
<span><a href="https://www.twitter.com/#" target="_blank"><img alt="Twitter icon"
style="border:0; height:20px; width:20px"
src="https://cdn2.iconfinder.com/data/icons/social-hand-drawn-icons/64/social_54-512.png">
</a> </span>
<!-- Google Plus Icon-->
<span><a href="https://plus.google.com/#" target="_blank">
<img alt="GooglePlus icon" style="border:0; height:20px; width:20px"
src="https://cdn4.iconfinder.com/data/icons/jolly-icons-social-media-and-communication/120/2006-social-google-gplus-512.png">
</a> </span>
</td>
</tr>
</tbody>
</table>
</td>
</tr>
<!-- Social Media Button End -->
Disclaimer in the HTML Signature
Professional business giants always add disclaimer text at the end of the Signature. To add the same in your’s follow the below code.
<tr>
 <td colspan="2" style="border-top:1px solid; border-top-color:#1793d2;
  width: 480px; padding-top:8px; font-family:Arial,sans-serif;
  color:#9b9b9b; text-align:justify;"><span>ADD disclaimer Text Here</span></td>
</tr>
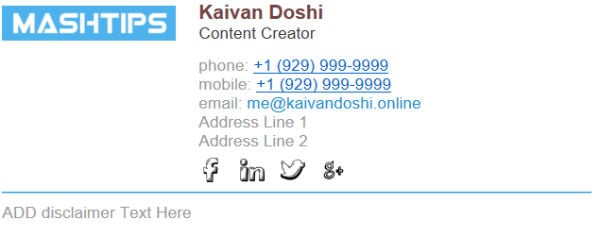
Feel free to use the above code and make edits as per required. After you are done placing the code in one place, the HTML Signature will look like this.

Unfortunately, you cannot use any JavaScript elements to style it as Gmail blocks any javascript content inside an email. Please note that more complex CSS properties which do animations might not work.
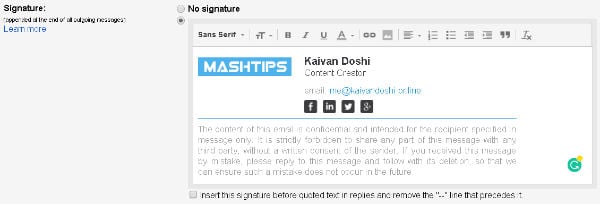
HTML Signature in Gmail
The tricky part here is that Gmail does not provide you with an HTML editor, you get a rich text editor of WYSIWYG (What You See Is What You Get) type. To overcome this issue, just run the HTML code in any browser. Select everything and copy paste it in the Signature area of Gmail. Scroll down and click on save changes for changes to take place effectively.

Online Tools to Create HTML Signature
For the folks who don’t have time to code their Signature can use online tools which can generate the structure for you. Some of the easy to use tools are Mail Signatures, MySignature, Signature. Tools mentioned above offers customization in great detail, and the signature can be made within 5 minutes. You can add different social buttons, images, certifications and many other things. There are options to add disclaimer text as well as quotes at the end of the Signature. After you create a perfect signature, all you need to do is copy it and paste the same in text editor under the Signature section in Gmail settings. Make sure to save the changes before you exit out.
For the Demonstration purpose, we have used Exclaimer’s free email signature creator. Here, you can personalize the Signature according to your interests. It also allows you to change the color schemes. In the Layout section, you can choose a template style which suits you best. Under Details, you need to add personal information such as name, company name, and website, email address, phone number, etc.


Link to the Website: HTML Signature Creator.
You can also add the customized Disclaimer text, and it also allows you to upload the logo of the company. When you’re done playing with the Signature tool, go under install section and select Highlight Signature. Finally, copy and paste it under the Signature section in Gmail settings.
Many premium services provide HTML Signatures with a more sophisticated design and analytics to track customers. Whenever a person clicks on your social button or link to the website it registers the click and gives you a report on how many of the people were interested and checked out your services. Such statements can play a crucial role in conversions.
Create HTML Signature for Gmail
Email marketing takes the credit of about 35% to the product sales every year. It is quintessential to draft the mail correctly to get better conversions. One part which most of the business entities miss out on is a creative yet simple design. Ending the mail flawlessly can be a tough job.
HTML Signatures is a way to let people know more about the sender, and it also makes you look more professional. Code a Signature yourself or use any of the mentioned tools to create one. Make sure to choose a simple and a professional looking design and keep it short, subtle.


Great article! Thank you very much!!
I encountered the problem of my email signature not left aligning on Gmail and it was driving me crazy. I searched the internet for hours trying to figure out a solution when I found your article. Your article was so helpful! A sanity-saver! Thank you so much!