
Long before there was Gmail, there was Outlook. It is still the default choice of the email service provider and desktop client for a lot of professionals and business people. One of the things that we all battle with is the constant barrage of emails from sources that we don’t even remember subscribing to. This is where auto-deleting emails in Outlook can come in handy.
Auto-Delete Emails in Outlook
Outlook is a powerful app that comes with rules that you can set to determine how emails are handled once they land in your inbox. You can archive it, send it to a folder, or even auto-delete it which is what we want to do. Let’s begin.
Focused Inbox
While Focused Inbox is useful in filtering important and useful emails and conversations from the rest, it is still not perfect. Focused Inbox was designed to reduce noise and clutter and acts as a filter. It won’t automatically delete emails that you don’t want but helps you focus on what matters.
For everything else, there are rules.
Also Read: How to Repair Outlook Email Database
Outlook Rules
Rules in Outlook, on the other hand, can help do a lot more. It allows users to control the flow of the emails once it lands in the Inbox. Outlook rules act like Zapier integrations that allow you to define what happens when a set criterion is met.
These rules can be used to delete Outlook emails automatically and while the rules will work everywhere, you can create new rules only on desktop and web apps. There is no way to create rules in mobile apps yet.
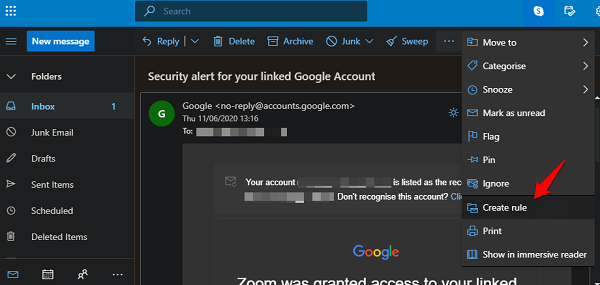
I am going to use the web app for this post. Open the app and then an email that you don’t want to see again or delete automatically. Click on the three-dot menu icon and select the Create rule option.

You can select the folder where you want to move all future emails from this particular sender. In your case, it will be the Deleted Items. Click on Options if you want to set additional rules here.


If you stop here after selecting the Deleted Items folder, all emails from that sender will now land there instead of the Inbox. You can always open the Deleted Items folder to view if you missed an important email. The default settings will keep the emails for 14 days before deleting it permanently. You can increase this limit to 30 days.
Also Read: How to Auto-Delete Emails in Gmail and Reclaim Lost Space
Let’s explore “More” options menu now. This will open the Settings area where you find a plethora of other options. You can use it to have granular control over the movement of the emails. For example, in my case, I don’t want all emails from my insurance company to be moved to the trash can. Some of them are really important to me. What you need is a way to control the movement of emails based on subject, keywords, and attachments instead of just the sender’s email ID.
Some examples can be promotions, offers, ads, and so on. The kind of emails that you receive will depend on the company that’s sending it. Some are useful while others are trash. Another example can be credit card statements vs card offers. You get the picture.
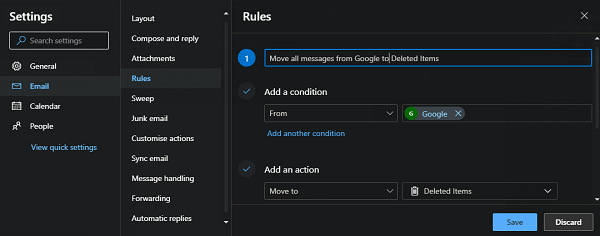

The first one is where you can name the rule. In my case, the name was automatically filled based on my previous actions.
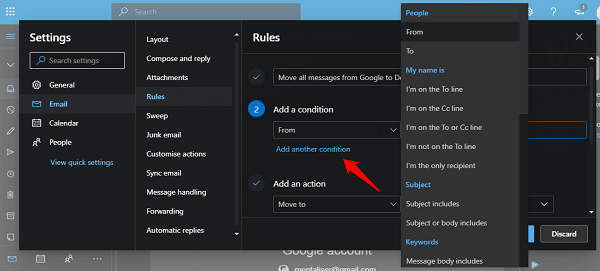

You will now Add a condition where you will enter a keyword and choose whether it is included in the From, To, Name, or another field. You can add multiple conditions by selecting Add another condition below. Some notable options include attachment size, mail size, flag, marked with, and so even more.
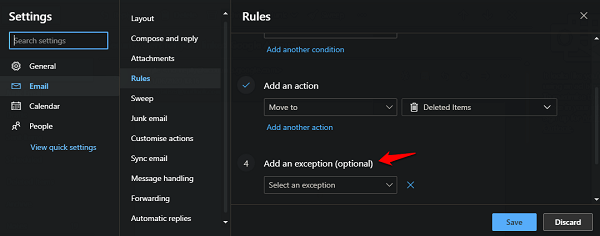
To offer even more granular control over what happens to the email, Outlook allows you to “Add an exception”. Unlike previous options, this is not mandatory and you may choose to skip it.
Remember to click the Save button once you are satisfied with the rule. You can always come back and edit the rule with more conditions and exceptions in case you find that certain emails are bypassing the rule and still landing in your Inbox. That’s why Outlook allows for adding multiple conditions and exceptions.
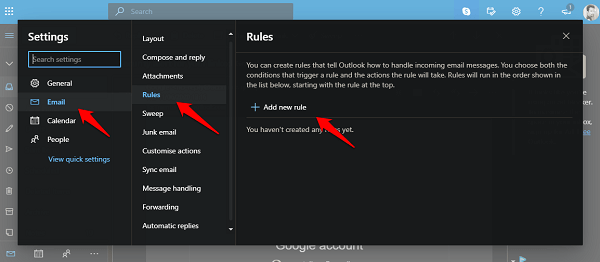

You can also add a new rule in Outlook directly from Settings > Email > Rules > Add new rule.
Also Read: A Nice Weather Forecast for Your Windows Outlook Calendar
Unsubscribe, Block, Report
Other ways to make sure you are not disturbed by unwanted emails are unsubscribing, blocking, and reporting as phishing. Look for the unsubscribe button at the bottom or top of the email. You will be asked to confirm your decision on the sender’s website and the reason for doing so. This is a polite way of saying I am not interested in your emails. You are asking the sender to stop sending the email by opting out.
Blocking emails works the same way as blocking numbers on smartphones. The sender will send emails but you will not see or be notified about them. A new filter or rule may be created to send the email directly to the spam folder.
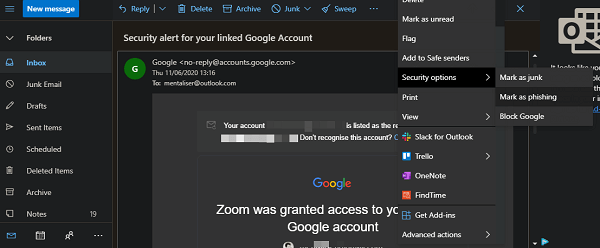

You can also mark an email as phishing under the Security tab. A phishing email is one that tries to trick you into sharing your personal information like credit card details, passwords, or other financial/personal data. They will redirect you to a site and try to steal sensitive information or data. Always report it to Microsoft. But that will not prevent future emails so make sure to block such senders to stay safe.
Also Read: Here is Easy Solution to Sync iCloud and Outlook
Auto-Delete Emails in Outlook
There are other ways to handle the emails in your inbox that you don’t want to see or deal with. However, if you do want to auto-delete emails rather than unsubscribe or report, you can use the rules. They are incredibly easy to use once you know how to.


