
Privacy is more important than ever. With the vast amount of personal data that is exchanged online, it’s essential to take steps to protect yourself while using the internet. Microsoft Edge, the popular web browser, offers several features that can help enhance your privacy while browsing. Microsoft Edge- a web browser that comes default with your Windows 10 or Windows 11 operating system. A lot of people seem to avoid using Microsoft Edge only because it reminds them of the dreadfully slow Internet Explorer. However, that is not the case with Edge. You see, it’s now based on Chromium and is now better than Google Chrome in a lot of ways.
In this article, we’ll discuss the top 10 privacy tips and tricks you need to know for Microsoft Edge, so you can take control of your online privacy and stay safe while browsing the web.
Enable Tracking Prevention
A lot of websites issue out trackers. These trackers are used to collect different types of information like browsing habits, search terms, and websites visited and show you ads based on what you search and browse. To avoid and prevent any trackers from tracking you, you can tell Edge to prevent any trackers from any website by following these steps.
- Open the Settings page by clicking the horizontal three-dot menu.
- Choose Settings from the pop-up menu.
- Click on the Privacy, Search, and Services tab on the left.
- The very first option will be Tracking Prevention.
- Switch the toggle to on, then choose the tracking protection level from Basic, Balanced and Strict.

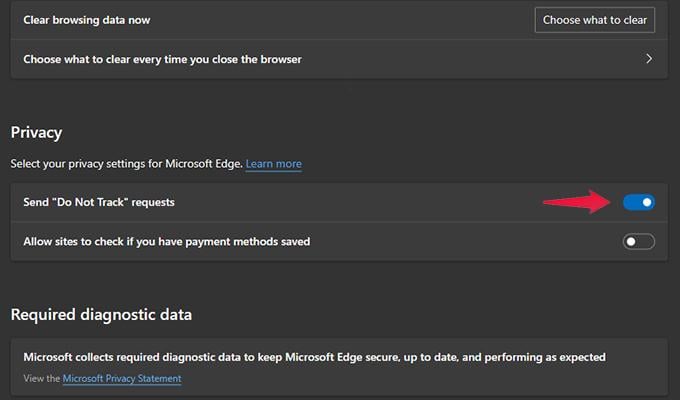
Enable Do Not Track Requests
Do you know your browser can send websites a do not track requests? When you have this enabled, websites cannot send trackers to track and get any information out of your browsing habits. Here is how you can enable it.
- Open the Settings page in Microsoft Edge.
- Now, click on Privacy, Search, and Services tabs.
- Scrill a bit down till you see the Privacy header.
- You should see the Send Do Not Track Requests option.
- Click on the toggle to switch the feature on.
Disable Personalized Ads
Personalized ads are served to you based on what you search, what websites you visit, and what content you are downloading. For many people, these kinds of advertisements can be annoying, especially after they search for something and see ads related to that particular search term. You can disable this personalization and ads in Microsoft Edge by following these steps.
- Open the Settings page and select the Privacy tab.
- Scroll down till you see the Personalization and Advertisement option.
- Make sure that the toggle has been set to off. If not, you will keep seeing advertisements based on your searches.

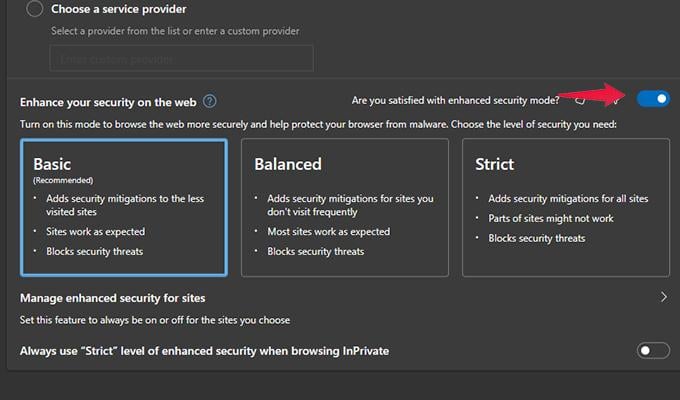
Enable Enhanced Web Security
One reason why I love to use Microsoft Edge is simply because of the numerous security and privacy-related settings that it has. Though it’s based on Chromium, it’s got more features and options for you to manage. There is also a web enhancement option that you can enable if you want to protect your web browser from any malware attacks. Here are the steps to enable it.
- Open Settings and select the privacy and Search tab.
- Scroll to the bottom of the page till you seeEnahcne Your Security On the Web.
- Switch the toggles to on.
- You will also have to choose the type of security level. You can choose between Basic, balanced and Strict.
- Choose what you like the best and enjoy safe and secure browsing on the internet.
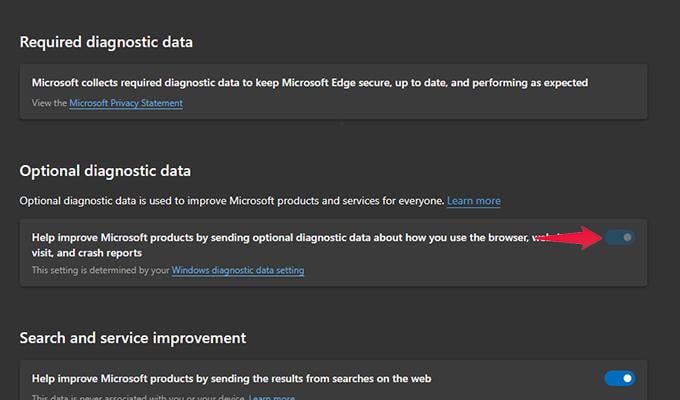
Disable Sharing Diagnostic Data
Now, many programs out there rely on users’ data to test and check how the program is working and if there are any issues with the said program. Microsoft Edge similarly has a feature where you can choose to allow or prevent any optional data from being sent to Microsoft.
- Launch the Settings page in Microsoft Edge.
- Open the Privacy and Search tab.
- Look for the Optional Diagnostic Data option.
- If the toggle is switched to on, click on the toggle to switch it off.
- You will now no longer be sharing optional diagnostic data with Microsoft Edge.
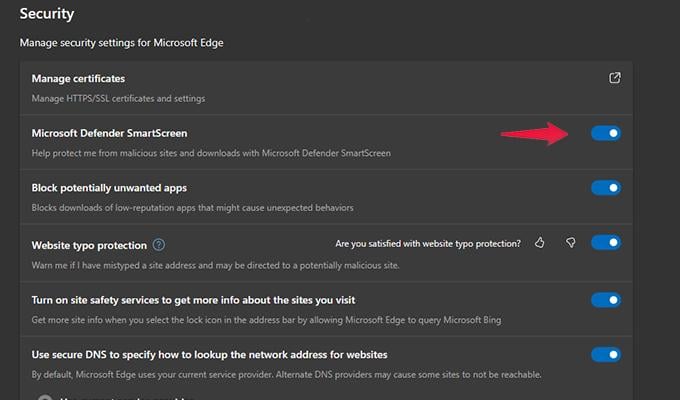
Manage Browsing Security On Microsoft Edge
Browsing the web might seem like a simple and easy task. There is no doubt about that. However, staying secure is also important. You wouldn’t want to land yourself into a spiderweb of unwanted problems. So, here are a few Security settings you need to enable in Microsoft Edge.
- Open the Edge Settings menu.
- Click on the Privacy tab on the left of the screen.
- Scroll down till you see the Security header.
- Switch the toggles to on for Microsoft Defender SmartScreen, Block Potentially Unwanted Apps, Website Typo Protection, and Secure DNS.
- With all these toggles set to on, you can safely browse the internet without getting caught in a web of unwanted problems.
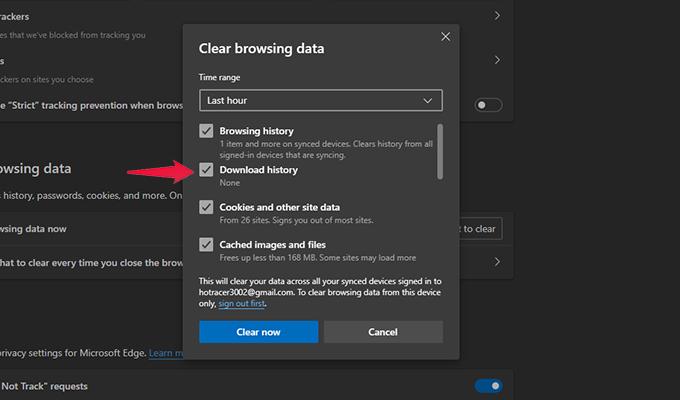
Clear Browsing Data
Browsing data on the web browser is data about the websites you visit, files you might have downloaded, or even media you might have played. With Mciorostf Edge, you get to choose what type of data you can clear from the browser. With such freedom of choice, you don’t have to worry about anyone checking up on your browsing data and history.
- Click on the three-dot horizontal menu in the top right corner of the web browser.
- Choose the Settings option from the pop-up menu.
- Select the Privacy tab from the left pane.
- Under the Clear browsing Data header, click on the Choose What to Clear button.
- First, choose the time range you want to clear the data.
- Next, select the items that you wish to clear. You have the choice to select all options or only select a few items.
- Once you have selected your options, click on the blue Clear Data button.
- All the data that you have selected will now be cleared away.
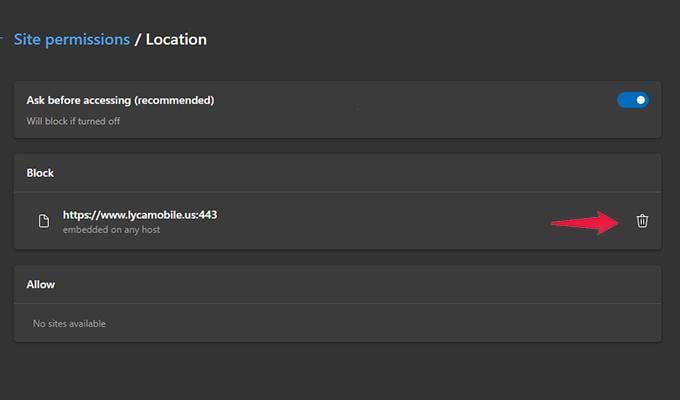
Adjust Site Permissions
While browsing the web, many websites will usually ask you for your location, camera, and other permissions to work and serve you better. It is sensible to approve such permissions for websites that need them now. However, it is possible that in a hurry, you might have permitted websites that don’t need it. Worry not, as you can easily remove these permissions for websites that don’t need them.
- Open the Settings menu and click on the Cookies and Site Permissions option from the left pane.
- Under the Site Permissions header, you will see a list of various permissions.
- Click on the permission and choose whether you want the website to ask you for permission first.
- You can also view the websites you have allowed or denied such permissions. Accordingly, you can remove websites you have allowed or blocked from granting such permissions.
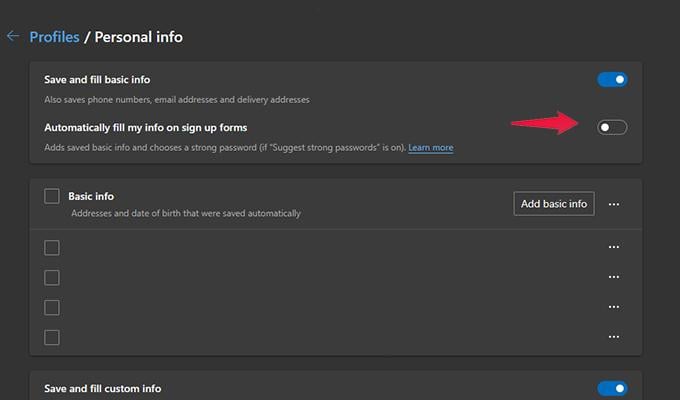
Disable AutoFill Information
A lot of websites out there require you to sign up with certain information like your name and email address. While this is fine for many genuine websites out there, it can be risky when you visit a website that might be harmful. Because the browser is directed to autofill such information, the browser will fill in the details in the text fields for such websites. This information can contain details like your email address, phone number, home or work address, and even sometimes your debit or credit card numbers. You can disable this by following these steps.
- Launch the Microsoft Edge settings page and click on Profile.
- Click on the Personal Info option.
- Switch the toggle off to where it says automatically fill my info on sign-up forms.
- If you want to enable the auto-fill option, you can choose what info it can fill in directly.
- Also, checkmark the option where it says Ask If You Want to Save Custom Info.
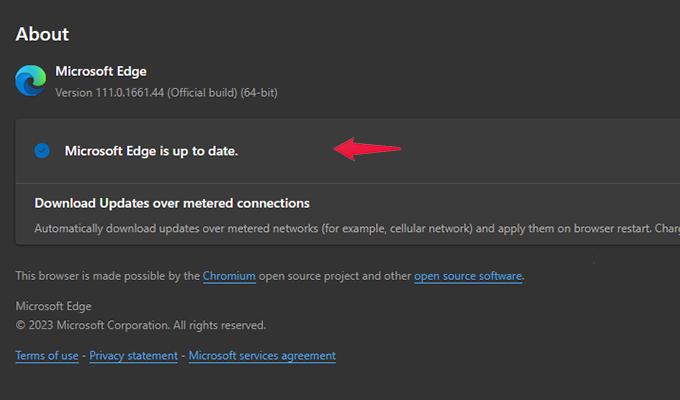
Update Your Web Browser
No matter what security settings you set up and keep, you will miss out if your web browser is not up to date. Outdated web browsers might have loopholes that can be exploited by hackers and websites that only mean to cause malicious harm. You can follow these steps to regularly check for and install updates for your Microsoft Edge web browser.
- Click on the three-dot horizontal menu at the top right corner of the browser.
- Choose Settings from the menu.
- With the Settings page open, click on the About Microsoft Edge option on the left.
- The browser will automatically check for any updates if available.
- If there are updates, the browser will download and install them immediately.
These are the best privacy tips and tricks you must follow when browsing the internet on Microsoft Edge. With these settings, you will be able to safely browse the internet and not worry about scams and fake websites that have been designed to steal your data. Apart from these settings, it would help if you were alert to what websites and files you download. Enjoy a safe and secure browsing session on Microsoft Edge.
So, if you are someone that is already using Microsoft Edge or planning to switch to Microsoft Edge, here are the best privacy tips that you need to follow to stay safe and secure on the internet.


