
The Android and iPhones are coming with a built-in QR Code scanner. QR Codes are easy to create and can be used to send contact details, share website links, YouTube links etc. Mostly, the businesses and companies tend to use QR codes a lot to create ad campaigns and even track them. Right? Now, the question is: Can QR codes be used by individuals like you and me? Yes, Of course. You can create a QR code for your phone number, email, website, social media profile (Facebook, Twitter, Instagram) and many more, the list is endless.
So, How will you create a QR Code? Do you need any special tools for creating the code? Before jumping to that, let’s try to understand a bit about QR codes.
What is QR code?
QR (Quick Response) code is a machine-readable code formed using an array of black and white squares. It can be read using a QR code reader app, scanner or the camera of your smartphone. Generally, a QR code is used to store the URL of a website/app or other kinds of short texts. A QR code can hold approximately 4000 characters which include alphabets, numbers or special characters.
How to Create QR code on iPhone?
Since iOS 11, it is possible to scan the QR codes using iPhone’s built-in QR Code Scanner. However, it cannot be used to create a QR code. For that, you need to download and install a third-party QR code Apps from the App Store. Even though there are a bunch of apps available on the App store, the QR reader app (App Store Link) is a good one.
Now we can go to more details for creating QR code with your phone. You can use the QR code to share your contact details or website link. Let’s imagine that you wish to create your own QR code for a website. (Eg. https://www.mashtips.com). Let’s see how to do that.

- First, open the QR reader app on your iPhone.
- Next, tap the ‘QR code‘ icon next to Settings icon which is located on the bottom of your screen.
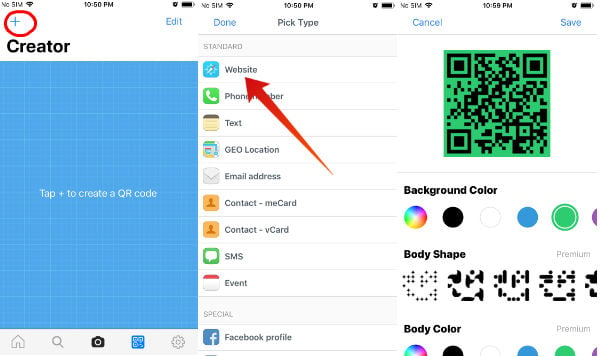
- Then, tap ‘+‘ icon on the top left of the page.
- Now, you will see different options under the heading Pick Type. Tap the option Website.
- Then, enter the URL address for which you would like to create the QR code and click the + icon.
- Next, tap the option Custom.
- Now, you can select the Background Color, Body Shape, Body-Color, Eye Shape, Eye Color and more.
- Finally, tap the Save button to save your QR code.
Now, you have successfully created the QR code for a website. Likewise, you can create the code for a Phone number, Email address, Contact, Facebook profile, Twitter profile, Linkedin profile, Paypal payment, YouTube video and more. You can also create the QR code for your Wi-Fi network so that you can share the Wi-Fi with your guests easily without revealing the network password.
Would you like to share the newly created QR code with someone? Let’ see how to do that.
How to Share QR Code on iPhone?
You can easily share the QR code which is created in the above section by following the steps listed below:
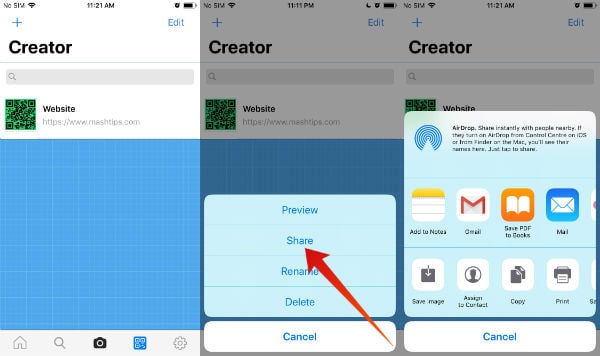
- Open the QR Reader app on your iPhone and tap the QR code icon located at the bottom.
- Now, the screen displays the list of all QR codes created using the app. Tap the QR code you would like to share. Then, a pop-up screen will be displayed.
- Next, tap ‘Share‘ option and then tap ‘PNG‘ in the following screen.
- Now, you can share the QR code via Email, AirDrop or other options shown on the screen.
Qrafter is a barcode scanner app that can be used not only to scan the codes but also to create QR codes on iPhone, iPod or iPod Touch. It can be used to generate codes for different data types like Email, Phone number, Location, Event, Tweet and more.
Download: App Store
How to Create QR code on Android?
Are you using an Android-based Smartphone? Not a problem. There are dedicated apps for Android users to create QR Codes. You can make QR codes on Android by installing the app Barcode Generator (Play Store Link).
Let’s assume that you would like to create a QR code for your email. (eg. info@mashtips.com). Let’s see how to do that.
- First, open the Barcode Generator app on your Android phone.
- Then, tap the + icon on the bottom right of the screen. Tap ADD CODE.
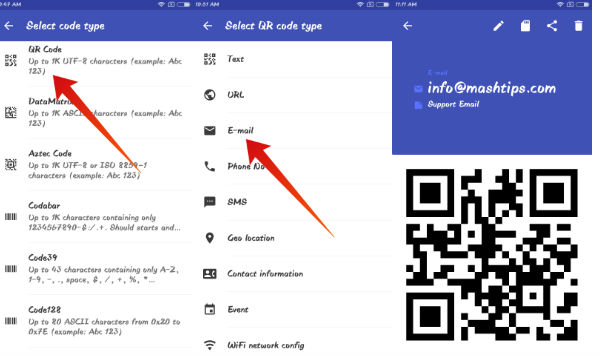
- Next, tap on the option QR code.
- Then, tap Email from the list of QR code types.
- Enter the email address for which you would like to create the QR code. You can also enter a description for the code. (Like Support Email)
- Now, your screen displays the newly created QR code. To export the image, enter the file name of the PNG file and tap EXPORT. The file will be saved on your smartphone.
- If you would like to share the QR code with someone, then tap SHARE. Now, you will see the list of sharing options like Messaging, Mail, Bluetooth and more. Select the option based on your need.
That’s it. You have successfully created the QR code on your Android smartphone. You can also try the QR Code Generator app to generate QR codes for 8 different types of data like Location, Email, Phone, Wi-Fi- network and more. It also allows you to change the background color of the code and save/share the final image.
Download: Play Store
Best QR Code Scanner Apps for iPhone
There are third-party websites to create QR codes for you. You can depend on your mobile phone to create QR codes as well. For mobile phones, there are a bunch of third-party apps to create QR codes. Do you want to try out some third party scanner apps in addition to the built-in QR Code Scanner app on iPhone? Then, this post on Best Free QR Code Scanner Apps for iPhone and Android will definitely help you.
Have you tried creating a QR code by yourself? Please share your thoughts in the comments.


nice job
amazing job