
Apple brought loads of appearance changes to the macOS, and the Mac Dark Mode is one among them. Introduced in macOS Mojave, the Dark Mode or the night mode on Mac helps in giving a much dramatic look to the entire ecosystem. Not everyone using a Mac seems to be aware of this cool feature that makes the entire interface dark.
In this article, we will discuss the Mac Dark Mode and how to use it.
- What is Dark Mode on macOS
- How to Enable Mac Dark Mode
- How to Schedule Dark Mode on Mac
- Use Mac Dynamic Wallpapers with Dark Mode
- Turn off Mac Dark Mode for Apps
What is Dark Mode on macOS
Dark Mode, in general, is a system-wide teme followed by most of the mobile and computing Operating Systems to switch the color major color schemes into a dark shade. Whether it be Windows, Mac, Android or iOS, the basic theme for the system UIs and third-party apps are set to white or light-themed shades.
But, this light theme needs a lot of power sometimes and causes eye irritation if used for a longer time. In order to avoid eye strains and focus shifts, Apple introduced the Mac dark mode with the macOS Mojave which entirely changed the face of the macOS itself. From a light-themed typical Unix look, the dark mode took macOS into a new dramatic look.
Since the dark mode or the night mode on the mac is a system-wide feature, almost everything light-shaded will be turned into dark appropriately. Most of the macOS apps support the dark mode currently, and some are customizable too. However, with the dark mode on macOS, all your window interfaces, menu bar, dock, etc. turn dark or black shaded. The dark mode also helps in reducing eye strain, display power usage and increase your focus on work too.
How to Enable Mac Dark Mode
The Mac night mode or the dark mode is a feature that Apple introduced in macOS Mojave. Therefore, if you are having a Mac or MacBook running macOS Mojave or Catalina, you can easily switch to the dark mode.
The system-wide dark theme was already introduced in Windows 10 lately, however, it did not have any effects on most of the third-party apps. In terms of macOS, you can get the mac dark mode on most of the apps on your MacBook. Here is how to enable dark mode or night mode on Mac.

- Make sure your MacBook is running macOS Mojave 10.14 or newer.
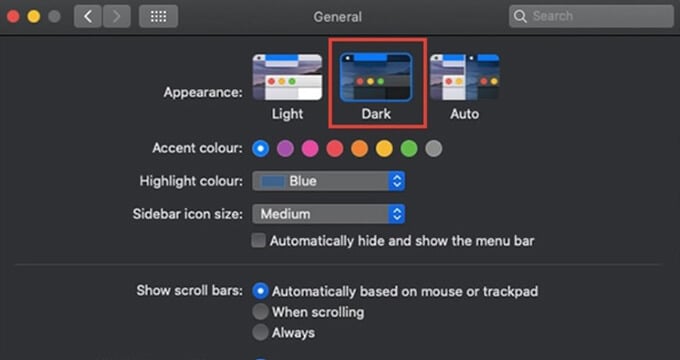
- Click on the Apple logo on the menu bar of your Mac.
- Choose System Preferences.
- Click General.
- Choose “Dark” from the Appearance.
When you change the appearance from “Light” to “Dark” all your system icons, elements, menu bar, windows, dock, etc. will turn gray instantly. You can also dark mode on the supported apps when it is enabled.
Related: 12 Things to Customize After Buying New MacBook Pro
How to Schedule Dark Mode on Mac
If you are an iOS 13, you must be familiar with the Dark Mode on iPhones. You can easily switch between light and dark mode on an iPhone at a single tap from the Control Center. However, when it comes to the macOS, switching the Dark Mode is a bit of a task.
You have to go to the System Preferences in order to switch to the mac dark mode or light mode. AUtomation is the only way to avoid this if you want to use the dark mode on night and light mode on day time for better visibility.
Here is how you can turn on automatic dark mode switching on Mac.

- Open System Preferences.
- Click “General“
- Choose “Auto” from appearance.
Choosing “Auto” will enable mac dark mode only when it is night, and the light mode otherwise, based o your system time. You cannot manually set a time schedule for this. If you really need to schedule dark mode at your desired time on your Mac, you can make use of the NightOwl app. Here is how,


- Install NightOwl app on your MacBook running macOS Mojave or Catalina.
- After opening the app, you will see a NightOwl logo on the Menu bar. Click on it.
- Select Light or Dark and check the “Schedule” option.
- Choose the time to schedule the dark and light modes on your Mac.
As long as the NightOwl app runs in the background, your Mac will switch between the Dark mode and Light mode as per the time schedules.
Use Mac Dynamic Wallpapers with Dark Mode
Dynamic Wallpaper is one of the coolest things which Apple introduced with the Mac Dark Mode. Instead of the standard static wallpapers, the dynamic desktop wallpapers from Apple can change its color theme according to the system theme.
The beautiful landscape wallpapers can change from day to night and vice versa when you switch the mac dark mode and light modes. The macOS has some great collections fo dynamic wallpapers that make cool transitions between themes. Here is how to use dynamic wallpapers with Mac dark mode.
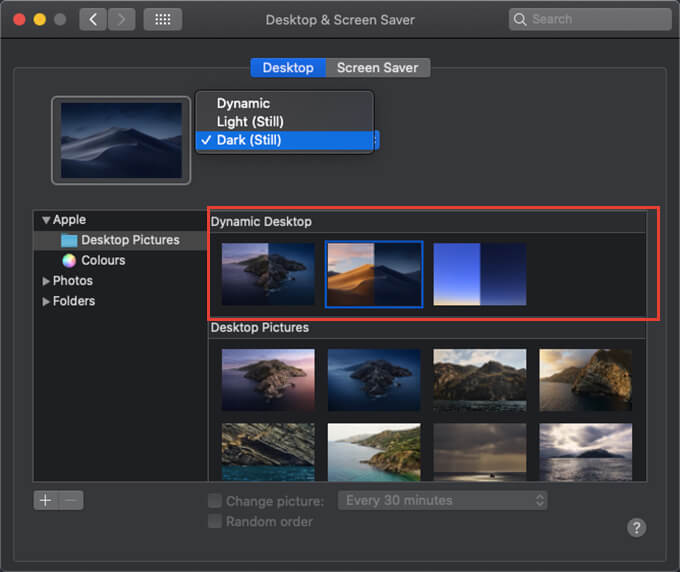

- Open System Preferences from the Apple menu.
- Click on Desktop & Screen Saver.
- Select “Dynamic Desktop” and choose wallpaper.
- Select “Dynamic” from the dropdown menu on the top.
After choosing the dynamic wallpapers, you can get cool transitions whenever the system theme changes.
Turn off Mac Dark Mode for Apps
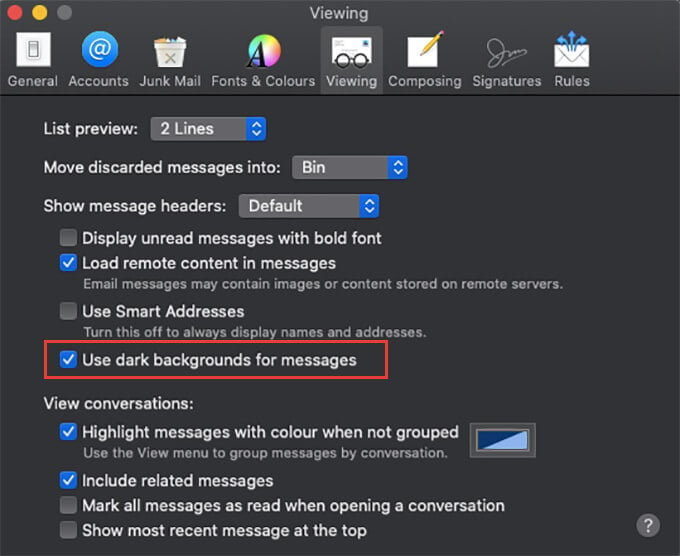
Even though the macOS Dark Mode is a system-wide theme feature, you can opt-out of certain app options. For example, if you want to read the email contents in a white background while the app stays dark, there is an option to enable or disable it in Mac’s Mail app. Here is how you can do it.
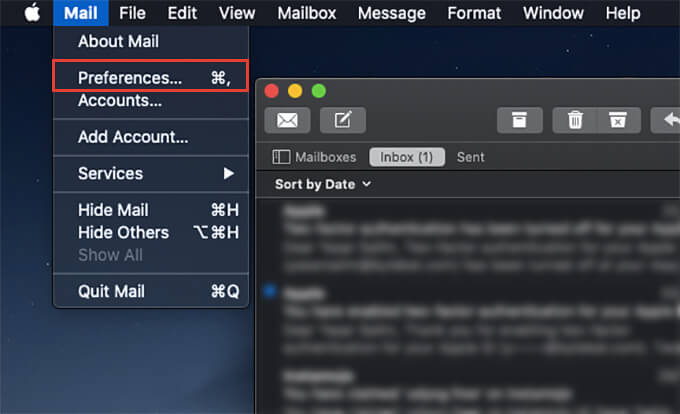

- Open the Mail app on your Mac.
- Click on “Mail” from the menu bar and choose “Preferences.”
- From the Preferences window, go to the “Viewing” tab.
- Check on uncheck “Use dark background for messages” based on your preference.

Likewise, you can choose to use the light theme instead of dark for many inbuilt apps on your Mac. Here are some of them.
- Maps: Open Maps app > View > Deselect “Use Dark Map.”
- Notes: Notes > Preferences > “Use dark backgrounds for note content.”
- TextEdit: View > “Use Dark Backgrounds for Windows.”
The Mac Dark Mode is a lifesaver for many users who are really tired of using conventional white backgrounds with black fonts everywhere. This can help you protect your eyes too, to a great extent.


