
We all live with the fear of losing important data from our devices, especially if it is your work device. MacBooks are definitely not immune to data loss, and backing up your data to an external drive can come in handy in such situations. Though hard drives are not reliable backup sources always, there are ways to set up failproof backup solutions for your Mac.
Let us begin.
Content
- Why Do You Need Backup for Your Mac?
- What Is RAID and Why Do You Need It for Backup?
- RAID 0 or RAID 1: What RAID Should I Use for Backup on Mac?
- What Size External Hard Drive Do I Need for Mac Time Machine Backup?
- Backup Mac to Single External Hard Drive (Without RAID)
- How to Set Up RAID Backup on Mac with Two External HDD
Watch Mac Backup to External Hard Drive (RAID):

Why Do You Need Backup for Your Mac?
The macOS lets you create a complete backup of your Mac or MacBook to iCloud or to an external hard drive, as you wish. But why should you take backups of your Mac or MacBook? If you have been thinking so, it is probably because you never lost any data from your Mac accidentally or during an update. Surprised? Yes, your Mac is not a 100% failproof machine.
Although Mac is capable of not losing anything most of the time, a simple glitch with an update or an accidental reset can wipe every data you have. That is why you should create a period backup of your Mac to an external drive or to iCloud.
What it does is that it takes a complete mirror copy of your Mac system to the drive. The next time you lose any data from your Mac, you can restore it from this backup which is a real lifesaver. A backup can help you even if you reset your Mac to factory settings. If you are using your Mac for important projects, we recommend you take a complete backup of your Mac to any drive.
Backing up your Mac to an external drive is quite simple – connect a large hard drive and choose the backup option. But this is not the safest way. Although you can take backups to a single hard disk, you can make it 100% failproof by using two hard disks with RAID configuration. We will talk more about it here so, keep reading.
Related: How to Backup iPhone to Mac and PC
What Is RAID and Why Do You Need It for Backup?
RAID stands for Redundant Array of Independent Disks if you have been wondering. When you connect two hard disks and set up a RAID configuration on them, your Mac will treat both combined as a single hard disk. Now your question must be whether you can utilize the combined storage space of both. Well, it depends on the RAID level you choose while configuring.
RAID 0 and RAID 1 are the most common RAID configurations you can use. Choosing between these two is not that hard. It all depends on whether you want more speed and storage or more protection for your data.
RAID 0 or RAID 1: What RAID Should I Use for Backup on Mac?
If you have two hard drives ready for the backups alone, you can combine both of them together to create a RAID configuration for your failproof backup needs. As said, you can go with either RAID 0 or RAID1 configuration. Both need two hard disks, so what is the difference? Let’s find out.
What Is RAID 0?
RAID 0 means you are combining two hard drives into a larger disk. Let’s say you have two 5TB hard drives and you are setting up a RAID 0 configuration with them. You will get a total of 10TB storage by combining them both, and your Mac will consider it as a single drive.
Your data will be spread across two hard drives, so if one of them fails, you will lose most of your data. Although RAID 0 is the fastest and cheapest way to store more data, it is not the safest bet.
You should choose RAID 0 if you want more storage space and focus lesser on reliability and data protection.
What Is RAID 1?
RAID 1, on the other hand, combines two hard drives but does not give you the benefit of combined storage space. If you use two 5TB hard drives for the RAID 1 configuration for your Mac backup, it will create the exact mirror copy of one disk on the other. That means your data is backed up twice into two different hard drives and you can sleep peacefully without having to worry about losing all your backed up data.

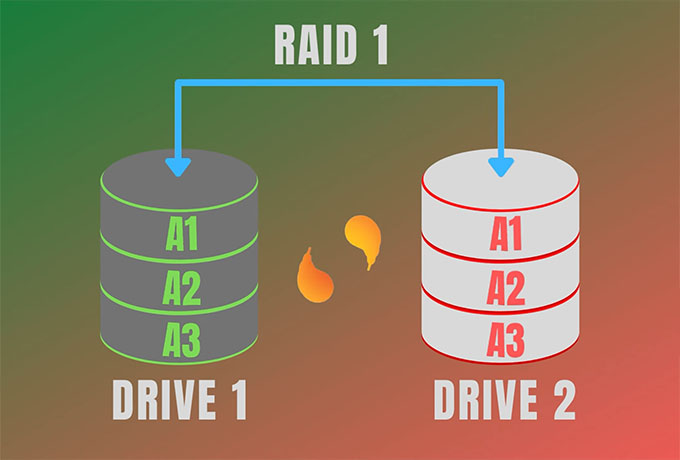
When you take a backup to the RAID 1 hard drives, it creates a mirror copy to the second hard drive as well. In case of any hard drive failure or even if you remove one of them, you will still have access to the complete data.
You can go with RAID 1 if you want more protection for your backed-up data and are not much concerned about storage space at all.
Related: 10 Best USB-C External Hard Drives
What Size External Hard Drive Do I Need for Mac Time Machine Backup?
A time machine backup takes the entire hard drive copy of your Mac and saves it into your external hard drive. So, you might be thinking to get an external hard drive with the exact size of your internal storage on your Mac. But, this can be a wrong move. The Time Machine is supposedly keeping an “almost failproof” backup to your hard drive, which will be almost 2 to 4 times bigger than the actual data you have in your Mac.
Therefore, while choosing an external HDD for your Mac Time Machine backup, we recommend you to choose a hard drive at least twice as big as your Mac’s internal storage. If you are using a 256GB model MacBook, plug in a hard drive that is 512GB or higher. Likewise, always keep a 2x or 3x larger hard drive for backing up your Mac.
Related: 10 Best USB-C Hub Docking Stations with Hard Drive Enclosure for Mac Mini
Backup Mac to Single External Hard Drive (Without RAID)
Settings up RAID and creating a failproof backup method applies only if you have two similarly sized hard drives dedicated for backup. In case you have just one external hard disk and looking to backup your Mac data into it, here is how.
Plug your hard drive to your MacBook and make sure it is detected to set it up for the Time Machine backup.
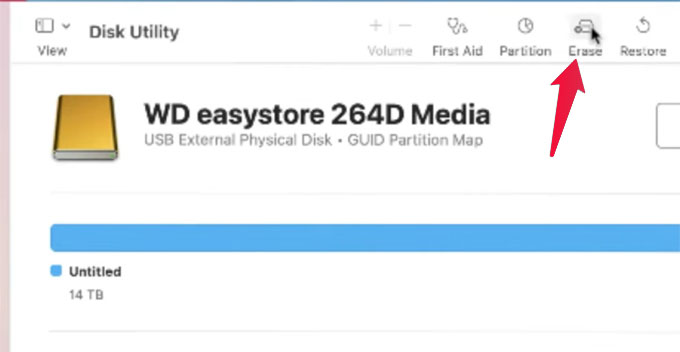
Firstly, we need to wipe and format the hard disk for the backup. To do that, press Command + Spacebar on your keyboard, type in “Disk Utility” and open the Disk Utility app.
Select your Hard drive from the left sidebar, under the “External” section. Now, click on the “Erase” option from the top of the window.

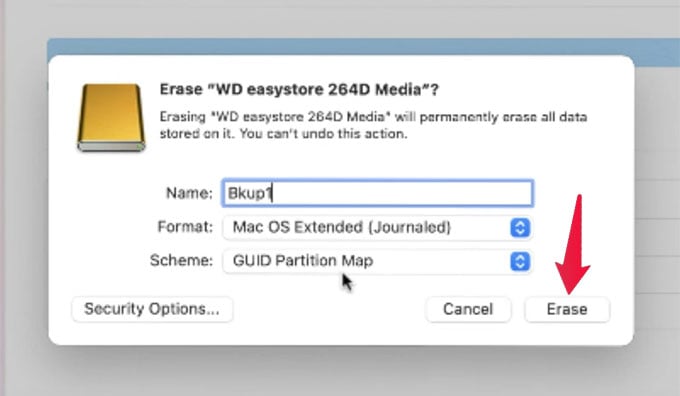
Provide a name for your Time Machine backup drive and choose a format. Select “MacOS Extended (Journaled)” if you are using a Hard Drive, and APFS if you use an SSD or flash drive.
Keep the “GUID Partition Map” for the Scheme and then click the “Erase” button.

Click Done once the drive is erased and formatted.
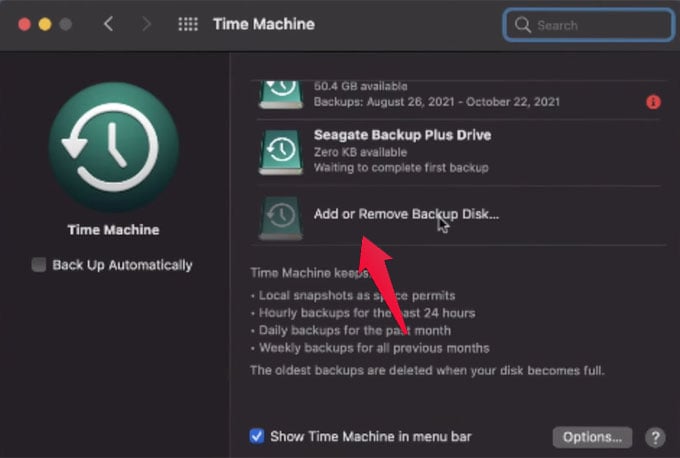
You can close the window and start setting up the disk for backup. For that, click on the “Time Machine” icon from the menu bar at the top of your screen and select “Open Time Machine Preferences.” Alternatively, you can go to System Preferences > Time Machine.

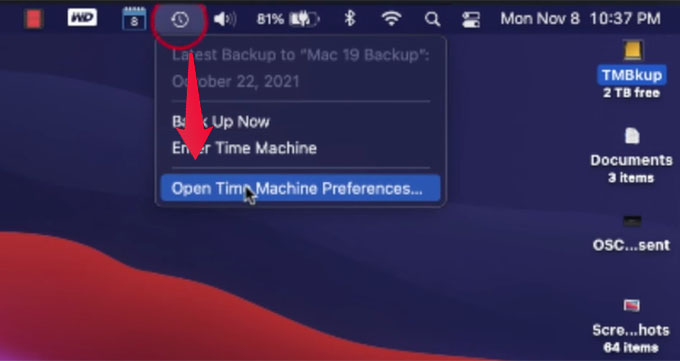
Click on the “Add or Remove Backup Disk” option.

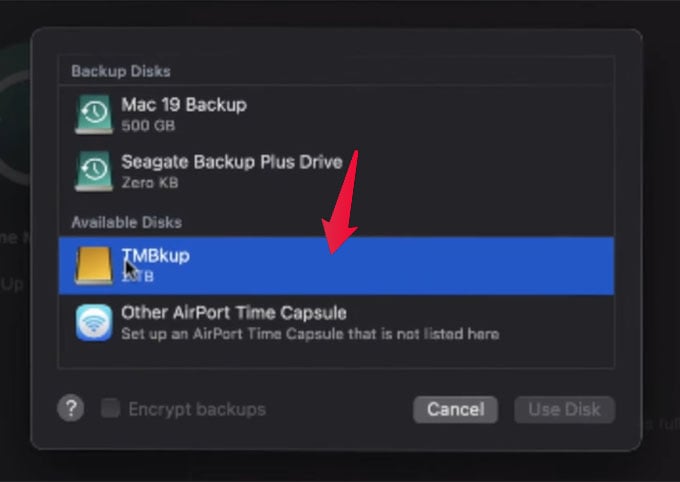
Select your external hard drive from the popup window and click on the “Use Disk” button.

Your mac will now start to prepare the backups to this connected external hard drive. You can abort and eject your hard disk anytime you want. Whenever you want to back up your Mac, you simply have to plug the hard drive into your MacBook and it will start taking Time Machine backups automatically.
Related: How to Convert iPhone as Portable Hard Disk for Mac?
How to Set Up RAID Backup on Mac with Two External HDD
Mac backup to an external hard drive is safe, but using a single hard drive is not the safest method. As we talked about already, a single glitch in your hard drive can lose all the backup data. To avoid this, we can combine two external hard drives with a RAID 1 configuration, which essentially keeps an additional backup of the whole backup. Let us see how to set up a RAID 1 backup disk for your Mac Time Machine backups.
Step 1: Choosing the Right Hard Drive for RAID Setup
Although Mac supports any external hard drive or flash drives for Time Machine backups, do not plug in ANY drives for this. You should keep two dedicated hard drives for the RAID 1 configuration with large enough storage space for all your backup needs.
I chose to go with a pair of 14TB hard drives from Western Digital. Although it is usually not necessary to have hard disks this big, you can still use them as an external drive for storing media and other data.


- High-capacity add-on storage.Specific uses: Personal
- Fast data transfers
- Plug-and-play ready for Windows PCs
Somebody might convince you to get external SSDs saying they are a lot faster. That’s true, but putting up SSDs for backups might not be a worthy option. The major thing is that giant SSDs will cost you a fortune. They may be fast, but not a reliable option compared to normal Hard drives.
Related: 7 Best Hard Disk Cleaner Apps for Mac to Retrieve Lost Space
Step 2: Check Hard Drive Health on Mac
Now that you got the hard drives ready for backups, it is time to check the hard drive’s health. Mac has a hard drive health check utility using which you can find out if the new hard drives are good enough to store your Mac backups. To do that, follow the steps.
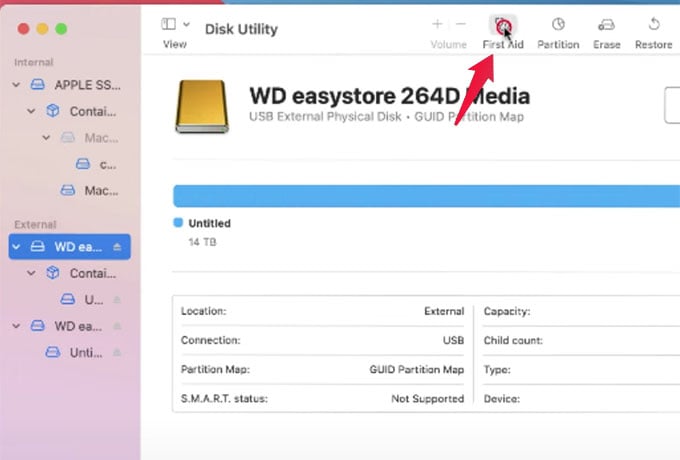
Once you connect the hard drives on your Mac, open the “Disk Utility” from the Finder > Go > Utility.
On the Disk Utility window, select your external hard drive from the left side panel. Then, click on the “First Aid” option at the top.
Click on “Run” to start the hard drive health check on your Mac.
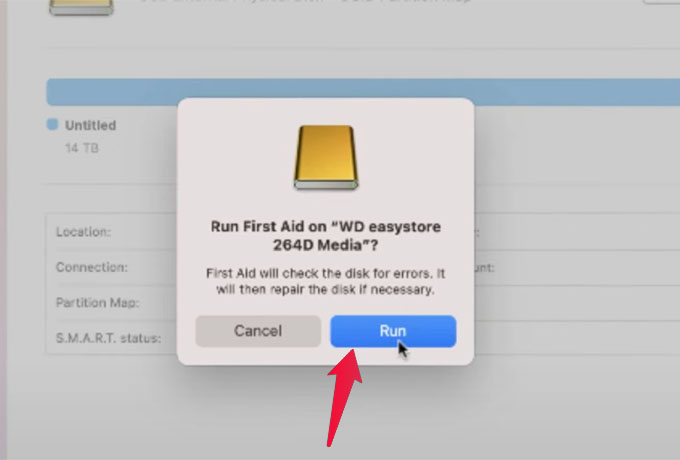
Once your Mac shows a completed message without any errors, click on”Done” to finish the setup. Likewise, check the health of your second hard drive and make sure you are good to go.
Before getting into the next step, wipe your both hard disks by clicking the “Erase” option from the same Disk Utility window itself.
Step 3: Partition Hard Drives for Data and Time Machine Backups
The RAID 1 setup combines two hard drives into a single hard drive (but with the storage size of a single drive only). In our case, we are using two external hard drives with a huge chunk of storage space.
Out of the 14TB storage, I am assuming my 512GB MacBook is going to use a maximum of 2GB for time machine backups. This leaves me with the rest of 12GB of storage space where I can save the video projects and other important files.
To do that, I need to partition the hard drives for data storage and Time Machine backups before setting up the RAID configuration. Here is how to do that.
Note: If your hard drive is not that huge and you do not want to partition the drives, you can skip this step and move on to the next step to create RAID 1 for the whole drive.
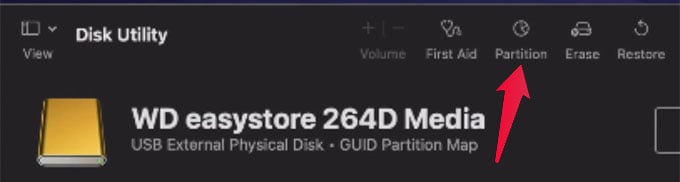
From the Disk Utility app on your Mac, select one of your hard drives and click Partition.

On the popped-up screen, choose a name and select the size from the disk for the new partition. Make sure you are leaving enough space for the Time Machine backup, then click Next.

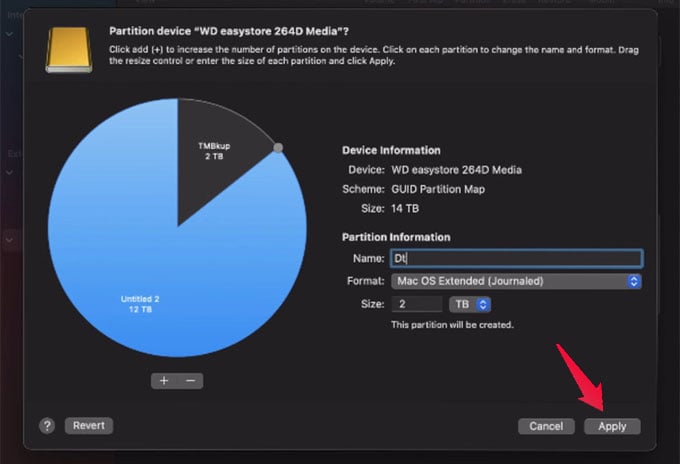
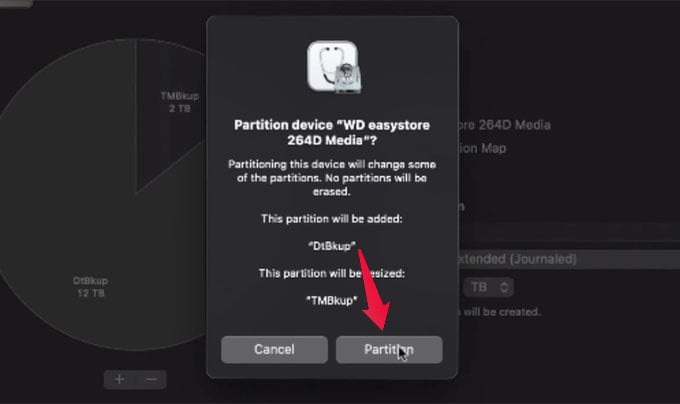
Then, click Apply to partition the hard drive and save the changes.

Likewise, partition your second hard drive with the same partition allocation as the first drive using the same method.
Related: Disk Utility: Guide to Powerful Tool for Mac Users
Step 4: Set Up RAID 1 Configuration on Mac
Now that you have the hard drives ready for the backup, you can set up the RAID 1 configuration by combining them both. You can create two RAIDs on a single hard drive if you have two partitions. Otherwise, a single RAID 1 configuration is enough.
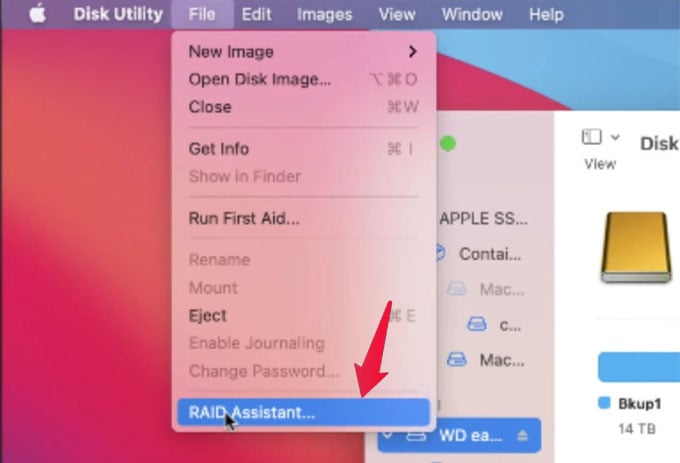
From the Disk Utility window, click on File from the menubar and choose RAID Assistant.

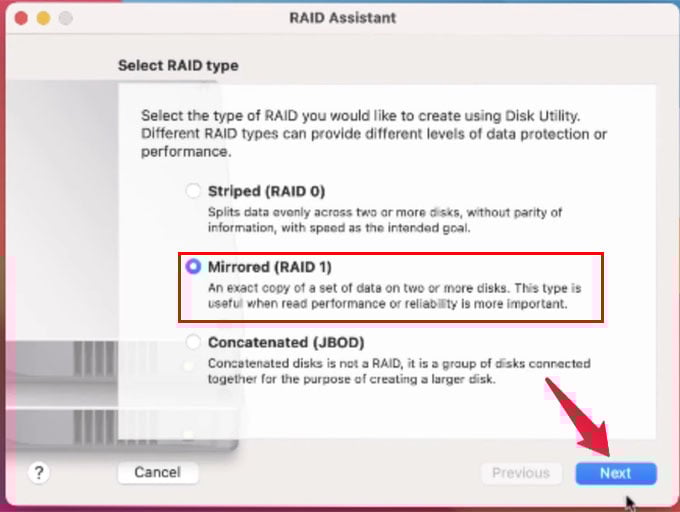
Select “Mirrored (RAID 1)” from the popup window and click Next.

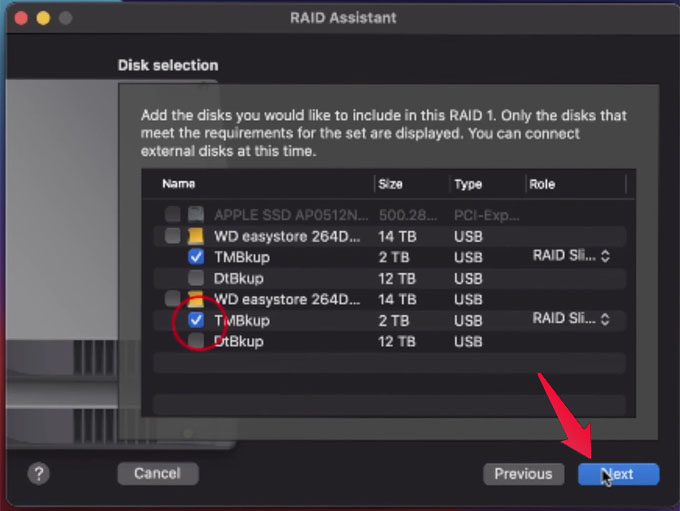
From the Disk Selection, select the same partitions from both your hard drives and click Next. Here I am choosing “TmBkp” which is the partition I created for Time Machine backups. Make sure to choose “RAID Slice” as the Role for both hard drives.

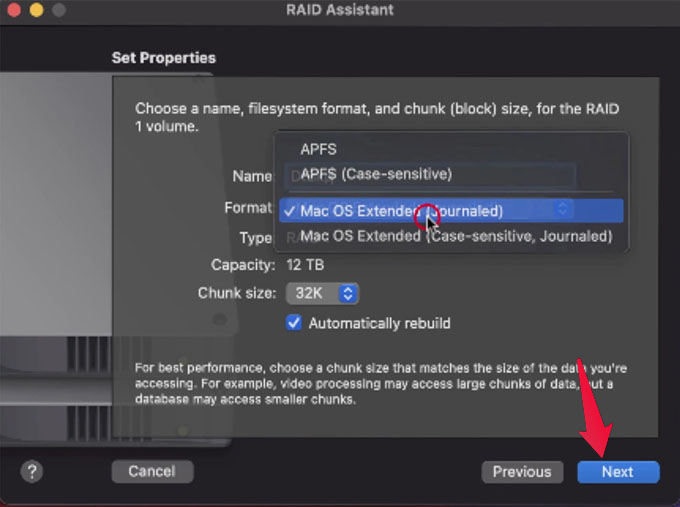
From the next screen, give your RAID 1 set up a name (TMBkup in my case) and disk format. Select Mac OS Extended (Journaled) for data storing, and select APFS for Time Machine backups. Check Apple’s guide for choosing drive formats for more.
Select the chunk size (default value for backups and maximum value to store large data like videos), and click Next.

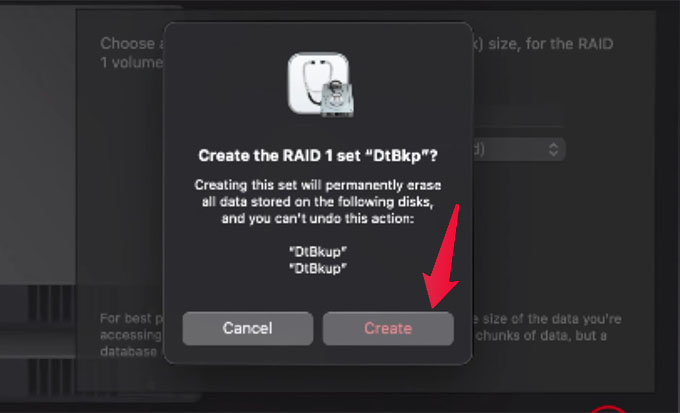
A popup window will appear with a warning. Click on “Create” from there and wait for the RAID setup to finish.

We just created a RAID drive for time machine backups using the smaller partition. Since we have a larger partition remaining, we can create an additional RAID for that partition to store files and media. For that, follow the same steps mentioned above by choosing File > RAID Assistant.
Once the RAID setup is done, you can look for your newly created RAID configuration under the “RAID Sets” title. Clicking on it will show you the RAID drive details, and status of both hard drives. In case one of the hard drives is damaged or disconnected, the error message will be shown, still, the data will be accessible from the other hard drive.
Related: How to Connect MacBook to Monitor and Multiple Display Setup: A Complete Guide
Step 5: Choosing Partition for Time Machine Backup
Creating just a partition and RAID will not backup your Mac data into the hard drive. You need to configure the device for Time Machine backup on Mac. Here is how.
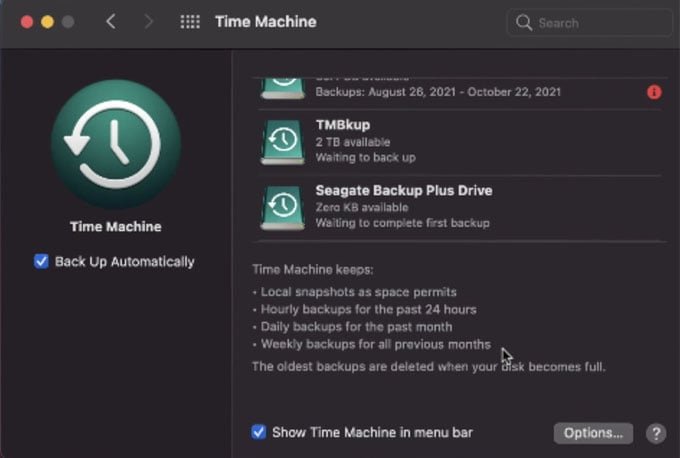
Click the Time Machine icon from the menu bar on your Mac and select “Open Time Machine Preferences.”
Click “Add or Remove Backup Disk” from the opened window.
Choose the “TMBkup” RAID we created earlier from the opened window and select the “Use Disk” option.
Check the option “Back Up Automatically” to enable auto backup for your Mac whenever the hard drive is connected.
If you do not want to backup Mac to the external hard drive at times, head over to the Disk Utility and unmount the RAID for backups, and mount only when you need it.
There is no 100% failproof method to backup your Mac. Although, setting up RAID configuration using two hard drives can save you from troubles and even let you retrieve your backup data if one hard drive runs into problems.


