
Hardcore gamers are facing issues with Nintendo Switch Joy Con, that is losing Joy-Con connection with the system. This wireless connection issue is spreading around especially on the left Joy-Con. Serious gamers are struggling to cope with this Joy-con connection issue while playing Zelda and other exciting Nintendo Switch Games.
However, there is a hardware fix for this Joy-Con connection issue. We performed this tweak in our lab, and we found that the issue has been resolved and also find a considerable increase in communication distance with Joy-Coin and main Nintendo Switch.
This is not an official fix from Nintendo and we do not recommend to fiddle with the controller, that may void your warranty. Please try this tweak at your own risk. We will not be responsible for any loss that may occur with this fix.
Reason to lose Joy-Con Connection
When we test the Joy-Con we experienced the same issue with Joy-Con in remote mode while placing the console near to TV. When you play with Joy-con in handheld mode, the internal antenna part is covered with your palm. The Nintendo Switch Joy-Con lose the wireless signal strength because of the interference between our body and the Joy-Con antenna circuitry.
iPhone users faced the same type of issue with iPhone 4 internal Antenna, and the users start to use an iPhone case as a temporary tweak to reduce the interference between the body part with iPhone Antenna.
Why is Left Joy-Con not Connecting?.
First of all, you may not see this problem while you play Switch by attaching the JoyCon with the system since Switch is working in wired mode. However, when you operate JoyCon in handheld mode, you are covering most of the internal antenna part with your palm. So the quick tweak that we performed here, we extended this internal antenna area with an additional small piece of wire.
How does this Joy-Con Fix Work?
Theoretically, there are several design factors like output impedance, antenna impedance match, RF Signal strength, etc, need to consider while designing an antenna for the best efficiency. However, in practical, a 3-inch wire extended from the internal antenna spot will expand the signal transmitting area and will do the trick with your Nintendo Switch Joy-Con.
Those who have Car garage door opener may notice a wire hanging on the main system, which designed to improve the antenna reception.
What do you get after Joy-Con Fix?
With our prototype left Joy-Con test model, we observed the following improvements while playing with the tweaked Joy-Con in handheld mode.

No more Joy-Con signal or connection issue with the main system. Also, we noticed a substantial improvement in the wireless communication range (35-40 feet with fix) between the Joy-Con and Switch console.
Related: 16 Best Nintendo Switch Games List of All Time
For the Hard Core Gamers who does not want to wait for an official fix and interested to try with this tweak, please follow the steps below.
1, Open Nintendo Switch Left Joy-Con
This requires a small Philips Screwdriver, beware, this may void your Joy-con warranty, please perform this step at your own risk.
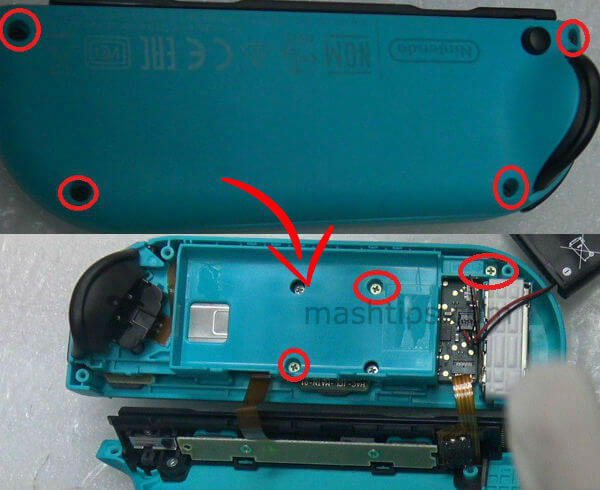

There are four screws outside to remove the back panel of the Joy con. There is an internal plastic face plate with three screws that have to address after opening the back panel. All these steps take only 2-5 minutes, and only seven screws to remove altogether.
2, Remove battery from Joy-Con PCB
It is important to detach the battery from the unit before any further steps. The battery is attached with a two-pin connector that can easily detach from the Joy-Con printed circuit board.
3, Spot the Antenna Point on the Printed Board
Here is the picture of the Joy-Con PCB. You can see a tiny spot that we zoomed out in the picture below. This the point we selected to solder the additional antenna wire.
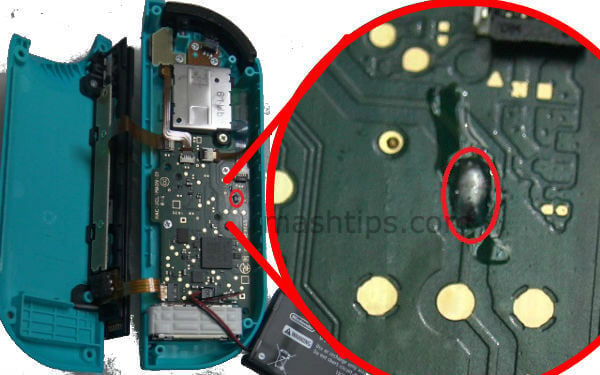

Please be careful and make sure you are on the right PCB spot before you proceed with this tweak.
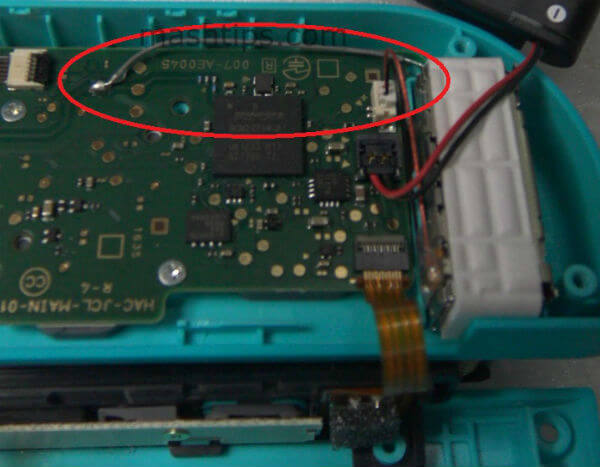
4, Connect the Wire on Joy-Con PCB
Please get an AWG 30 wire, with almost 3-4 inches in length, remove the insulation for about 2-3mm to solder. You can use a 10-15W Soldering Iron (15 W Soldering Iron from Amazon) to solder the wire on this PCB. Please do not use high power (like 100W) soldering Iron on this PCB that may cause to overheat the other electronic parts on the PCB and also peel off the PCB tracks.

This step has to be very careful. Soldering is not a difficult job, however, if you do not know how to solder, please be careful and practice well before you try on Joy-Con PCB. Also, make sure you are not short-circuiting with other PCB tracks while you solder the wire.
Once you solder the wire, please set the cable near to the Joy-Con case. You can use some additional tape to secure (not displayed in the screen shot) this wire near to the case. Please make sure the other end of this wire is not going to touch any PCB parts and not making any short circuiting.
5, Close the Joy-Con Cover Back
Once you make sure, you have soldered the additional antenna wire properly on the PCB. Now the time put the Joy Con enclosure back. Before you do that, please cross check the antenna wire is secured close to the Joy Con plastic case.
Here is the video version of this fix for those who want to follow each step with more details and zoomed views of Joy-Con PCB.

Also please check the additional soldering is not made any short circuit between other PCB tracks or solder points. Once you make sure PCB Solder area is clear and clean, you can connect the two-pin battery cover back. Now close the inner plastic panel and back enclosure back to the Joy-Con.
Related: Memory Card Buying Guide-Choose Right Memory Card for Camera&Gadgets
We recommend waiting for an official fix from Nintendo for this Switch Joy-Con. However, those who want to play with the Joy Con in remote mode and experiencing the connection issue, this tweak will resolve the Joy Con Connection Issue. This additional antenna tweak extends the signal strength of the Joy-Con and also resolve the connection issue with the system while you play in remote mode.


