
Does your old laptop make you want to smash it into a wall? Windows machines don’t age very well. It is something that won’t probably change until Windows is done from scratch. But Windows isn’t the only quality OS in the market. You can’t download Chrome OS and can’t install Chrome OS on your old laptop but you can still make it a Chromebook, sort of.
Chromebooks are quite popular, specifically in the US and Europe. The OS these machines run, i.e., Chrome OS is the center of all the popularity. It makes it possible for Chromebooks to be cheaper than traditional laptops running Windows and they provide a better experience if internet browsing and media consumption are all you want.
Chrome OS vs Chromium OS
While Chrome OS is great and all, you traditionally have to shell out some cash to get your hands on it. Chrome OS isn’t available for download from anywhere and therefore you cannot install Chrome OS on your laptop unless it’s a Chromebook. Google doesn’t allow it to be installed on devices that haven’t been authorized by the company. That’s why you only have a Chromebook when you have a Chromebook.
However, Chrome OS is nothing much but the Chrome browser running on top of the Linux Kernel. Chrome itself is based on the open-source Chromium browser, also by Google. As it does with the browser, Google also maintains an open source version of Chrome OS called Chromium OS. On top of it, Google adds proprietary code o build Chrome OS. A key difference between Chromium OS and Chrome OS is the browser used for the principal user interface. No points for guessing which OS uses which browser. Another key difference is that you cannot download Chrome OS but you can download Chromium OS.
Related: How to Get Google Chrome Dark Mode in Android, Windows 10 & Mac?
Requirements to Install Chrome OS on PC
Before you can install Chrome OS on your laptop, you will need some preparation:
- A USB drive with 4GB or more storage. The data on this USB will be completely wiped and several partitions will be created, most of which Windows will not be able to read later without a deep format with specialized software.
- Change BIOS settings of your target PC so it can boot from the USB and change the boot order to make USB the first and default choice.
Install Chrome OS on Laptop with CloudReady
CloudReady is an OS based on Chromium OS like Chrome OS. Where Chrome OS is a fork of Chromium OS with proprietary code from Google, CloudReady uses the proprietary code from Neverware, the company that makes CloudReady.

The advantage CloudReady offers is that you can install it on your PC, laptop or MacBook. Being based on Chromium OS, CloudReady is not as resource hungry as Windows, Mac or even a full-blown Linux based OS like Ubuntu. Therefore, installing CloudReady on your old laptop might give it a significant boost and you get the same experience as you’d get if you could install Chrome OS.
Editor’s Note: CloudReady supports almost all kinds of hardware but it doesn’t support every piece of hardware out there. So before you install CloudReady, make sure to boot it from a USB Drive and try it out to see if everything is working.
Related: Best Paid and Free VPN Chrome Extensions
Create CloudReady Installation USB on Windows
- Download the CloudReady Home edition USB Maker for Windows from this link.
- Insert the USB drive into your PC that you’ll use to install CloudReady.
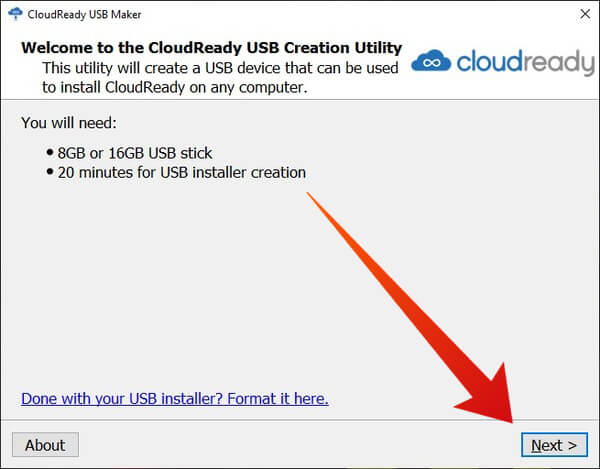
- Run the CloudReady USB maker and click Next.
- Select whether you want to install the 64-bit version or the 32-bit version and click Next > Next. Most PCs or laptops released after 2012 are generally 64-bit.

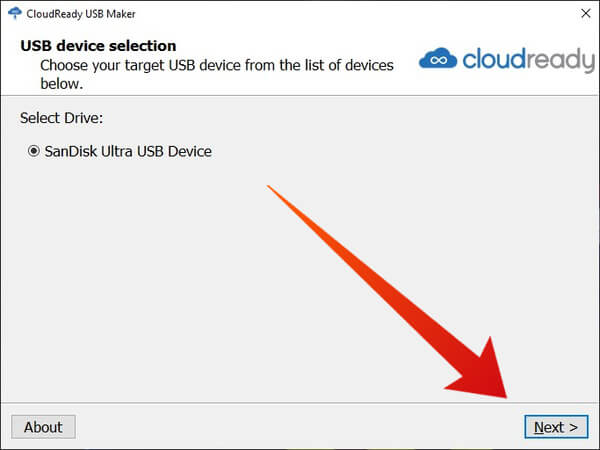
- Now select the USB drive you will use to install CloudReady and click Next.
- The USB maker will then proceed to download the latest version of CloudReady onto your USB drive.
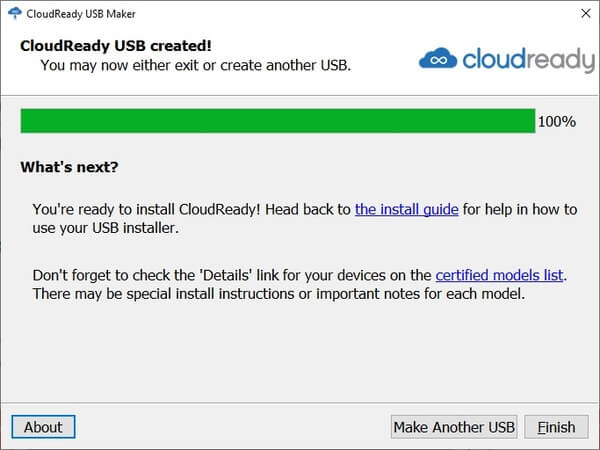
- Click Finish when done. The process can take a lot of time depending on the hardware and internet speed.


Create CloudReady Installation USB on MacOS, Linux or Chrome OS
To create the CloudReady installation USB on MacOS, Linux, or Chrome OS, you’ll actually need the Google Chrome web browser which is already present on Chrome OS. Once Chrome is installed, follow the steps below.
- Download the CloudReady image from the links below.
- Extract the downloaded zip file so you have a .bin file.
- Launch Chrome and go to the Chromebook Recovery Utility on the Chrome Web Store.
- Click ADD TO CHROME.
- Now open the Chromebook Recovery Utility and click the gear icon in the top right.
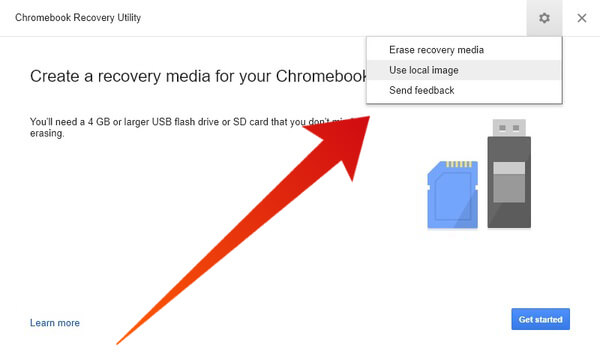
- Select Use local image.
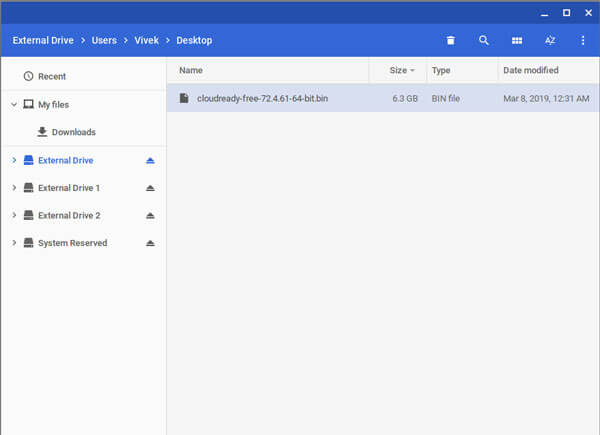
- Navigate to and select the CloudReady .bin file that you extracted above.
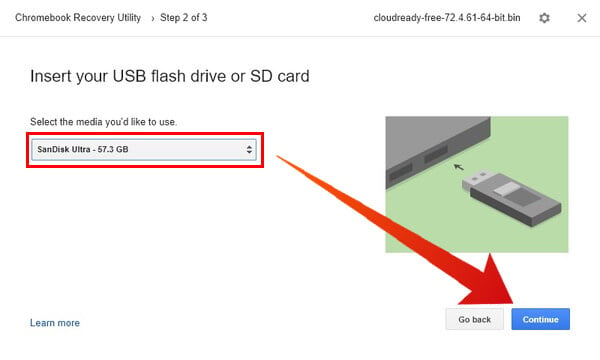
- Click or tap continue.
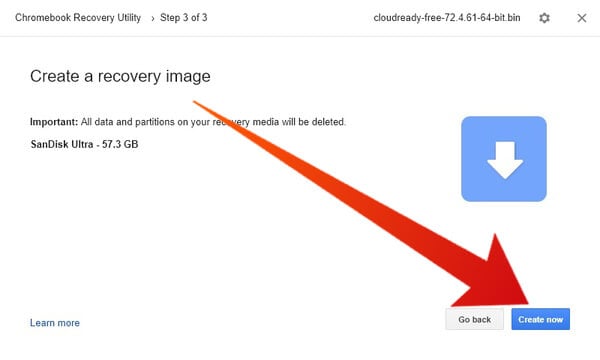
- Wait for the process to finish, and click or tap Done.


Related: How to Share Link between PC and Mac using Chrome
Install CloudReady on Laptop
Once CloudReady is installed on your USB drive, you can install Chrome OS on your PC or Mac. But before you do, it’ll be wise to make sure your hardware is fully compatible.
- Insert the USB drive in the USB port on your computer while it is turned off.
- Turn the computer on.
- If your computer boots straight into the default OS, you’ll have to change the boot order in BIOS.
- Alternatively, you can access the boot menu while the computer turns on and select the USB drive from there. Depending on the make and build of your PC or laptop, the method to access the boot menu can be very different. Therefore, we cannot discuss it here since it can be a whole different topic on its own.
- Wait for the CloudReady welcome screen to appear.
- Click Let’s Go.
- You’ll then be asked to connect to your WiFi network and then Sign in using your Google account.
- Your Google account keeps all your data such as installed apps, tabs, history, etc. synced.
- Complete the set up by following the on-screen prompts.
- You can skip everything and click Browse as a guest in the bottom left too.
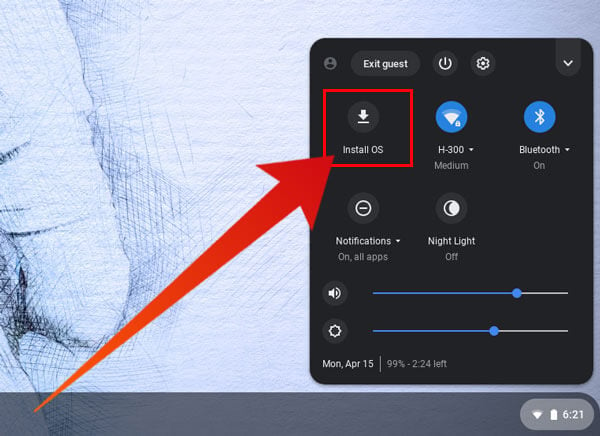
- Once you’re on the desktop you can click around things and make sure everything works. For instance, whether or not you can change the brightness of the screen, speakers work, etc.
- If everything seems fine, click on the system tray in the bottom right and select Install OS.

Install Chrome OS on Laptop with Fyde OS
Fyde OS is another fork of Chromium OS but it originates from China and some people have issues with software originating in China. So if you’re one of those CloudReady might still be your best option. If not, Fyde OS is actually better because it supports Android apps. Neverware has officially stated that they’re not concerned with supporting Android apps on CloudReady. Therefore, CloudReady lacks that one part of the Chrome OS experience.
Fyde OS requires creating a local account on your system instead of a Google account. This means your history, apps, etc. aren’t synced to your Google account. There is a workaround to that which you can easily Google but it requires the use of command line. Fyde OS also has a version with English as the default language called Flint OS. Development on Flint OS, however, has ceased. Thus, you’d be better off if you install Fyde OS instead.
Create bootable Fyde OS USB
- Download Fyde OS image for PC from here.
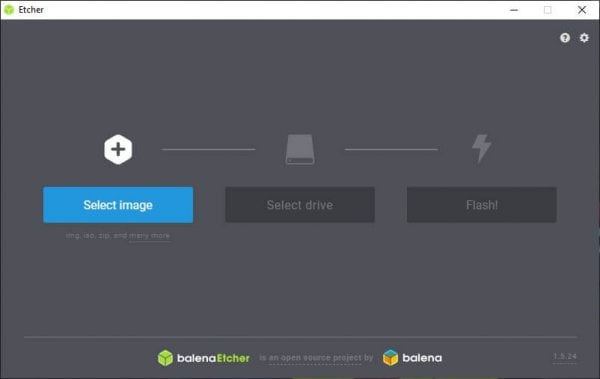
- Download and install/run Etcher.
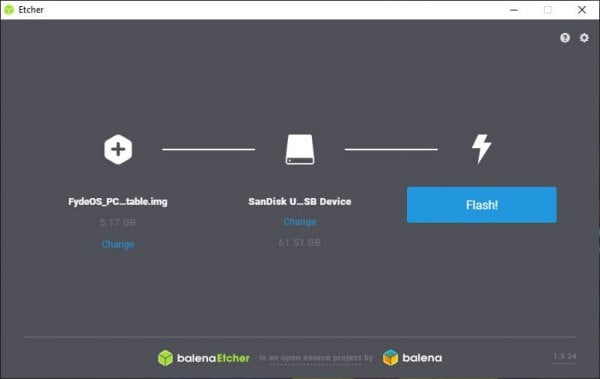
- Insert your USB drive into your computer.
- Select the downloaded image and your USB Drive from Etcher and click Flash.
- Etcher will flash the image to the USB Drive and then verify it.
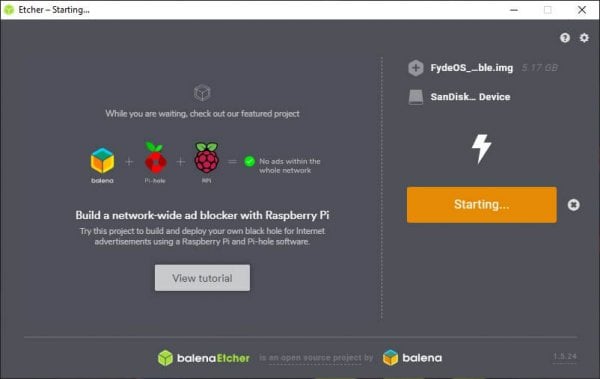
- Once that’s done, click Finish.

Install Fyde OS to PC
Unlike CloudReady, Fyde OS is completely useable from your USB drive and provides all the storage space left on your USB drive after the OS installation. However, installing it onto the hard drive of your PC is a tad bit difficult in comparison. When you’re done though, Fyde OS is closer to what you’d get if you could install Chrome OS. Well, other than the Chrome icon and Google Sync.
- Boot to Fyde OS using the create bootable USB Drive.
- If your computer boots straight into the default OS, you’ll have to change the boot order in BIOS.
- Alternatively, you can access the boot menu while the computer turns on and select the USB drive from there. Depending on the make and build of your PC or laptop, the method to access the boot menu can be very different. Therefore, we cannot discuss it here since it can be a whole different topic on its own.
- Follow through with the setup wizard to connect to your WiFi and create a local account or skip the process by clicking Browse as a guest at the bottom.
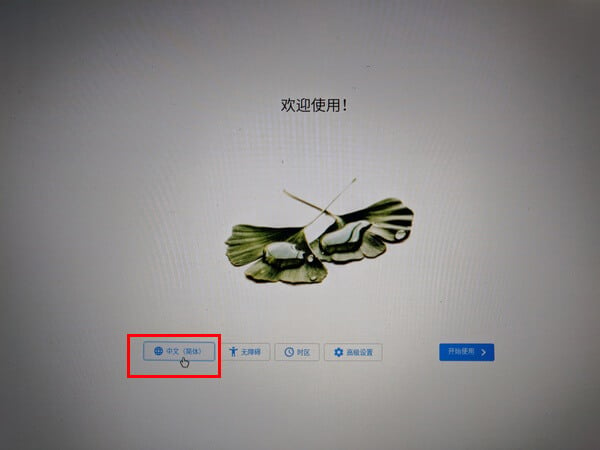
- In case you can’t understand Mandarin, click on the left-most button with a globe icon.
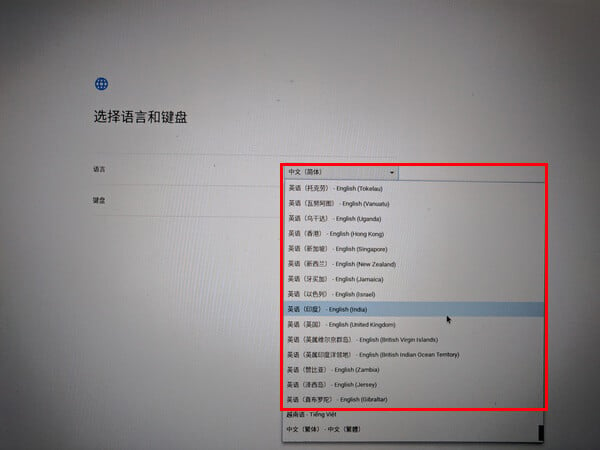
- Select your desired language from the drop-down menu.
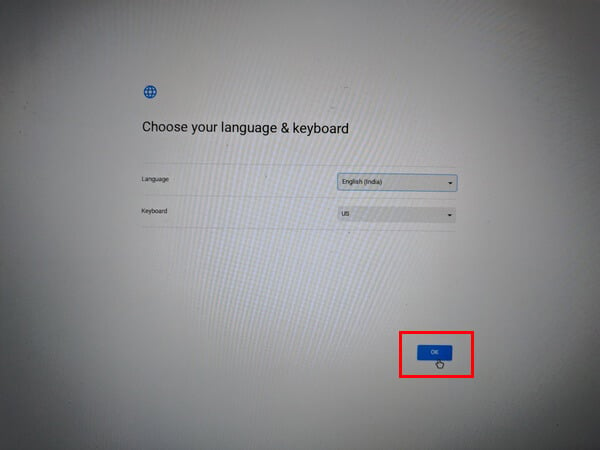
- Click OK.
- In case you can’t understand Mandarin, click on the left-most button with a globe icon.
- Once you’re on the Fyde OS desktop, press Ctrl+Alt+F2 (Fn+Ctrl+Alt+F2, for some).
- This will open up the terminal. If asked for a username and password, enter chronos for both.
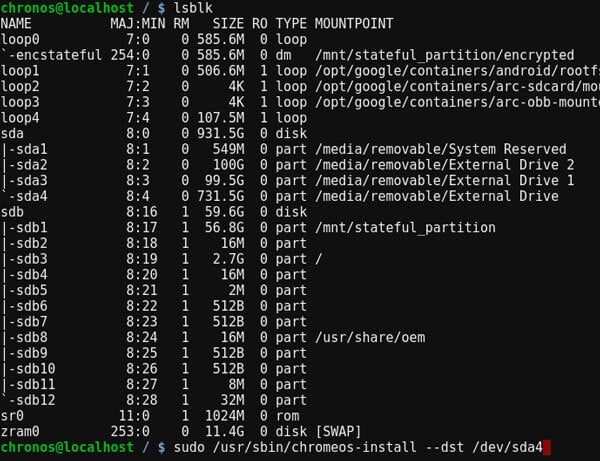
- Obtain a list of all attached drives with this command.
lsblk
- Identify the drive you want to install Fyde OS on and run the installation script with the following command.
sudo /usr/sbin/chromeos-install --dst /dev/sda
In the above command, sda is the label of the drive that you want to install the OS on. Make sure you replace it with the correct label.
- You may be asked for the password again so enter chronos.
- Press Y when asked for confirmation.
- Wait for the script to run. Your entire hard drive will be formatted to install Fyde OS.

Pull out the USB and reboot your computer one the script has finished installing Fyde OS.
Install Chrome OS on PC
After Netbooks were pretty much dead Chrome OS has revived them again in the form of Chromebooks. Because Chromebooks don’t run the full-blown Windows-like desktop, they’re not just cheap laptops, unlike the netbooks of yesteryear that got thrashed out of the market by the iPad. Chromebooks excel at what they provide, a lightweight, cheap desktop-like internet experience. And they exist in a world where several professionals depend on the internet for work.
Clearly, they have a lot going for them. At the heart of all of this though is the OS, Chrome OS. While Google only allows it to be installed on authorized devices, other developers and even companies have filled in the demand for Chrome OS on other devices. Sure, Chromium OS or its forks are not exactly Chrome OS but the experience is very similar after installation. It’s like using a Pixel Experience ROM on a device that’s not a Google Pixel, in case you understand custom ROMs on Android.


why does google chrome os can’t open this page keeps popping up it makes my laptop run slow please remove it thank you