
We’ve discussed a number of desktop environments as well as what exactly is a desktop environment (or DE, for short) before. In our list of the best Linux desktop environments, the first DE on that list was the KDE Plasma desktop. I mentioned how customizable and flexible it was but also that it can get slightly confusing at times.
Let’s explore what KDE Plasma has to offer and the annoying little things that you might be wishing to get rid of if you install it on Ubuntu.
Install KDE Plasma Desktop on Ubuntu Linux
The Plasma desktop works very well with Ubuntu Linux, in fact, Canonical even has an official flavor of Ubuntu called Kubuntu. If it wasn’t already obvious, Kubuntu is simply Ubuntu, but instead of the usual GNOME desktop, it comes with KDE Plasma as the default desktop. Not to worry though, you can still install the KDE Plasma desktop even if you have any other flavors or versions of Ubuntu.
Naturally, KDE Plasma can also be installed on other Linux distributions based on Ubuntu such as Linux Mint, Elementary OS, etc. It also works on other Linux distributions but we’re focusing on Ubuntu here since it is the most popular Linux desktop.
Unlike normal apps, desktop environments are more like a bundle of several apps and other back-end code. It’s quite hard to find one on the Software Center, that is. Installation is easier and actually more convenient via the Terminal. It’s an entire desktop environment we’re talking about here so it’s pretty big in size and installation can take quite some time.
Add PPA
First, you need to add the Kubuntu-ppa/backports PPA to your system, which can be done with this command.
sudo add-apt-repository ppa:kubuntu-ppa/backports
Update system
Next, the system needs to be updated so it knows about the newly added PPA and the packages it contains. This step isn’t necessary for Ubuntu 18.04 and above since the OS automatically performs this function as soon as a new PPA is added.
sudo apt update && sudo apt upgrade
Install KDE Plasma
Now to actually install the KDE Plasma desktop, execute the following command.
sudo apt install kubuntu-desktop
At some point during the installation, you’ll see a screen similar to the one shown above. Here you’ll have to choose the default login manager because KDE Plasma brings its own login manager with it known as sddm. Chances are your current login manager is gdm3 which also works fine with KDE Plasma so you don’t necessarily need to switch. However, if you want the full KDE experience, you might want to switch. Whatever your choice, highlight it using the arrow keys on the keyboard and press Enter.
Log in to KDE Plasma
Once the installation is complete, reboot your system. Simply logging out also works generally, but a reboot is just a lot safer since it also allows the login manager to restart. Depending on the login manager you chose during installation, you’ll have either of the two login screens shown below.

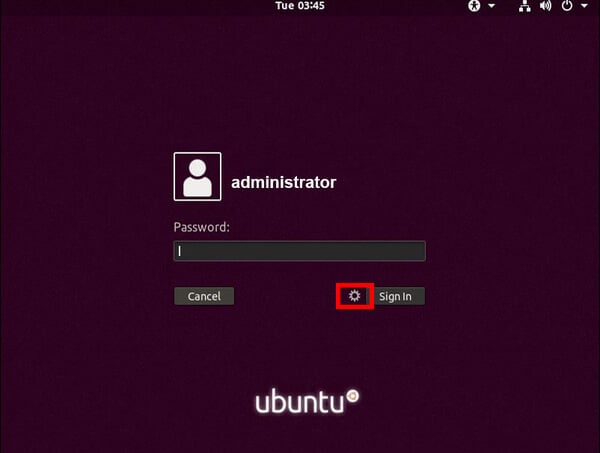
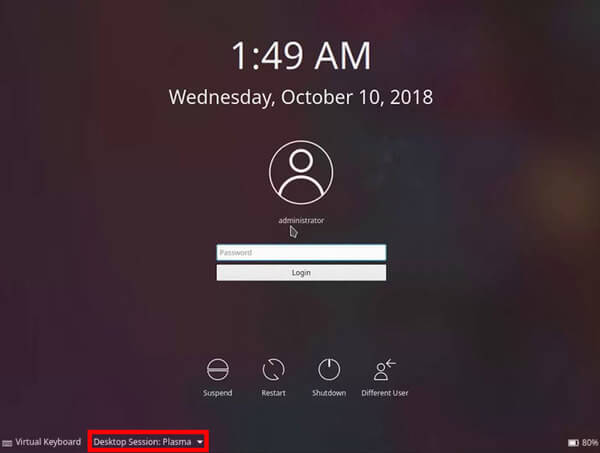
On gdm3, you can select KDE Plasma by clicking on the cogwheel icon next to the Sign in button while on sddm, a similar drop-down list is available in the bottom-left of the screen.
Getting familiar with the interface

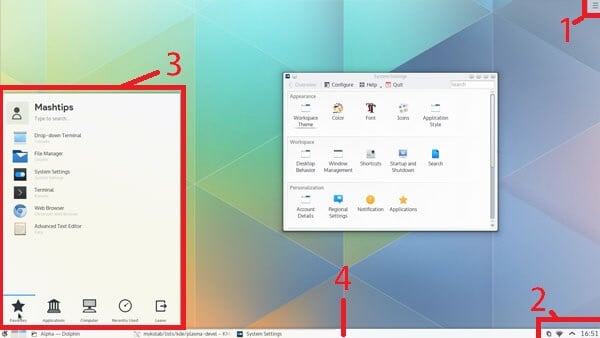
When you boot into KDE Plasma for the first time, you’ll notice something that looks like it could be a Windows desktop. Soon you’ll notice all that is different, such as the huge clock in the system tray, a few extra icons like the clipboard, and a menu button in the top-right corner.
It’s actually called the Desktop toolbox and is perhaps the most useless feature ever invented on a Linux desktop environment. Clicking on it basically gives you a menu which you can also get to by right-clicking on the desktop.
Plasmoids/Widgets
In place of the Start menu is the KDE menu which is an app launcher just like the Start menu on Windows. It looks pretty different though and the apps are all categorized into different categories. This app launcher is, in fact, a widget, a KDE Plasma widget or Plasmoid. This is the stuff KDE Plasma is made up of.

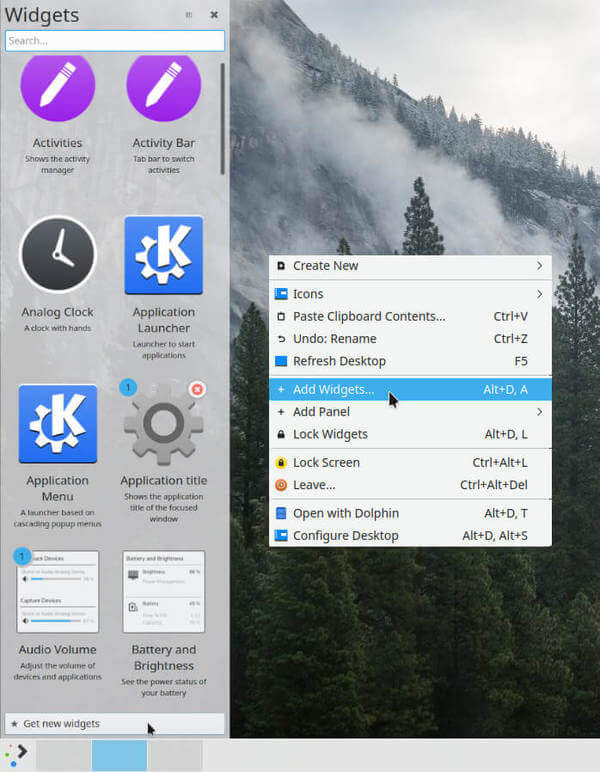
There are panels, and there are Plasmoids (Widgets). The panel, is the taskbar like the white bar you see at the bottom, housing the app launcher widget, the system tray which is also a widget, the clock, etc. These aren’t even the only widgets available on KDE. Right-click anywhere on the desktop, select Add widgets and you have a whole world of widgets to choose from.
You can add these onto the desktop like, well, widgets, or you can add them to the bottom panel so they feel more integrated.
Panels
By default, you only have the one bottom panel but you can add more, and you can add plenty. There is generally no limit but a couple of panels or even three or four if you decide to go crazy should be enough. To add a panel, just right-click anywhere on the desktop, highlight Add panel and select either one of the available options.

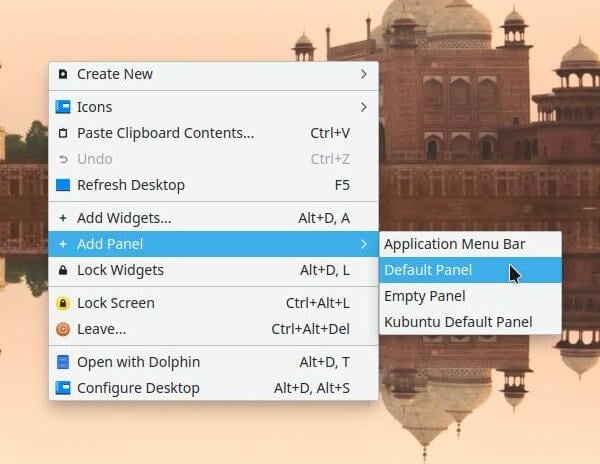
The Default Panel or Kubuntu Default Panel is, as the name suggests, the default panel that you already have on your desktop. This is for when you have removed the default panel and are regretting doing it. An Application Menu bar is a macOS-like panel which contains a global menu for any app window currently selected. And an Empty Panel is, just a panel, that’s empty because it says Empty Panel.
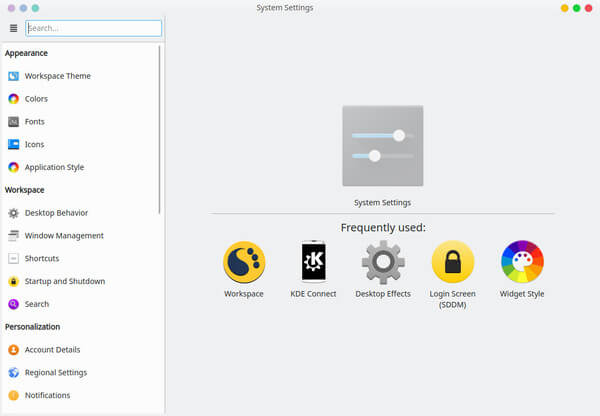
Settings
This is where the actual magic happens after you’re done adding all those panels and widgets that your heart desired. It is in the Settings that you can theme those panels and widgets, apply icon packs, change color schemes, fonts, how windows look, and even how many buttons and where you see buttons on a window.
All of this can be tweaked from within the Appearance section of the Settings. For example, I normally have six window control buttons on the top as you can see in the screenshot below.

From right to left, these let me keep a window above everything else, keep it below everything else, pin it so it is visible on all desktops (virtual desktops), and the usual minimize, maximize, and close.
Window control buttons, the look or theme of application windows and applications themselves can be tweaked in Application style. Icons, Fonts, and Colors are pretty self-explanatory, while Workspace Theme allows you to change the theme of desktop elements such as the panels, the context menus, etc.
There are plenty of options in here apart from customizing the look and feel though. It wouldn’t be possible to cover each and every setting so you might have to explore around.
A Few Things to Change
While we can’t possibly discuss each and everything you can change in the Settings or describe how you should use your KDE Plasma powered Ubuntu Linux desktop, we can definitely tell you some of the things that will make life easier.
Enable Mouse Click Emulation
One of the first annoyance you will notice if you’re using the touchpad on your laptop, is the left click not working. If your touchpad has buttons, the button for left click does work but tapping to emulate a left click doesn’t.

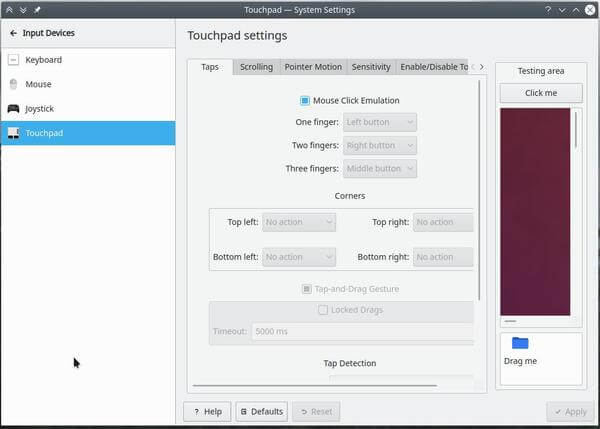
This can be easily fixed in System Settings > Input Devices > Touchpad by enabling Mouse Click Emulation.
Configure Desktop
One of the options you can choose when you right-click on the desktop is Configure Desktop. This is an important one because if you’re using KDE Plasma, one has to assume to love customizing. And if you do, you’ll be changing wallpapers pretty often and this is the only place you can do that from. Unfortunately, somehow, you can’t just right-click any image and select Set as wallpaper. So much for the customization and flexibility.

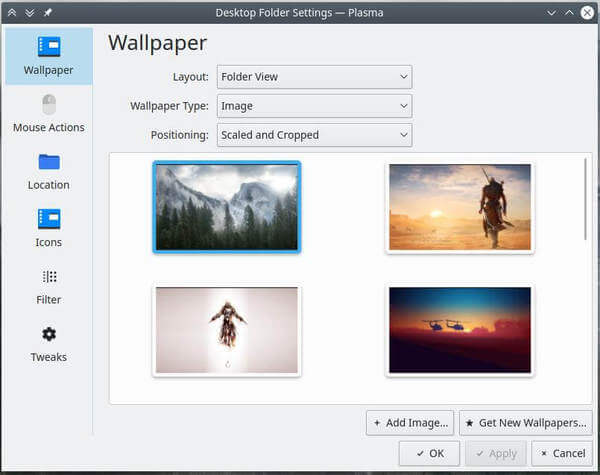
This is also where you can change the default folder Location that will be shown on the desktop. This is somewhat of an advanced feature you won’t find on many desktops other than Plasma. Your desktop can show the contents of not only your Desktop folder but even the Downloads folder or any other folder you want. Any folder that you feel you access pretty regularly, can be shown right on the desktop, as if it was the desktop folder.

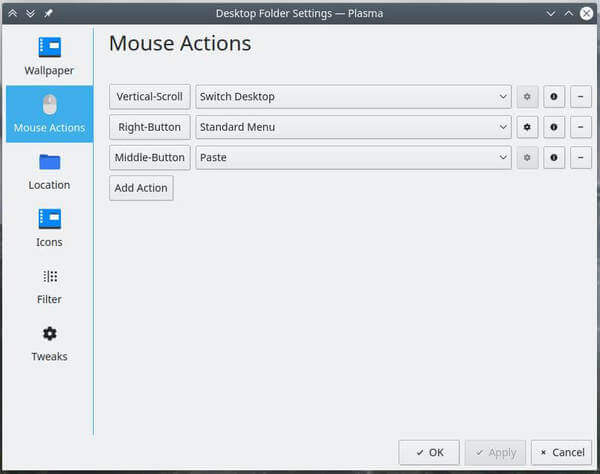
Other than that, you can tweak what happens when you scroll on the desktop, middle-click, right-click, or left click, or click any other buttons you mouse may have. This can be done under the Mouse Actions. Under Icons, you can change how icons look on your desktop and there are enough options here as well. You’ll want to make sure you check out Tweaks because this is where you can turn off the annoying, and useless desktop toolbox.
Try a Different Launcher
By default, you get a pretty polished app launcher that looks a lot like the Start Menu on Windows prior to Windows 10. You can change this pretty easily though.

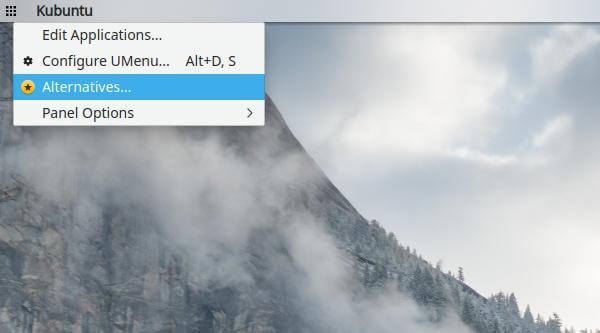
Just right-click on it and select Alternatives. There is at least one other alternative launcher already installed on the Plasma desktop but you can install more by adding more widgets.
Krunner
Krunner will be your best mate if you do decide to use the Plasma desktop. Especially true if you remove the default app launcher from the desktop. It can search your entire machine for files, folders, apps, open tab, bookmarks, almost anything. It can even search directly for apps from the Discover app, allowing you to quickly install them.
Krunner is like the spotlight on MacOS. There are other alternatives on Ubuntu, and Linux in general, but Krunner is built-in and it works great. It can be triggered by pressing Alt + F2 or a more mac-like Alt + Space key combination. If you’re on the desktop you can even just start typing anything and Krunner will appear just like that. Apart from the usual searching, it can also run commands and calculate, convert, etc.

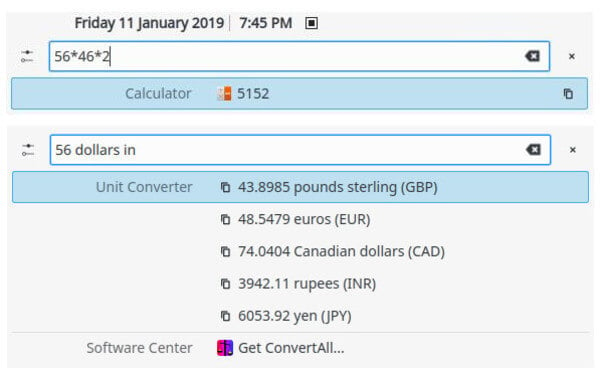
For instance, to kill an app, type kill followed by its name and the command will be executed. Type 56*45*2 and you’ll have your answer.
Enable Virtual Desktops
Virtual Desktops have been around on Linux a lot longer than Windows and are actually a very integral part. Once you’ve used the feature it is hard to imagine life without it. This is only true though if you’re someone who has a busy desktop. Someone who has several windows open while you work and maybe get entertained all at the same time.
KDE Plasma makes it pretty easy to switch to different virtual desktops. You can make it even easier in the settings but we’ll leave you to explore that bit. What we will show you is how to enable virtual desktops because it’s disabled by default.

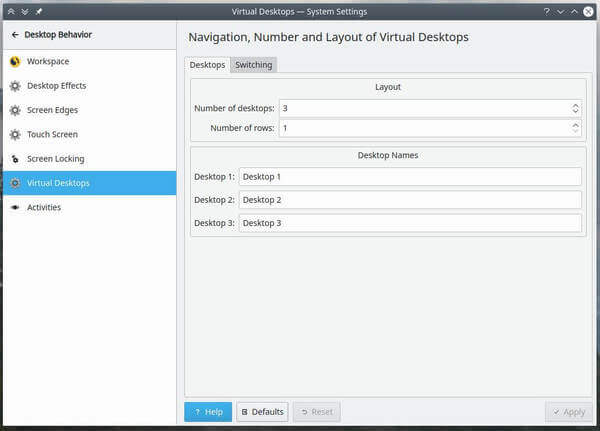
To do that, go to System Settings > Desktop Behaviour > Virtual Desktops. On the right, you can decide how many virtual desktops you will need and other things. It is a good idea to keep the number small, like three to four. Because you can’t possibly use more than that unless you’re really trying to.
By default, Plasma will display the virtual desktops in the bottom panel below. The widget that does this on the panel is called Pager and it can be placed wherever you want.
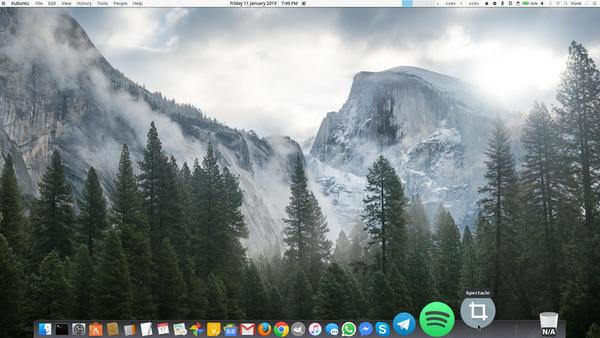
In the end, I’ll just leave you with this macOS inspired KDE Plasma desktop setup. Just to showcase the flexibility and customizability of this amazing Linux desktop environment.


