
Do you wonder how you take screenshots for a new mac? Struggle while taking screenshots on Mac during the initial few times? Worry not, for there are many solutions, including Mac screenshot shortcuts to print screens on mac. As usual, Apple devices offer easy solutions for taking screenshots on their devices.
There are a few solutions to take screenshots with the Mac precisely for the entire screen or a particular window to the area of the screen.
Table of contents
If you use any currently available MacBooks, you can take a screenshot in three main ways, using already available keyboard shortcuts. Now, if you own a MacBook Pro with its iconic Touch Bar, there’s another fourth method to take screenshots of the touch bar. Apart from these, Apple’s macOS gives you various options to quickly save, delete, and open your captured screenshot for markup.
Keyboard Shortcuts for Mac Screenshots
Keyboard shortcuts are easy and quick to do any job. There are 3 main keyboard-based shortcuts for taking screenshots on any Mac. These are combination keys that you use simultaneously for capturing screenshots. They are:
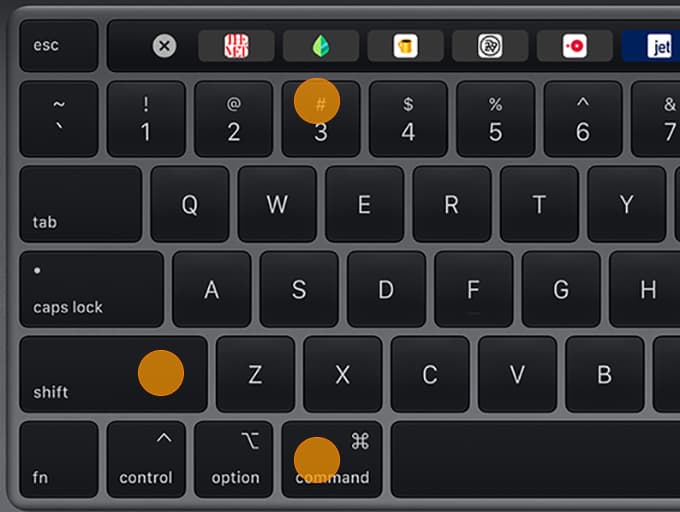
Get Active Screen Mac Screenshot (CMD(⌘)+SHIFT+3)
This is the simplest method of taking a screenshot. When you combine the CMD(⌘)+Shift+3 key combination, it takes a screenshot of the entire screen of your mac.

If you have more than one or an external screen, it will take screenshots of your entire screen.
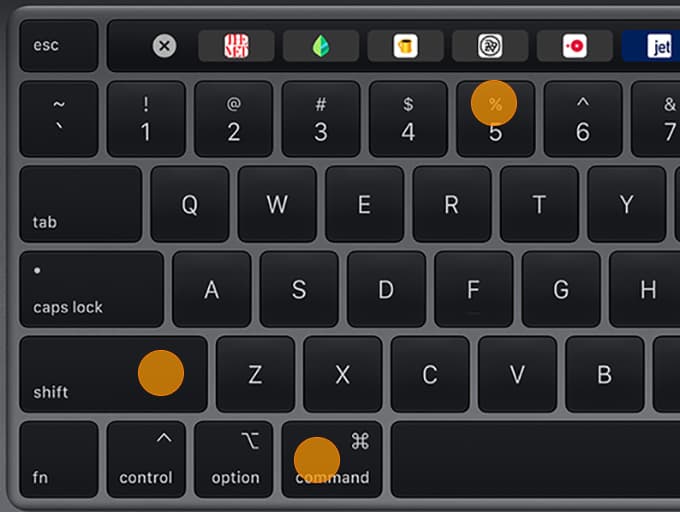
Get Selected Area Screenshot (CMD(⌘)+SHIFT+4)
Sometimes, we need to take an area of the screen, and we don’t need the entire part of the screen. For taking a screenshot of just a portion of your screen, CMD(⌘)+SHIFT+4 is the shortcut to use.
When you use this keyboard combo, your cursor immediately converts into a cross. You can then drag this cross to select any portion of your screen to capture that particular section. When you’re done, release your mouse button or trackpad to capture the screenshot of the exact section of the screen that you want.
After using CMD(⌘)+SHIFT+4, there are a number of additional options you can avail like:
Move the Selected Marked Area Around the Screen: Press and hold the spacebar, and you can select the screenshot area to take the screenshot. Holding the spacebar after dragging will highlight the area before releasing the trackpad or mouse button. This marks the desired shape and the size of the selection area and lets you move it around on the screen.
This option is excellent if your initial selection area is off the mark by a few pixels. You can keep the spacebar pressed, and this can reposition the desired area before releasing the trackpad button to capture a screenshot of the marked section.
Reposition the Edges of the Marked Screenshot Area: You can adjust the screen’s position by pressing and holding the “Shift” key. You need to hold the “Shift” key after you drag your mouse cursor to highlight an area, but just before releasing the mouse button or trackpad.
When you do this, it marks each side of the selection area made with the mouse cross cursor, except the bottom edge. This lets you move your mouse up or down to position the bottom edge.
Now, without releasing the mouse button, release the Shift key. And now, press it again to reposition the right edge of the selection area. Using this method, you can keep switching between moving the bottom and right edges by keeping the mouse button or touchpad engaged and holding the Shift key.
The macOS Screenshot Menu (CMD(⌘)+SHIFT+5)
The CMD(⌘)+SHIFT+5 option for taking screenshots was introduced long back with macOS “Mojave” in 2018.

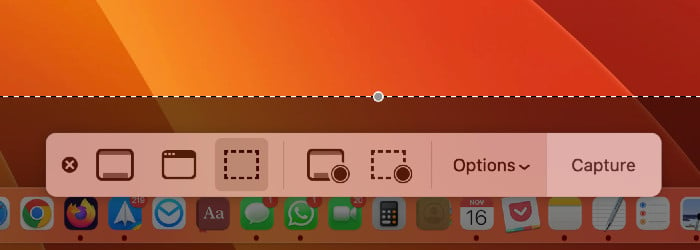
When you use this key combo, it marks a small section at the bottom of your display with various screen capture options. It also enables 3 screenshot-capture buttons that let you capture:
- Your entire screen
- A single window or,
- A selection of your screen.
Additionally, this option comes with 2 video-recording buttons that enable you to record your entire screen or just a part of it. There’s an X button to the left of this Screenshot menu to close the screenshot panel, but again, you can hit the “Escape Key if you want to exit the panel.
Use The macOS Screenshot App
Most recent versions of the macOS, starting from macOS “Mojave,” “Catalina,” “Big Sur,” “Monterey,” and the latest “Ventura” now come with a new Screenshot app.

To invoke the standard macOS Screenshot App, press the combo CMD(⌘)+Shift+5. You’ll now see a small menu panel on the screen’s bottom. There are 3 icons to the left of this panel that allow you to take:
- A screenshot of the entire screen
- A specific window, and
- A highlighted section.
Select any of these options, and click the “Capture” button to take the desired screenshot on the far right of the screenshot.
You can also see an “Options” menu in the Screenshot App. This menu helps you to choose the exact folder where you’d like to save your screenshot. You can even configure the time gap between pressing “Capture” and the actual screenshot capture action.
Are you not a fan of key combinations to use on mac? Instead of using the key combinations, you can use Mac’s spotlight function to get the screenshot app.

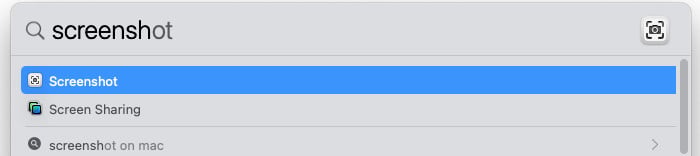
Open Mac Spotlight from the top right of the menu bar, and search for Screenshot. Now you click on the result “Screenshot” to open the Screenshot Menu on your Mac.
Screenshot of the MacBook Pro Touchbar (CMD(⌘)+SHIFT+6)
Do you know that you can even take a screenshot of your MacBook Pro’s Touch Bar If you use any of the older 15 or 16-inch MacBook Pros or any current 13-inch MacBook Pro (which, unfortunately, is the last model with the Touch Bar), you can also take a screenshot of what’s currently being displayed on the Touch Bar.


Press Cmd(⌘)+Shift+6 to take a wide and thin screenshot of your MacBook Pro’s Touch Bar.
Third-party Apps for Mac Screenshot (Mac Snippet Tool)
Apart from the above macOS in-built options for taking a screenshot, there are additional 3rd Party options available for taking screenshots on your Mac. Some of these are:
iScreen Shoter

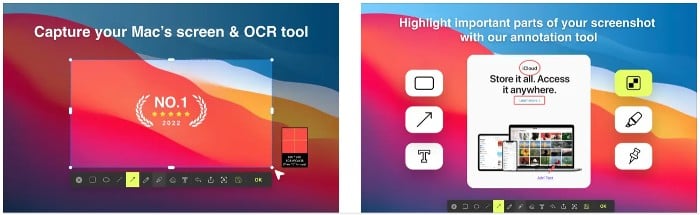
A neat little screenshot app for macOS, the iScreen Shoter app lets you take screenshots from your Menu Bar. It’s also equipped with a built-in Optical Character Recognition (OCR) Scanner, so you can directly extract and use text from images. You can save your captured screenshots in multiple formats or convert them into PDF files. The app also has a “floating screenshot” option to keep your screenshot visible on the desktop at all times before you decide to save it.
Download the iScreen Shoter: Mac App Store
Snip My – Screenshot Tool

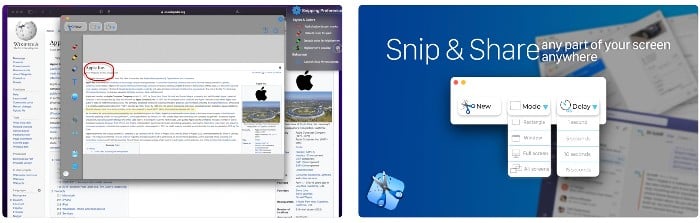
Another excellent app for taking mac screenshots, the Snip My App, has a timer that enables you to take your screenshot after a specified time delay or immediately.
In addition, you have a great variety of image editing tools available within the app, like adding shadows to your screenshots for marking with the pen, setting default colors for both pens and a marker, and even setting the opacity of your Highlighter. You can even configure the “Snip My” app to start automatically when your Mac starts up.
Download the Snip My Screenshot App: Mac App Store
Lightshot Screenshot
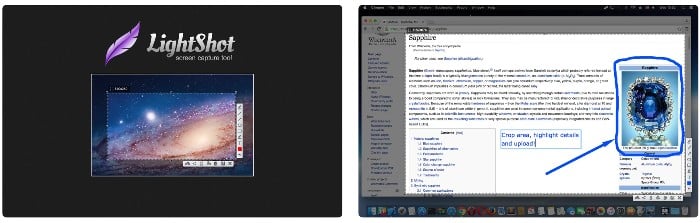
The Lightshot Screenshot app lets you capture any part of your Mac screen. You can then upload your captured screenshot on the www.prntscr.com server and get a link to download the screenshot as an image file. In addition, you can also share your screens via Twitter or Facebook.
Lightshot also lets you search for similar images over the Internet. The app’s built-in image editor allows you to add lines, arrows, and text annotations as soon as you capture them. The captured screenshots can also be saved on your local hard drive or printed.
Download the Lightshot App: Mac App Store
Change Default Screenshot Saving Location (Bonus Tip)
Do you ever wonder where your screenshots are going on Mac? When you take screenshots on your Mac, they are usually saved to your desktop. This is the macOS default for saving a screenshot. Your screenshot will usually be saved with the “Screen Shot” title, along with the date and time of the screenshot capture. The final screenshot will be in PNG format.
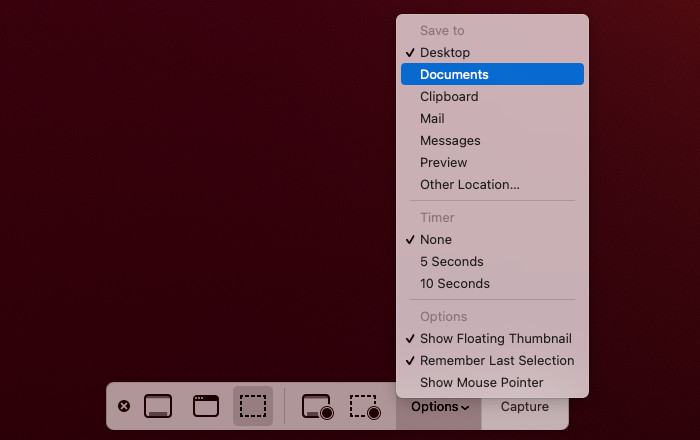
For changing the default mentioned above location for saving screenshots, you can:
- Press CMD(⌘)+SHIFT+5 to open the macOS Screenshot Menu.
- Click Options in this menu. (You’ll now see a list of default locations displayed in a list.)
- Just click the Save To option and select one of these pre-listed locations.
- If you want to select any other custom folder to save your screenshots, you can click on Other Locations to select any folder where you want your screenshots to be saved by default.

So, as you have seen above, taking screenshots on any recent MacBook is quite simple. Several screen capture modes are available, such as a screenshot of your current screen, a selected area, or even a single window, just by using your Mac’s built-in keyboard shortcuts.
And if your MacBook has macOS “Mojave” or higher, you can also use the CMD(⌘)+SHIFT+5 shortcut to launch the Screenshot app, which gives you even more options—including recording your screen.


