
Usually, it is very convenient to view a Google Spreadsheet on the go either on your smartphone or a laptop. However, a hard copy will come in handy especially if you would like to mark or analyze only specific rows/columns. And, when it comes to printing, Google Sheets is so flexible that you can print only the information you need instead of the entire sheet or workbook.
In this article, let’s take a look at how to customize print options in Google Spreadsheet.
How to Set Print Area in Google Sheets
Whether you need to print only specific cells, an entire Spreadsheet, or other kinds of selection, you can exactly set the print area on Google Sheets based on your need.
Related: How to Print Selected Cells In Google Sheets
How to Print Only Specific Cells in Google Sheets
Let’s assume that you are organizing an event in your company and you are assigned a list of tasks. Now, let’s say that you would like to print only the tasks for a specific day. Let’s see how to do that.
- On your browser, navigate to sheets.google.com.
- Next, open the Google Spreadsheet you would like to print. (Make sure you are logged in to the Google account)
- Then, select the cells you wish to print.
– If you are using a keyboard, you can select a cell, press & hold the CTRL key and select the remaining cells.
– If you are using a mouse, then you can hold the left-click button and simply drag the mouse to select the desired cells.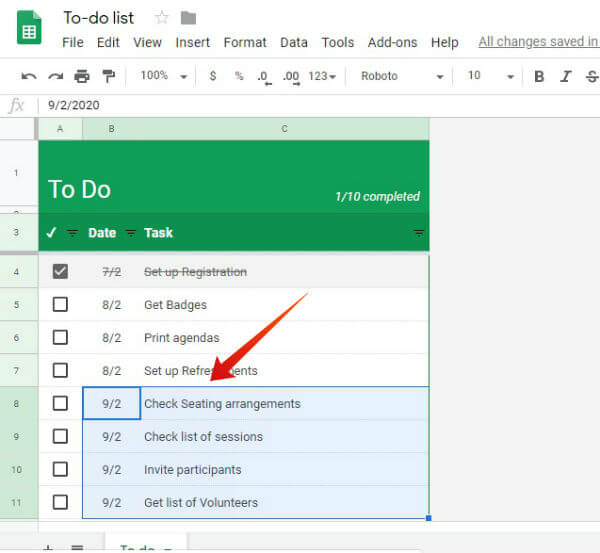
- Once the cells are selected, release the CTRL key or left-click mouse button.
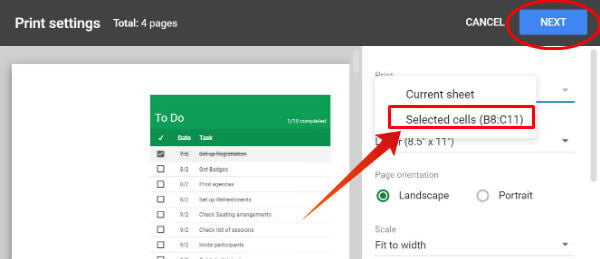
- Next, click Print icon located on the top-left of the screen. Alternatively, you can press CTRL and P keys on your keyboard. Or you can navigate to File->Print from the menu.
- Here, a print menu will appear on the right side of your screen. On the left, you will see the print preview of your current page.
- In the print menu, click the drop-down box under the title Print and select Selected cells. By default, the option Current Sheet will be selected.
- Now, your print preview will be switched to your selected cells as shown below:
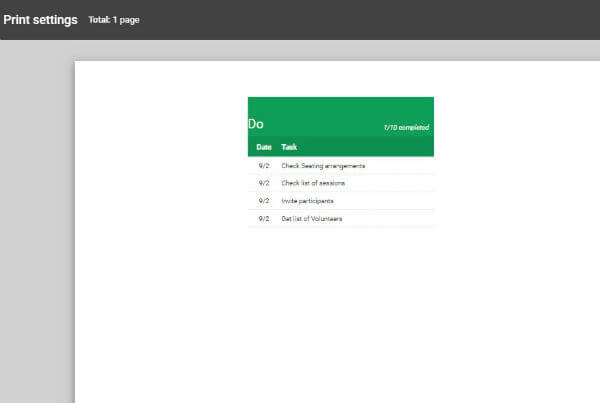
- Then, click Next button and follow the on-screen instructions to print the specific cells on your Google Spreadsheet.


You can follow the above steps to print a set of specific cells, rows or columns.
Related: How to Share Specific Sheet from Google Spreadsheet
How to Print a Single Google Spreadsheet
Let’s assume that you are working on a Google Spreadsheet with multiple sheets. And, you would like to print only a specific sheet. (eg. Sheet titled ‘Week 2’) Let’s see how to do that.
- Repeat Steps 1 and 2 mentioned in the section How to Print Only Specific Cells in Google Sheets.
- Next, open the sheet you need to print and click Print icon or press CTRL and P keys on your keyboard.
- Here, a print menu will appear on the right side of your screen. On the left, you will see the print preview of your current page.
- In the print menu, the option Current Sheet (default) will be selected in the drop-down box titled Print. If not, click the arrow in the drop-down box and select Current Sheet option.
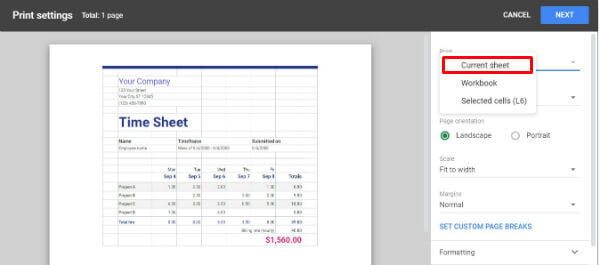
- Finally, click Next button to print the current sheet of your workbook.

How to Print Entire Workbook in Google Sheets
Let’s say that you need to print an entire workbook instead of a single sheet or specific cells. Follow the below steps to print the entire workbook.
- Repeat Steps 1 and 2 mentioned in the section How to Print Only Specific Cells in Google Sheets.
- Click Print icon or press CTRL and P keys on your keyboard.
- In the print menu (located on the right), select the value Workbook from the drop-down box titled Print.
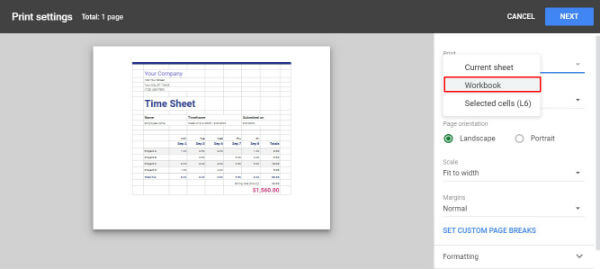
- Then, click Next to print the entire workbook.

Also Read: How to Swap Values Between Cells, Rows or Columns in Google Sheets
How to Customize Print Options in Google Sheets
Besides configuring the print area, Google Sheets has several print options like adjusting margins, selecting the paper size, inserting headers/footers, and more.
Adding Headers & Footers
Let’s say you are printing a long workbook of more than 10 pages. Won’t it look better if you can print the page numbers so that you can arrange the sheets easily? With a single click, you can add page numbers, date, time, name of the sheet/workbook. Let’s see how to do that.
- Repeat Steps 1 to 3 mentioned in the section How to Print an Entire Google Spreadsheet.
- In the print menu, look for the title Headers & footers. Under that, you will find multiple checkboxes to add the page numbers, date, time, etc. Once you select the checkboxes, the print preview pane on the left will be updated accordingly.
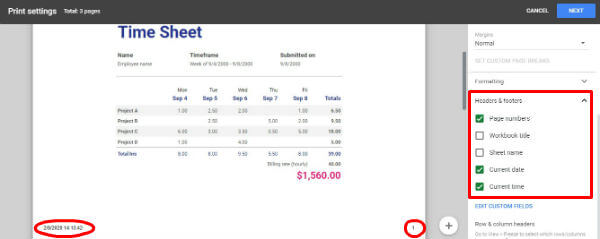
- Click Next to print the page.

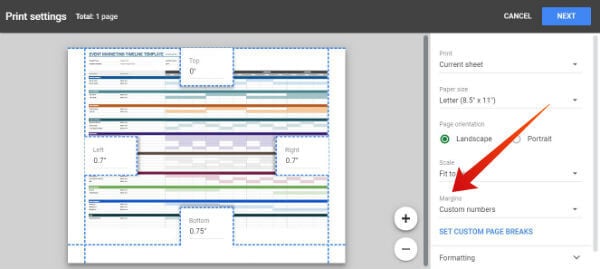
Adjust Margins
If you need to print a Google sheet with a lot of columns on a single piece of paper, then this setting will come in handy. In the print menu, look for the section titled Margins. When you click that drop-down box, you will see four options: Normal, Narrow, Wide, Custom Numbers. If you select Custom Numbers, you can see the margin markers on the print preview displayed on the left side of your screen. Then, you can just adjust the margins with your mouse based on your requirements.
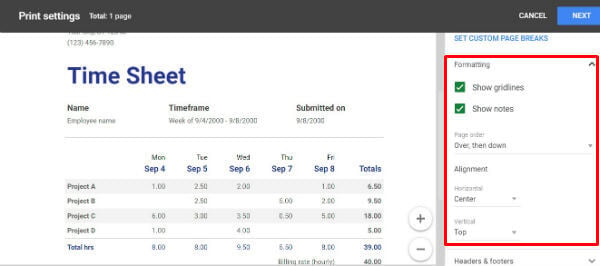
Formatting
Apart from adjusting page margins, you can also change the horizontal/vertical alignment of the sheet to Left/Right/Center. If you wish to print the gridlines, then you can select the checkbox titled Show gridlines. All these settings are available in the Formatting section of the Print window.

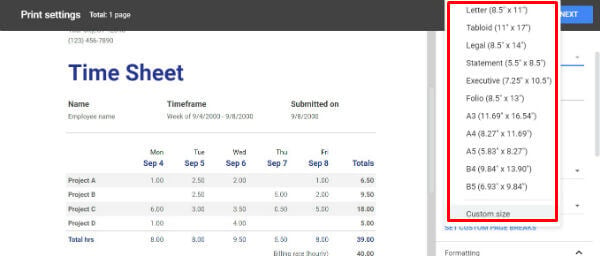
Configure Paper Size
By default, the paper size is set to Letter (8.5″x 11″). However, you can select the paper size to any of the 10+ options (A3, A4, A5, B4, and so on) listed under the drop-down menu Paper size on the Print window that appears, after you click the Print icon or CTRL+P keys on your keyboard. In addition to the pre-defined paper size, you can also set your own paper size by selecting the value Custom size and entering values for Height and Width.

Apart from the above-listed settings, you can also set Page orientation (Portrait/Landscape), insert custom page breaks, and scaling as well.
By now, we hope you should have gained a good amount of knowledge on printing Google Spreadsheets and customizing the print options.


