
While using a lock screen on Windows 10, you will have to keep entering the password every time you want to log-in. It will be annoying at times when it automatically gets locked due to inactivity. You can automatically sign in to a Windows 10 device using any user account. To set up this feature, you must have the Administrator privileges to follow the steps for auto sign-in.
Here, we show two methods to auto log-in to the Windows 10 without entering the password.
Solution 1: Turn On Auto Sign-in for Windows 10
First, press Windows + R to open up a run window. Type “netplwiz” and hit enter. You can also type “control userspassword2” if “netplwiz” doesn’t work. We are opening the User Accounts management page by doing this.


Now, select the account which you want to sign in automatically and uncheck the Users must enter a username and password option. It will prompt to type the password of the account which you want to change the settings. Press OK after entering the password.
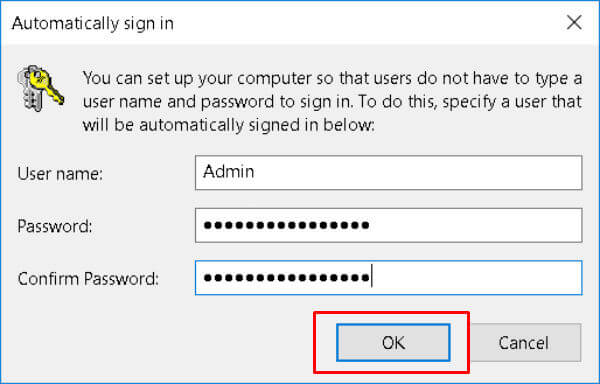

After doing this, Windows 10 will no longer ask you for any passwords. You can easily revert back this option to ask for the password by checking the Users must enter a username and password option.
Also read: Best Windows 10 Account Security & Encryption Features to Protect your Account
Solution 2: Edit Registry to Automatically Sign-in Windows 10
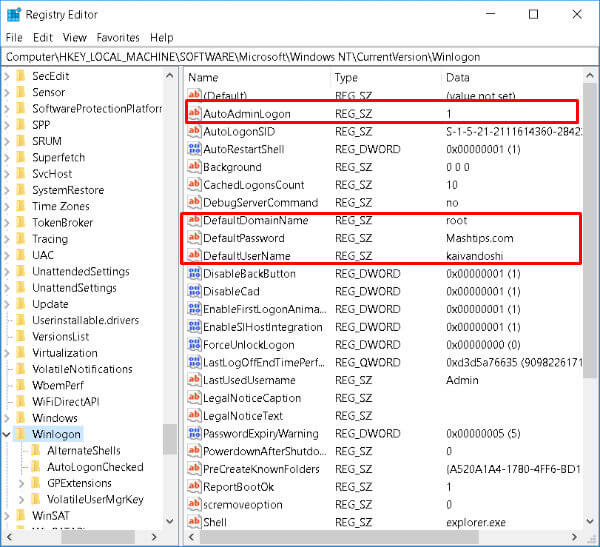
If you are familiar with the Windows Registry, you may try this second method. Press Windows + R and type regedit to open up the registry. Navigate to HKEY_LOCAL_MACHINE > SOFTWARE> Microsoft >Windows NT > CurrentVersion > Winlogon. Here, we may have to change or add 4 new registry entries according to your configuration.
At first, right-click to select New > String Value. Now add the following value names and value data in the displayed text boxes. First, create new value and name it as AutoAdminLogon with a value data of “1”. Secondly, add the value with a name of DefaultDomainName and enter your computers name in the data. The third will be DefaultUserName and in value data, type your windows 10 username by which you want to automatically log-in. Finally, create DefaultPassword value name and type your password for the username which you want to activate the auto-login process in the value data field.

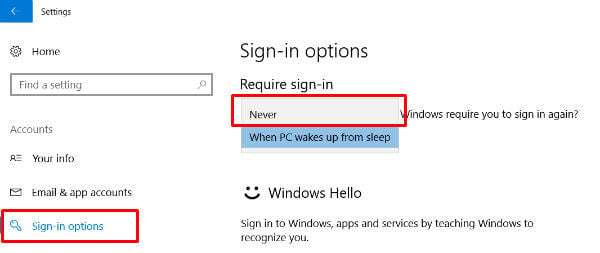

If you want to apply the auto login only when you are logging back after the screen lock timeout where Windows will ask for a password, then go to Start and type Settings. Select Account > Sign-in Options. Here, change the Require sign-in to Never.
Solution 3: Auto-login Tool to Automatically Logging in Windows
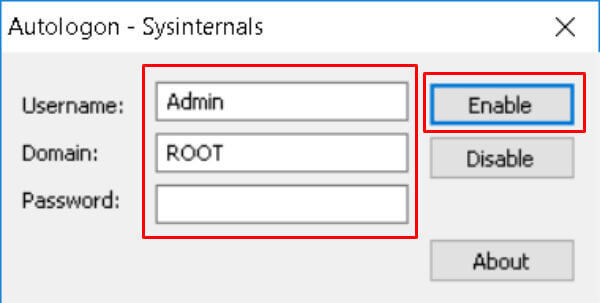
Microsoft gives you a small tool to make this happen. Users can download the auto-log-on tool and extract it to any convenient place. Run the AutoLogon.exe file and 3 fields will appear. In the Username you have to enter the name of the user which you want to make auto login. In Domain you have to type the name of your computer. Type the password for the username you select for the Auto Login in Password field. Click on Enable and then press OK.

Editor’s Note: Automatically getting into an account is not encouraged due to security concerns. You may lose privacy after doing this. Please follow this only if you are a single user or there are less or no chances of your system data to get stolen or of any external access.
Related: A Guide to Windows 10 Login Security Options to Protect your PC
Enable Auto Login in Windows 10
In general, Windows 10 Lock screen takes up to 3 to 5 extra seconds to boot up your computer. You can’t leave your computer for updating procedure as it involves automatic restarts and you have to enter the password sometimes for the process to continue. Such situations might be inconvenient to users. Configure the settings as given above according to your need and get rid of entering the password to login by turning on the Automatic Sign-in for Windows 10.


The command to use is “control userpasswords2”, not “control userspassword2”. Also, note that using “netplwiz” in of Windows 10 – 2004 – doesn’t appear to offer that option and either the registry hack or Systinternals’ Autologon utility are required.