
Timeline Feature in Windows 10 allows you to resume your previous tasks across platforms quickly. The latest Windows 10 update lets you view your previous activities in chronologically organized cards. The task view button implemented in the Taskbar gets you the full activity and continue where you left off.
What sets the Windows 10 Timeline feature apart from the rest is that this is not just recent history. In fact, you can work on the same material that you were attending previously in the exact App itself. Most interesting is that it can be from any, iOS or Android to your PC. Sounds pretty neat, doesn’t it!
Now let us look into how to set up Timeline feature in Windows 10 and Timeline settings in Windows 10.
Setup Windows 10 Timeline
The setup for Windows 10 Timeline is pretty easy. There are only two OS permissions required to set up Windows 10 Timeline feature on the PC. This includes the ability to Collect Activities information and to Filter Activities from Each Account. To enable Timeline in Windows 10, head over to Settings > Privacy > Activity History.
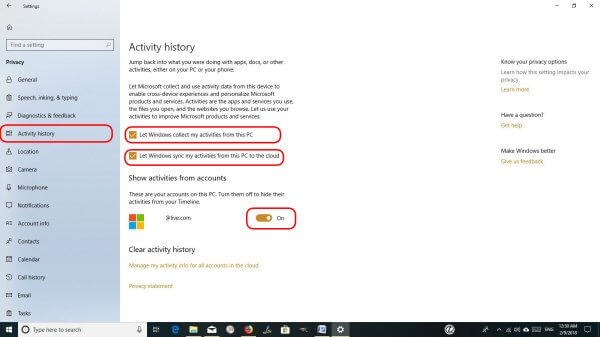

Now Under Filter activities from accounts, toggle to enable the Timeline Activities for each Microsoft account. To proceed further, toggle and enable Let Windows collect my activities.
Related: How to Sign in Windows 10 with Phone number (No Password)
Use Timeline Feature on Windows 10
The Windows 10 Timeline Feature is a welcome addition to the OS for Windows 10 users. Hence if you want to know how the awaited buzz came to be, you need to it out first hand yourself. Timeline feature is available in Windows 10 using the Task View button in the Taskbar. Go ahead and click on the Task View to display your Windows previous activities in chronologically organized cards. However, this is not the only way to use the Timeline feature at most.
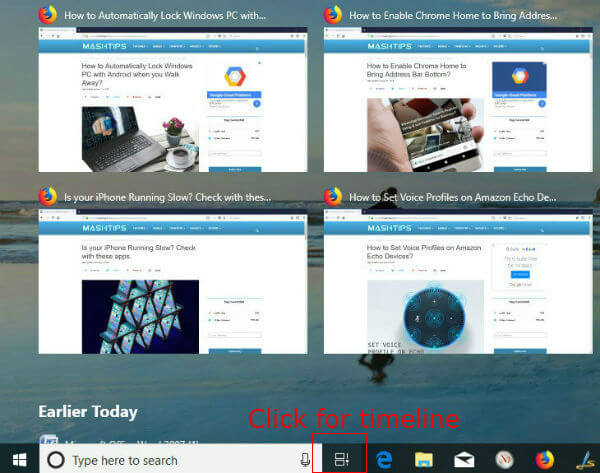

By default, Timeline is sorted according to the previous time period of activities that the user attends. An annotated scrollbar will be used to browse through the screenshots of the earlier actions. Furthermore, we can click the See all activities option to view the activities that are grouped according to the specific hours of usage. You can go back to the previous view anytime and to revert to the earlier view, click on the See only top activities next to day indicators.
Related:How to View Hidden Files, Folders, and Drives in Windows 10
Windows 10 Timeline Search
After using your device for a while, you will be able to view your Timeline with the Task View that shows all the history of work you did.
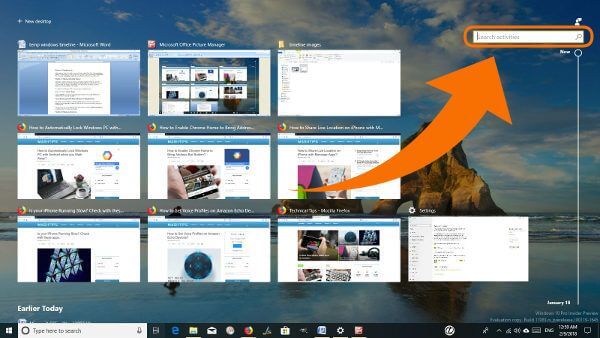

Now, type in the name of a Website that you visited or a file that you recently used in the Search text input field. This will launch the Timeline card that shows the Website or folder that you recently used.
Windows 10 Timeline Activity Cards
The Timeline feature in Windows 10 allows you to address multiple usage scenarios successfully. These include features like Opening a Website that has images using Edge. You can try viewing a slideshow of photos or videos and even you can run a Web application.
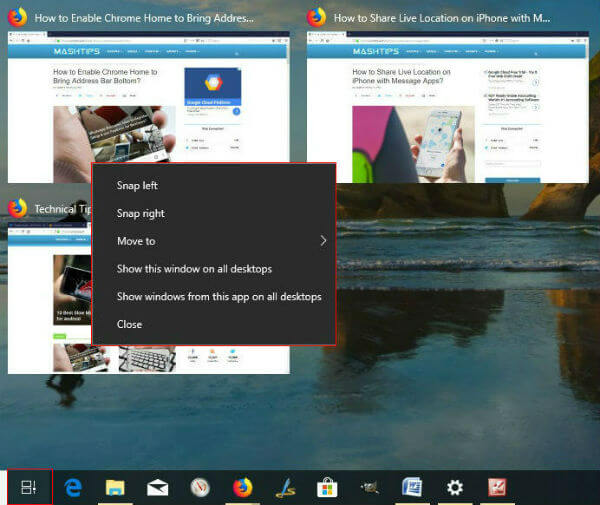

For each of the above activities, you should see a Timeline card. Right-click on any of the cards and select the appropriate commands. The commands include Opening and removing the event and clearing all activities from that timeline.
Disable Timeline Feature in Windows 10
If you don’t want to use Windows Timeline feature, you can disable the Timeline Feature to stop Windows from collecting your activities for privacy concerns. Head over to Settings > Privacy > Activity History.
Now Under Filter activities from accounts, toggle to disable the Timeline activities for your each Microsoft account that you would like to disable, toggle the button that will Let Windows collect my activities to disable it.
Under Clear activity history, click the Manage my activity info for all accounts in the cloud option. Click the Clear button and confirm the prompt that appears to erase all the previously collected data.
Windows 10 Timeline in Multiple Displays & Tablet mode
Furthermore, Timeline Feature can be used as an ample accessibility feature as well in the Windows 10 Latest Update. When Connected to multiple displays, the monitor from where you opened the Task view displays your Timeline. The other monitor will display the regular applications currently running on the computer.
The Timeline layout activities are very much reliable in the case when a secondary virtual Desktop is created. Open the Taskbar and click the Task view button featuring in the right of the Start Button. The same is the case with an additional Tablet Mode setting. To do this, Enable Tablet Mode on a supported Tablet device and open Timeline.
Microsoft Sets or Tabbed Apps Feature
Every Windows 10 Latest Updates bring exciting new features to the users. The Timeline Feature is currently the hottest topic according to that trend. Earlier set to be released with the Windows 10 Fall creators update, Timeline is rolling out to the insider builds currently. Windows 10 Timeline will be released in the coming major update.
As with every other Windows 10 significant updates, features are continuously being improved and developed. The most noteworthy extension of Timeline to the upcoming update is that of the feature called Sets. This brings browser Tab like the grouping of Apps or activities that you’re working on simultaneously.
The Windows 10 Timeline feature is coming in the early 2018 update release. This feature also enables users to complete their tasks from cross-platform devices like Android and iOS. In fact, this is a major advantage and welcome addition to all those who have either of these devices with them. The latest Cortana integration will be making the PC timeline feature accessible from your Smartphones in the future. So that’s about it. If you want us to cover any new features that you guys might be interested in, please leave a comment. Stay Tuned for more latest updates.


