
Most of our important files are usually kept on the desktop or document folders to access them easily. However, your C drive on the Windows 10 PC gets filled up quickly without you knowing. Plus, there is a high risk of losing all your “important” data if the PC gets into any error unexpectedly. In order to avoid such a situation, the best way you can adopt is to sync your important folders to the cloud.
Using the below guide, you will learn how to sync Windows 10 folders with Dropbox and Google Drive easily.
Content
- How to Setup Dropbox Smart Sync on Windows PC?
- Use Dropbox Selective Sync on Windows 10
- Sync Desktop to Google Drive Using Google Backup and Sync
How to Setup Dropbox Smart Sync on Windows PC?
The iCloud Drive is popular among Mac users since it is the default cloud backup platform for all the Apple devices. However, Windows PC users are not much bothered about such a service yet. Even though Microsoft provides the OneDrive cloud with limited features, most users tend not to use the OneDrive backups and sync features. Plus, it cost a little higher in case you need an upgraded storage option.
What exactly would you be looking for, when you need a cloud backup storage to sync your important folders? The Dropbox Smart Sync allows you to sync your important folders from PC to the cloud and saves some space on your hard drive.
The Dropbox has grown enough to replace the default cloud storage services including Google Drive and iCloud. Now you can even replace the iCloud Drive sync with the Dropbox Smart Sync. Likewise, it is quite easy to set up Dropbox to sync the desktop and other folders in PC with the cloud. Here is how to set up Dropbox Smart Sync on Windows 10 PC.

- Make sure you have Dropbox Plus or Dropbox Business account. If not, you will have to purchase any of the plans starting at around $10 per month.
- Now, go to the Dropbox from your web browser and download the Dropbox app for Windows PC.
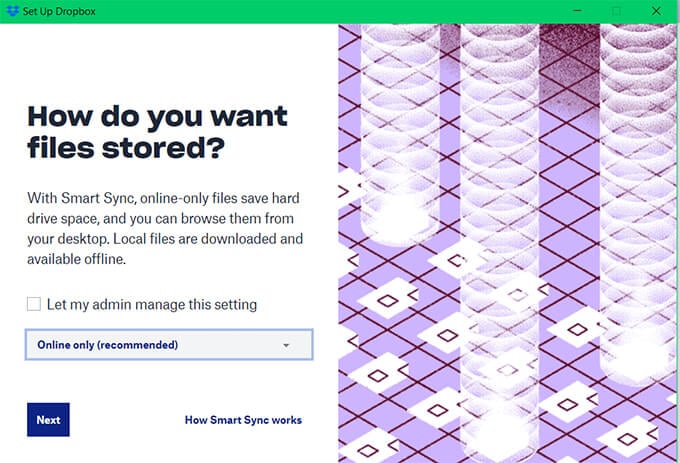
- Install the Dropbox and start setting up the Smart Sync when it asks.
- Choose the File Storage preferences and finish setting up the Dropbox for your computer.
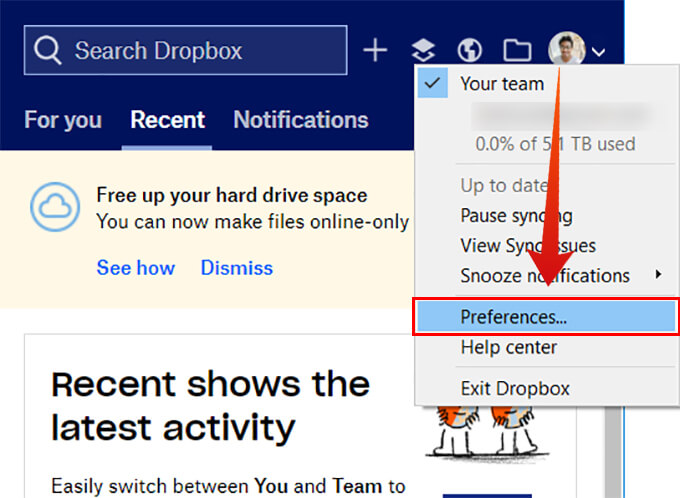
- Now click the Dropbox icon on your System icon tray.
- Click the profile picture at the top right corner of the small popup window.
- Click Preferences and go to the General tab.
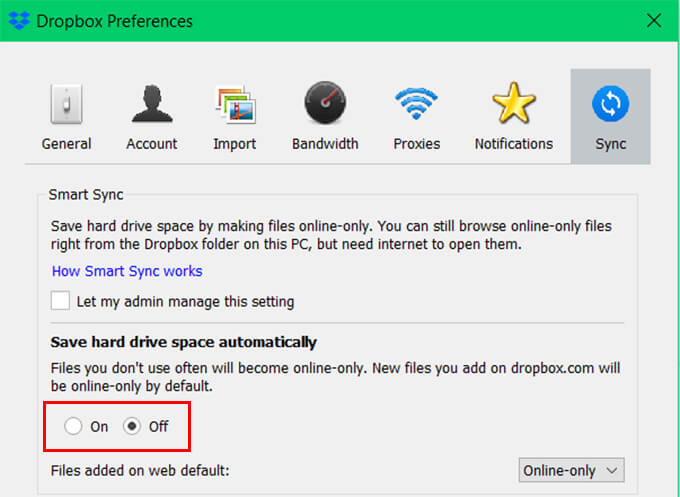
- If you see the message “Smart Sync isn’t enabled,” click the enable button.
- Go to Sync tab and choose “On” under “Save Hard Drive Space Automatically” if you want to free up space on your computer while the files are being synced to the Dropbox.


The Dropbox Smart Sync automatically syncs your essential folders, including desktop, documents, etc. Therefore, you could instantly get the newly-downloaded file on your PC from another device through your Dropbox drive.
Related: 12 Best Apps to Record iOS Voice Memos into Dropbox (Cloud Drives)
Use Dropbox Selective Sync on Windows 10
As you sync folders and files on your computer to the cloud, the Dropbox also allows you to make the Dropbox drive files offline and save to your PC. The Dropbox app on your Windows PC can save the cloud files to your drive and lets you access them offline. For that, you can choose whichever folders to sync and appear on your computer for offline access. Using the Dropbox Selective Sync feature, you can select the folders to sync to your PC. Follow the steps below to customize Dropbox selective sync on Windows 10 PC.

- Click on the Dropbox icon from the system icon tray.
- Click the profile picture and choose “Preferences.”
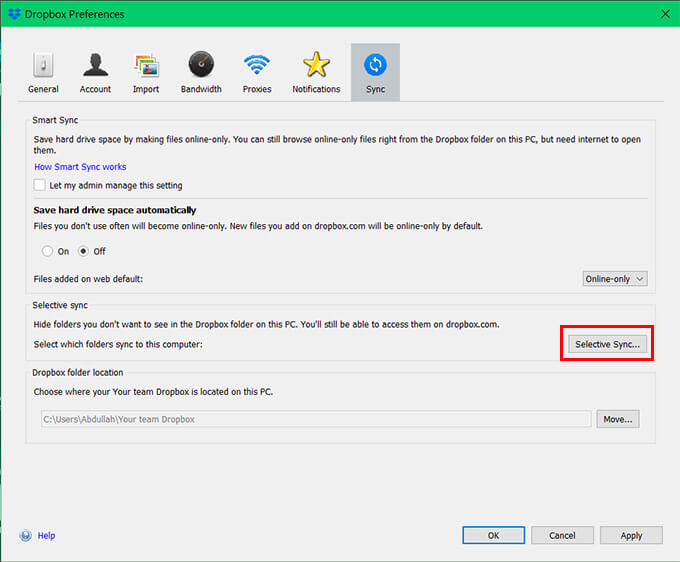
- Go to the “Sync” tab and click “Selective Sync.”
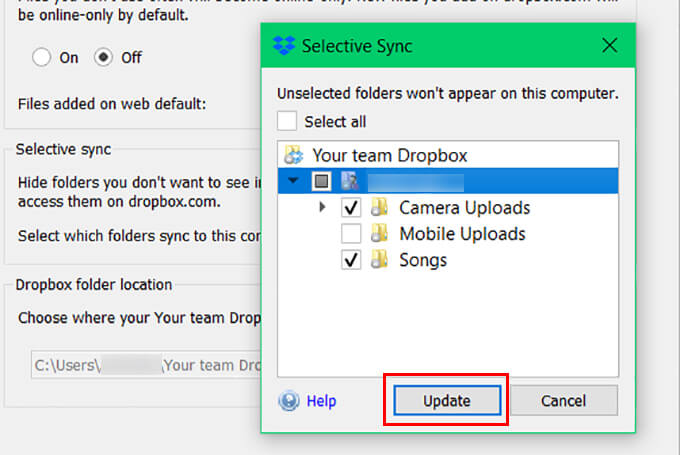
- Choose the folders you wish to sync with your computer and click “Update.”
- Click OK.

The Dropbox selective sync lets you choose the folders to appear on your PC from the dropbox drive. Although, you can still access other folders and data from the dropbox drive using your web browser. With the Dropbox Smart Sync and the Dropbox Selective Sync, it is now easier to sync your PC to the cloud and vice versa.
Also Read: How to Get the Best Out of Google Drive
Sync Desktop to Google Drive Using Google Backup and Sync
Google Drive has one of the best-in-class desktop sync experience with its Google Backup and Sync for Windows and Mac devices. The Google Backup and Sync feature is available for all the Google account users so that they can back up important files on the desktop to Google Drive and access them anytime. Instead of backing up files manually, the Backup and Sync feature from Google ensures the automatic sync of all your data from specific folders.
You can easily set up an auto-sync of your PC files to the Google Drive if you have a google account (Gmail account). Here is how to sync desktop to Google Drive using Google Backup and Sync app on Windows 10 PC.


- Download and install Google Backup and Sync on your Windows 10 PC.
- After installation, open the app and sign in using your Google account.

- From the next window, choose the folders you wish to sync with your Google Drive and click “Next.”
- Choose whether you want to make Google Drive files offline and click “Start.”

Google Drive will update in real-time with your files on the PC, and you can access them using any other device. The backed-up files will be stored under the “Computers” section on Google Drive.
Now you can sync your computer’s folders with your cloud accounts, including Google Drive and Dropbox. Therefore, you can avoid the fear of losing data, and can access them from anywhere using any device.


