
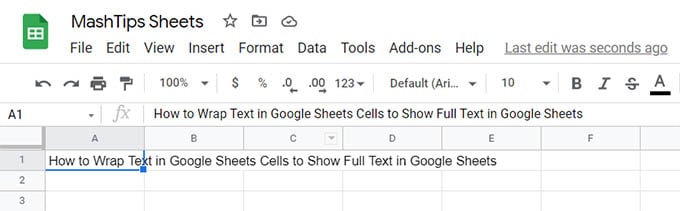
Google Sheets is pretty useful as an Excel sheet alternative. When you enter a long text or a link into a cell in Google Sheets, it usually overflows to the adjacent cells. It will then no longer show the full text in Google Sheets when the next cells get filled. This is really uncomfortable, and that’s why we have a solution to wrap text in Google Sheets cells quickly.
Let’s do this. We included two possible methods to tackle Google Sheets cells overflowing issue by wrapping text into the cell.
Why Google Sheets Not Showing Full Text in Cells?
Google Sheets bsically looks good when you enter small data. To avoid any confusion in the data entered, Google Sheets wrapping method is set to “overflow” by default. This lets the long texts to overflow the cells and to be shown in the next cells.

If you find this annoying and not helpful while doing your job, you can either wrap text in Google Sheets cell itself, or auto resize the rows or columns depends on the text length.
Related: How to Freeze Multiple Rows at Top in Google Sheets
Wrap Text in Google Sheets Cells
When you see a text is not fitting right inside a cell in Google Sheets, the first thing that comes to your mind may be resizing the whole rows or columns. Well, you can select all rows and columns at once and resize in bulk in Google Sheets. But this alone is not going to help you wrap a long text in Google Sheets cells. You should change the text wrapping option in Google Sheets first. For that,
Go to the Google Sheets file and select the cells you want to wrap the long text within the cells. In case you want to apply text wrapping for all cells, click the gray cell at the upper-left corner of the sheet (top-left of cell A1).

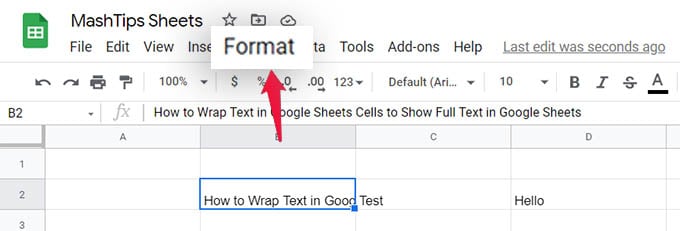
Now, click on the Format menu from the top menu bar.

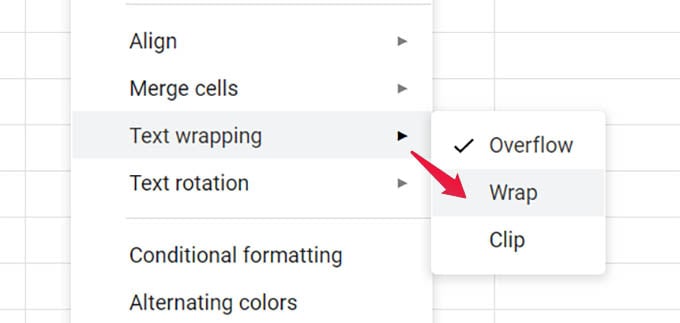
Go to Text Wrapping > Wrap to see the magic in action. Once you click and select the “Wrap” option there, all your overflown cell data will be wrapped within the cells themselves. If your cell has enough height, you can see the whole text in multiple lines, instead of broken data in a single line.
Related: How to Convert Rows to Columns in Google Sheets
Auto Resize Columns for Longer Text in Google Sheets
Not everyone is a fan of multiline data in excel sheets. Especially, if you are entering some codes, encryption keys, passwords or somethin in the Google Sheets, you would rather make it single line than in wrapped into multiple lines. In such cases, you can set columns to automatically resize depends on the text length.
If you ask me, well, I’m kind of dubious about this auto column resizing thing. That’s because if I enter a massive paragraph into Google Sheets, the whole column will be long-drawn-out than my screen width. If you really want this, here are the steps.
First, select columns you want to automatically resize depends on the text length. If you are not so sure about selecting the whole column, it is not just selecting all cells. To select a column in Google Sheets, click on the alphabets above the topmost row. Click and drag through multiple columns (top cells with alphabets on them) to select all of them at once.

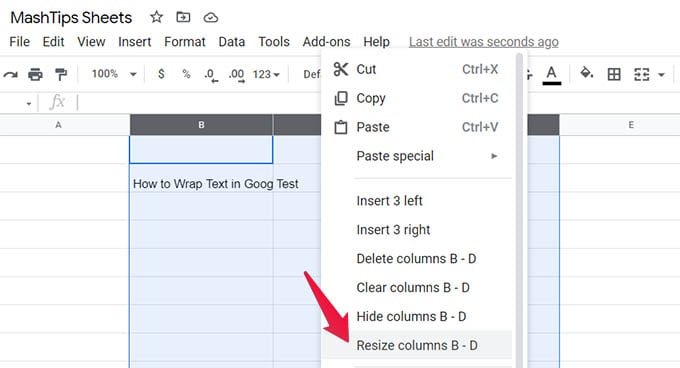
Once you selected the necessary columns, right-click anywhere inside the selection. From the menu, click on Resize Column(s).

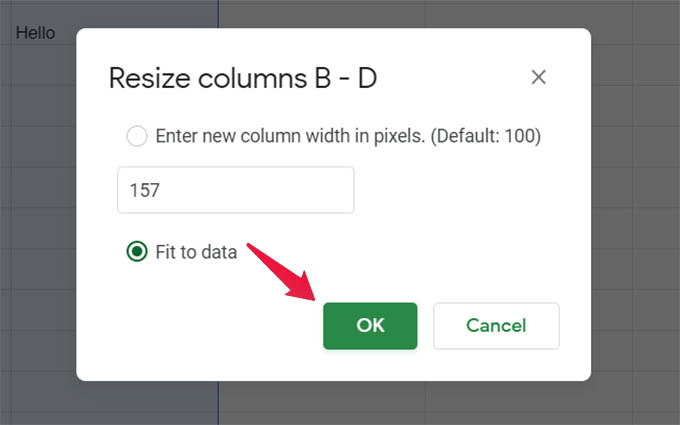
On the popup window, choose “Fit to Data” and click Ok.
There you go. Depends on the data you entered in the cells on the same column, it will show resize the column width automatically.
Auto Resize Rows in Google Sheets for Multiple Line Text
Resizing the column width or wrapping text inside the cell may be enough sometimes. In this case, you may be trying to enter multiple lines of text into a single cell. To wrap everything inside the cell and show all texts in Google Sheets, you can auto resize the row heights.
Auto resize row in Google Sheets is exactly the same as resizing columns automatically, except it is the cell height that changes here instead of the width. Let’s see how.
Select all the rows you want to auto-resize in Google Sheets depends on the text height. To select rows, click on the numbered cells in the left-most vertical gray pane. You can also click and drag to select multiple rows.

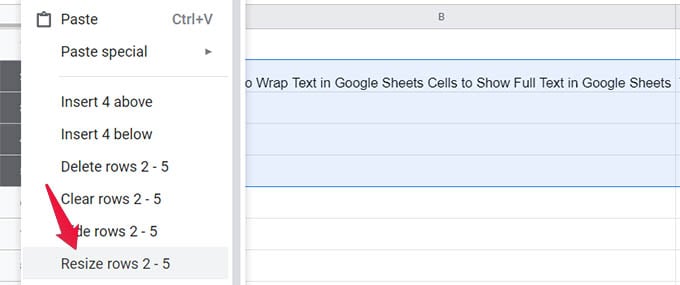
Now, right click within the selection and select Resize Row(s).


From the popup window, choose “Fit to Data” and then click Ok.
Just like the resized columns depends on the text length, auto-resized rows may not look overall. However, this is a brilliant way to wrap text in Google Sheet cells and show all text every time.
Related: Google Sheets Offline: Everything You Need to Know
Google Sheets have solutions to pretty much every issue you face. If you are just putting some information onto the Google Sheets table so that viewers can read them easily, the above brilliant methods will be good enough to wrap text in Google Sheets cells.


