
“Windows 10 is slow and takes too much time to boot up”, is becoming the everyday story of a normal Windows 10 user. You may be looking for the options to quick boot Windows 10 PC. Well, there are several things you can do to improve the performance and cut down the Windows 10 startup time.
In this article, we are going to show you a couple of tweaks and customizations to get back Windows 10 boot time on the right track. Let us go through the compiled list of top things you must do to speed up the startup procedures and fast boot Windows 10 as much as possible.
Disable Windows 10 Startup Programs
Windows startup apps or programs are the ones which load as soon as the system load the OS. These apps make a serious impact on the system performance since they are loading from the beginning and work in the background all the time. If you have a resource hungry app that load in the startup, that’s enough to make the system slow in the startup.
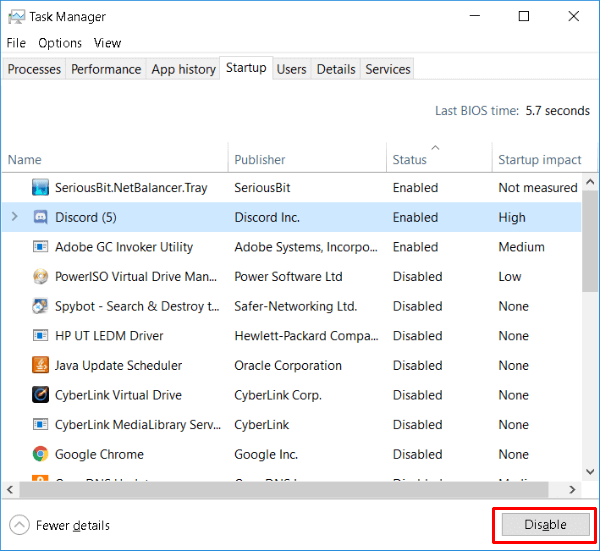

Let us go and see what are the apps set to start with Windows 10 login process that is called Windows 10 startup programs. Now, Press “Ctrl+Shift+Esc” or right click on the Windows icon and select Task Manager. Head over to the Startup tab in Task Manager. Here we will see a list of programs and their impact on startup. We can disable all the unnecessary programs that load with Windows startup. We recommend disabling as many as the programs from loading on startup. However, there are a few programs like mail app that supposed to load with Windows 10 and convenient to keep in the startup list.
Related: How to Reduce Data Usage on Windows 10?
Be aware that disabling a Windows 10 program will not disable the software completely. Windows will just prevent the app from launching at the startup and you can launch the app whenever you want by clicking on the application icon.
Cleanup Unwanted Programs and Files
There will be a lot of unwanted things in the device that may not be required at all like the temporary files or unused programs. It is better to clean up these things to make the device working better and boot faster. Windows 10, you can clean up both the files and apps with Disk Cleanup and Unwanted Apps Removal process.
Disk Cleanup to Clean Files
Windows 10 Disk cleanup we will focus on cleaning the temporary files, cache memory, thumbnails, recycle bin. Temporary files are the ones which hold information about any other file which gets created. When the system wants to recover any lost data, Windows will use these temporary saved files to recover information back. Cache memory is same as that of regular memory which is used to store data that is frequently accessing. This makes Windows OS faster to access as compared to the regular data access. And the last and least one is Recycle bin, that stores the files which are deleted by the user.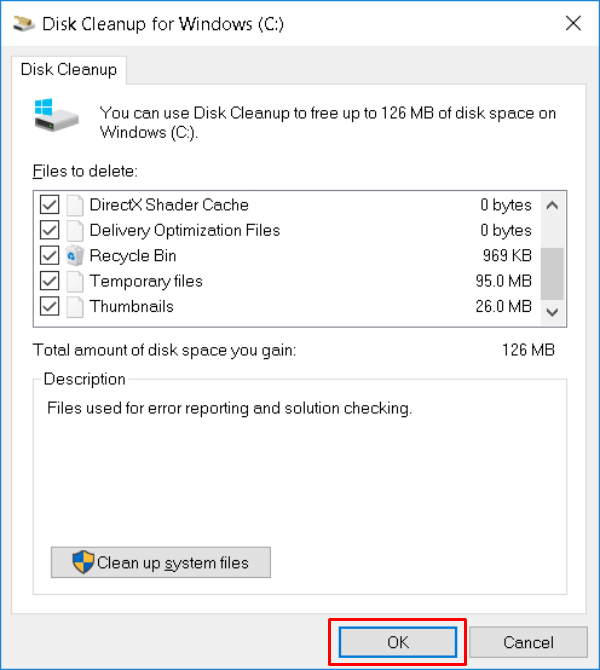

Click on Windows icon to search and type “Disk Cleanup”, press enter. You will get a new Windows for “Disk Cleanup: Drive Selection Window” Here Select Windows C (Drive) and click on OK. You will come across this screen. Check all the unwanted items and click on OK. A dialog box prompting to confirm for permanent file deletion will show up. Press on Delete Files. The Windows local disk cleanup will take about a few minutes depending on the junk you have in your Windows 10.
Related: How to Clean up Windows 10 to Gain Disk Space?
Remove Unwanted Programs
This featured is dedicated to uninstall all the bloatware and useless programs on Windows 10. Press Windows button and type “Add or remove programs” and press Enter. Look for any unwanted apps which you have never used and Uninstall those programs from Windows 10.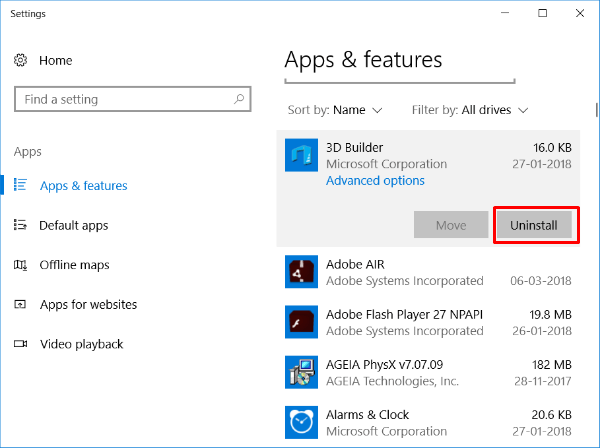

Once you clean up the OS unwanted programs and files, you may see the improvement in the performance. After you uninstall the unwanted programs, your system may have more resources released free to use for their applications on Windows. This will The uninstalling unwanted apps will enable faster windows 10 Boot time and more efficient operation.
Customize Visual Effects and Animations.
Windows 10 is well known for the best user interface screens, special effects, and animations. There is a trade-off between the performance and these special animations. Of course, these animations demand more CPU power and graphics card resources that may slow down the system. This is applicable for low config Windows system too. If you are the one don’t care about the special effects and want a better performance, you can disable all these animations and effects on Windows 10. This step might not be suitable for all users as it will make Windows look a bit out of visuals. If you are into Photo or video editing you may refrain to go further with this step.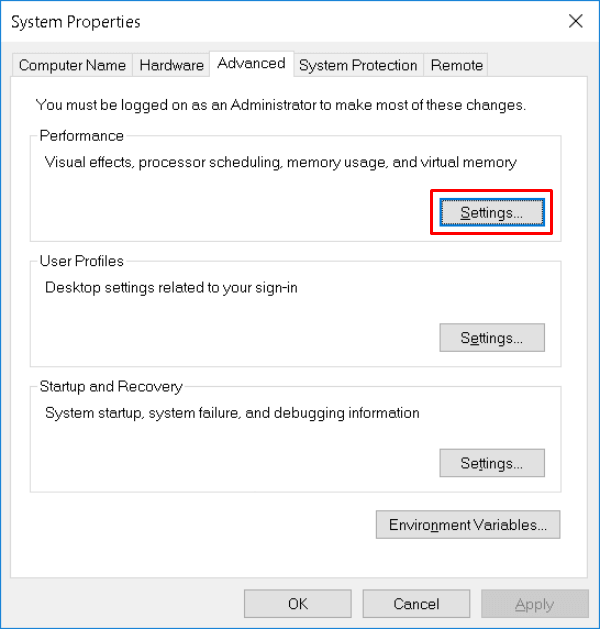

Click on the Windows button and type “Advanced system settings” and press enter. Under “performance” tab click on Settings. Now select “Adjust for best performance” then click on Apply and then press OK.
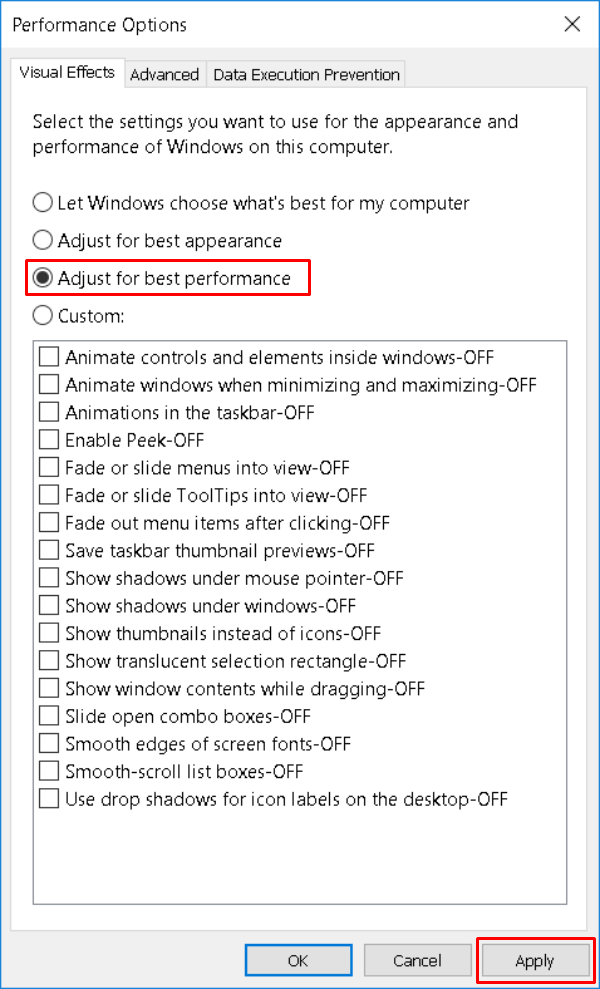

This is the simple one-click settings to get rid of animations on Windows 10 to improve the performance. Now you have successfully got rid of all the animations and extra visual effects which Windows 10 used to make it look good. This will improve Windows 10 Boot time and performance as well.
Customize Windows 10 for Maximum Speed.
We do not recommend this for a regular user. However, if you are really concerned about the Windows 10 fast Startup, go through this tweak that boosts the system performance. For those who are interested, we will explore these advanced options which will skyrocket Windows 10 performance and dramatically cut Windows 10 boot time.
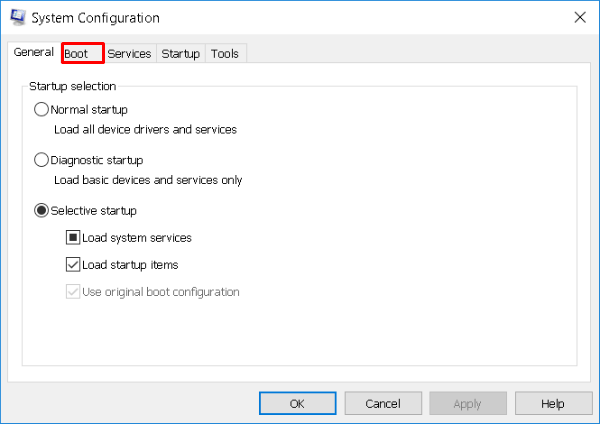

Press the Windows button and type “System Configuration” in the search bar and hit enter to load the Windows 10 System configuration. Now head over to the Boot Tab and click on “Advanced options”. Check “Number of processors:” and select the maximum number of processor on the system. Now, check “Maximum Memory:” and type the maximum amount of RAM you have. If you have 8GB RAM then type 8192, for 4GB RAM then type 4096 and type 20148 for 2GB RAM.
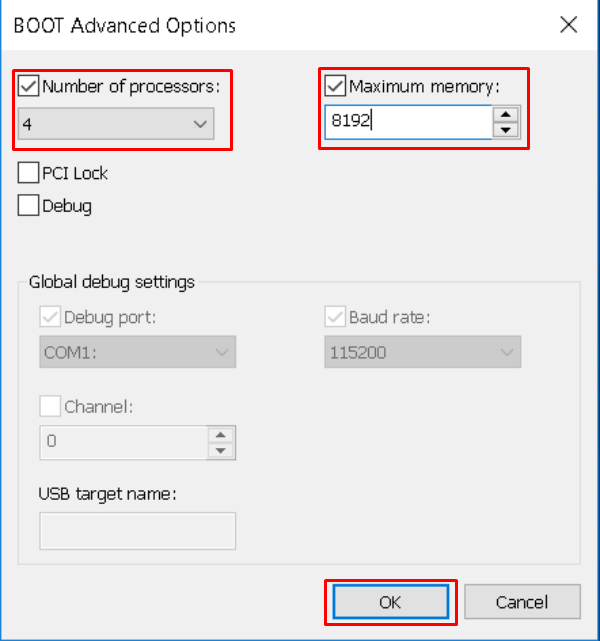

Those who don’t know the system memory size, you can check the amount of Memory you have on the computer. Press “Windows+R” button and type “DXDIAG” and hit enter. Now you will be able to see the Memory that your system detected and ready to use.
There is one more option to improve make fast boost Windows 10 by selecting the “No GUI boot”
This option will make the Windows 10 Logo or boot animation disappear. No GUI means you will have a black screen when you start your computer or laptop. Now in the “Timeout:” set it to 3 seconds. The default value for this is 30 seconds. This is for the Boot menu which you may see before the operating system loads.
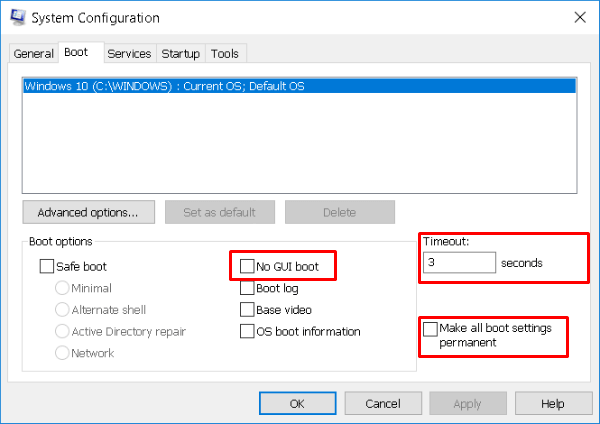
Check “Make all boot settings permanent” and click on Apply and click OK. Windows may ask to restart the system in order to make the above changes.
Turn On the Fast Startup
If you turn on this Fast Startup featured turned on, Windows 10 Boot time will change dramatically. When you enable this setting, Windows will save the current device state, which includes programs that are opened while turned on PC. With this setting enabled, all the previous programs will reload from this saved memory when the system reboot. Basically, Windows 10 will keep an image of the current status in the system memory and reload the OS to this state quickly.
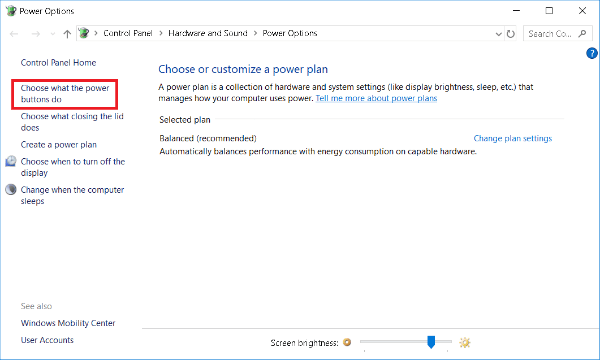

Press Windows button and type “Power and Sleep settings” in the search bar and hit enter. When this screen Power Option appears, click on “Additional power settings”. Now click on “Choose what the power buttons do”.
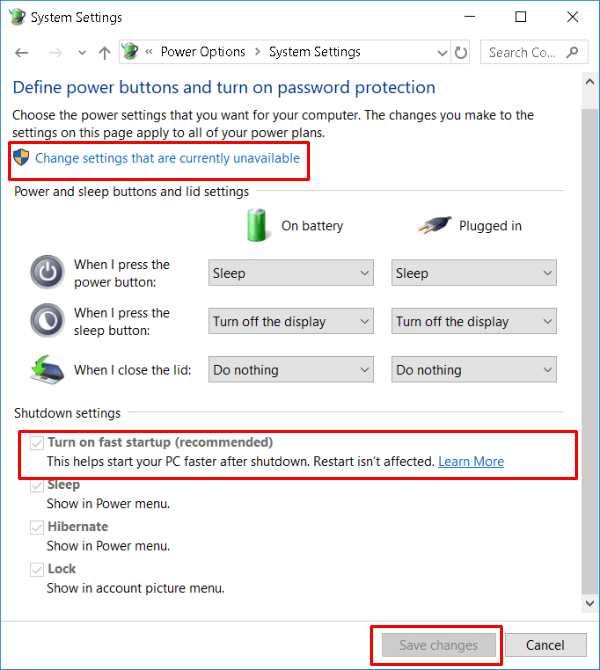
Now select “Change Settings that are currently unavailable” and check “Turn on fast startup”, and click on Save Changes.
Note: In case you have any difficulty while updating windows 10 then please turn this feature off. You can turn it on again after your Windows 10 updates.
Customize to Fast Boot Windows 10
Make sure to clean all the junk files from Windows 10 every week to make sure the best performance. Follow all the above-mentioned steps and select the convenient tweaks that work best for you. This will make sure your Windows 10 Boot time is as short as possible. With such tweaks and timely maintenance, you can make sure your Windows never lags when it comes about boot time and performance.


