
You might have heard a lot about eSIM on iPhone but have no idea how to get it or use it. Well, it is the same with most of us and hey, don’t worry, we got your back. We will demonstrate you how to get and how to use eSIM on your iPhone, without leaving any questions behind.
Here, we will guide you through how to get and use eSIM on iPhone you use.
Content
- What Is eSIM on iPhone
- What iPhone Models Support eSIM
- Convert Your Normal SIM Card to eSIM
- Add New eSIM on iPhone
- Add Multiple eSIM on iPhone
- Can You Use Multiple eSIMs on iPhone at A Time
- Label Your eSIM on iPhone
- Use eSIM as Default SIM on iPhone
- Remove eSIM from iPhone
- Reset iPhone without Removing eSIM
- Will I Lose eSIM If I Reset My iPhone
- Will I Lose eSIM If I Log Out of Apple ID on iPhone
- Where Do I Find My eSIM Number on My iPhone
- Transfer eSIM from Old iPhone to New iPhone
- What Are the Things to Be Careful About eSIM
What Is eSIM on iPhone
The eSIM or embedded SIM is the digital alternative for the physical SIM cards we use from cellular carriers. The physical SIM cards contain the configuration to activate your service and other information to connect to the network. On the other hand, eSIM lets you store the same information within your iPhone without even using a physical SIM card. That means, no need to eject the SIM tray to ‘insert’ eSIM on your iPhone.
Adding eSIM to your iPhone is just as easy as adding a new contact to your iPghone. but there is still some confusion when you set up a new eSIM on iPhone. Keep reading to clarify all your doubts.
What iPhone Models Support eSIM
Well, eSIM is pretty new to iPhones and there are only a handful of models that support eSIM configurations. Check if you have an eligible iPhone model here, before proceeding to get and install eSIM on your iPhone.
- iPhone XR
- iPhone XS
- iPhone XS Max
- iPhone 11
- iPhone 11 Pro
- iPhone 11 Pro Max
- iPhone 12
- iPhone 12 Mini
- iPhone 12 Pro
- iPhone 12 Pro Max
In case you are using older iPhone models like iPhone X, 8, 7 or older, bad luck. You cannot add or use eSIM with those older iPhone models.
Convert Your Normal Physical SIM Card to eSIM
As you might be thinking, eSIM is not a separately sold type of SIM card. You can convert your existing physical SIM cards into eSIMs easily, depends on your carrier. Some carriers allow easy conversion with their app, while some require direct in-store visits to help you with eSIM on iPhone.
First of all, check with your carrier’s website to know more about converting physical SIM cards to eSIM for iPhone. These are some possible methods you will have to approach in order to initiate eSIM conversion.
- SMS or text message the carrier service (with some carrier-specific codes) to activate eSIM. This will probably get yourself the eSIM configuration in your mail.
- Email the service provider with a request to change physical SIM cards into eSIMs.
- Use the carrier’s app to select the option to convert a SIM card.
- Visit the nearest store of your carrier to get clarification and an instant solution for converting into eSIM.
Procedures depend on the carrier and you will have to follow the method they prefer to convert physical SIM to eSIM. Also, here are the methods to convert popular carrier physical SIM cards to eSIM in the U.S, India, and the UK.
- T-Mobile Postpaid (U.S): Visit the nearest T-Mobile store.
- T-Mobile Prepaid (U.S): Download and use T-Mobile eSIM App.
- Verizon (U.S): Contact Verizon Wireless customer support.
- AT&T (U.S): Visit AT&T eSIM activation kit online or at the nearest AT&T store.
- Airtel (India): SMS eSIM<>registered email id to 121.
- Jio (India): Visit the nearest Reliance Jio store with ID proof.
- Vi India (India): SMS eSIM< space >registered email id to 199.
- EE (UK): Order new eSIM from EE accounts. Or, call “150” from EE phone.
- O2 (UK): Request a SIM swap on the O2 website.
- Three (UK): Dial 333 from your network.
- Vodafone (UK): Switch to eSIM from the Vodafone website.
Drop a comment if you are confused about how to convert your physical SIM to eSIM from another carrier.
Add New eSIM on iPhone
Once you finish converting your physical SIM card to an eSIM, things are easier. You will get a barcode or QR Code that contains the configuration information to add a new eSIM to your iPhone. You just need to scan the same to add the eSIM to iPhone.
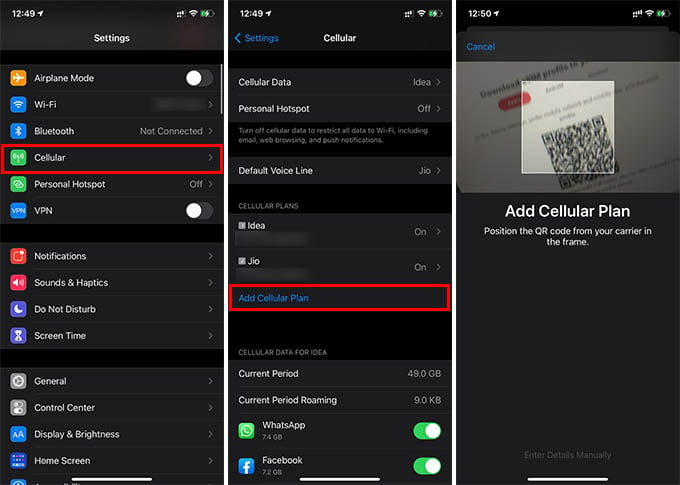

- Open Settings on the iPhone.
- Go to the Cellular option.
- Tap Add Cellular Plan.
- Scan the QR Code you got.
If you have the information instead of a QR code, tap the “Enter Details Manually” option at the bottom. Enter your eSIM details and confirm with the carrier to activate eSIM on iPhone.
Add Multiple eSIM on iPhone
The number of physical SIM cards you can insert on an iPhone depends on the number of slots it has. Generally, the iPhone has a single physical SIM slot. The second line is dedicated to eSIM. As said above, eSIM is the SIM card information stored on your iPhone without using a physical card. That being said, it is possible to add multiple eSIM on iPhone even when a physical SIm and an eSIM already exist. Here is how.
- Get the additional eSIM QR code by going through the carrier procedures.
- Now, open Settings on your iPhone and go to Cellular.
- Tap Add Cellular Plan option.
- Scan the given QR code to add the extra eSIM on your iPhone.
There you go, you have an extra eSIM added to your iPhone.
Related: How to Lock SIM with PIN on iPhone?
Can You Use Multiple eSIMs on iPhone at A Time
You can easily add multiple eSIM to your iPhone. But, standby is limited to one eSIM at a time. You can switch between both eSIMs whenever you want while using an extra physical SIM card at the same time. You can use eSIM and Physical SIM at a time, but not two eSIM at a time. Here is an eSIM compatibility chart for iPhone to understand how it works.
| eSIM Standby Mode on iPhone | Yes/No |
|---|---|
| eSIM Only | Yes |
| Physical SIM Only | Yes |
| eSIM + Physical SIM | Yes |
| eSIM + eSIM | No |
| eSIM + eSIM + Physical SIM | No |
Label Your eSIM on iPhone
When you have both eSIM and the physical SIM on standby at a time, it will be difficult to make calls from a specific line. It is better to label your eSIM and physical SIM to identify them easily. Also, you can quickly identify which line is receiving calls when you label the second line.
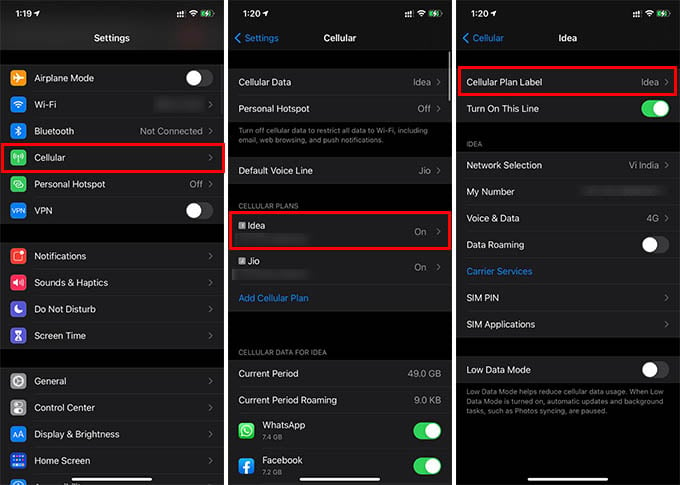
- Open Settings and go to Cellular on iPhone.
- Select your eSIM from the list under “CELLULAR PLANS.”
- Tap on “Cellular Plan Label” at the top.
- Select a label or add a custom label for your eSIM.
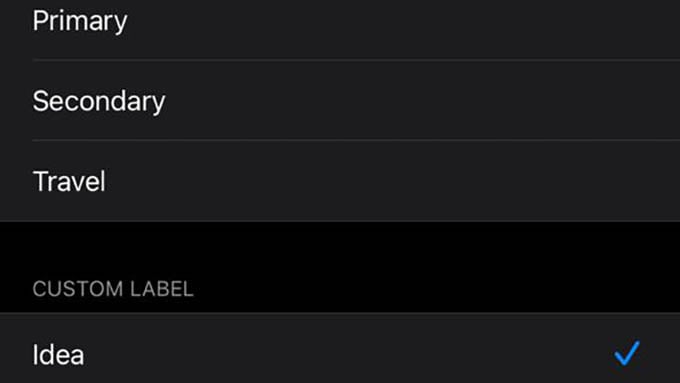

You will see the first letter of the label you selected when you make or receive calls with the same line.
Related: How to Update iPhone without WiFi Using Cellular Data
Use eSIM as Default SIM on iPhone
Do you want to switch from your physical SIM to eSIM as the default voice and cellular line? iPhone allows you to change default SIM from physical one to eSIM and vice versa whenever you want.

- Open iPhone Settings.
- Go to Cellular settings.
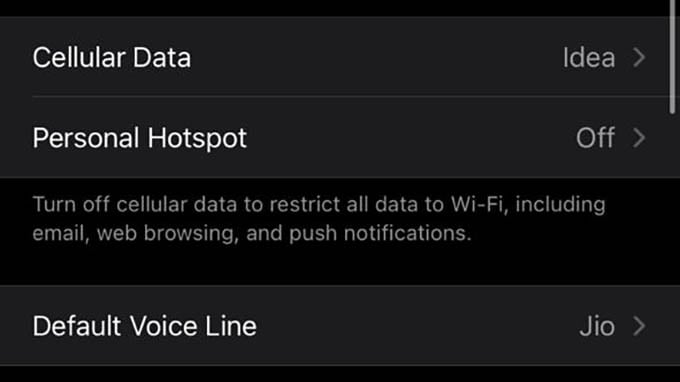
- To set eSIM as the default cellular line, choose “Cellular Data” and select your eSIM.
- To change the default calling SIM, tap on “Default Voice Line” and choose your eSIM.

You can switch the default options back to physical SIM from eSIM anytime later. Plus, enabling the “Allow Cellular Data Switching” option in “Cellular Data” will let the iPhone switch automatically between both lines while using cellular data.
Remove eSIM from iPhone
Removing or swapping SIM cards is easy with physical SIM cards. You just need the SIM tray eject pin to take it out. Well, removing the eSIM plan from your iPhone is even easier. See how.
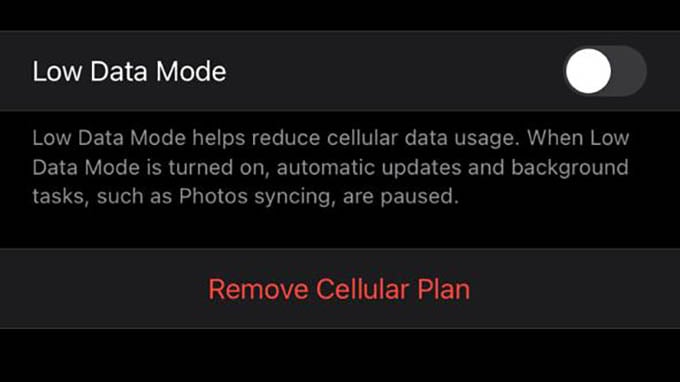
- Go to iPhone Settings > Cellular.
- Open the eSIM plan from the screen.
- Tap “Remove Cellular Plan” at the bottom.
- Confirm to remove eSIM from iPhone.
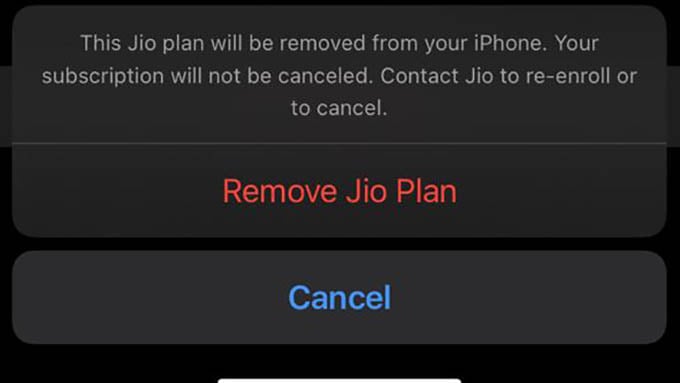
This is literally like removing the physical SIM from your iPhone, except you cannot insert it into another phone without the cellular plan QR code.
Related: Check These iOS 14 Privacy & Security Features to Secure Your iPhone
Reset iPhone without Removing eSIM
Admit it. We all mess up with the settings of our iPhone so that we are forced to factory rest settings. It will mostly lose your data, including eSIM added. To reset your iPhone without removing eSIM,


- Open Settings and go to General.
- Scroll down and tap “Reset.”
- Choose the option “Reset All Settings.”
You can also check out our guide to reset iPhone without losing data for a better idea.
Will I Lose eSIM If I Reset My iPhone
When you reset your iPhone to factory settings including data wipe, it will remove eSIM too. If you want to reset your iPhone without losing eSIM, see the steps described above.
If you still choose to reset your iPhone including data and settings, make sure you have the backup QR code to configure the eSIM again on your iPhone once you set it up fresh.
Will I Lose eSIM If I Log Out of Apple ID on iPhone
No, you will lose your eSIMs from your iPhone even if you log out or switch your Apple ID. It does not affect the eSIM you use. The eSIM on iPhone is embedded to your iPhone and not the iCloud or Apple ID.
Where Do I Find My eSIM Number on My iPhone
If you just added a new eSIM to iPhone and are unsure about its number, try out any of these methods.
- From your iPhone, go to Settings > Cellular and select the SIM card to find the number on it.
- Dial from your phone to your friend’s phone or a secondary device to find the eSIM number.
- Ask Siri “what is my number.”
Transfer eSIM from Old iPhone to New iPhone
If you just bought a new iPhone and want to transfer the eSIM from older one to the new iPhone, it is easy. You can do as follows after signing the new iPhone in with the same Apple ID as the old one.
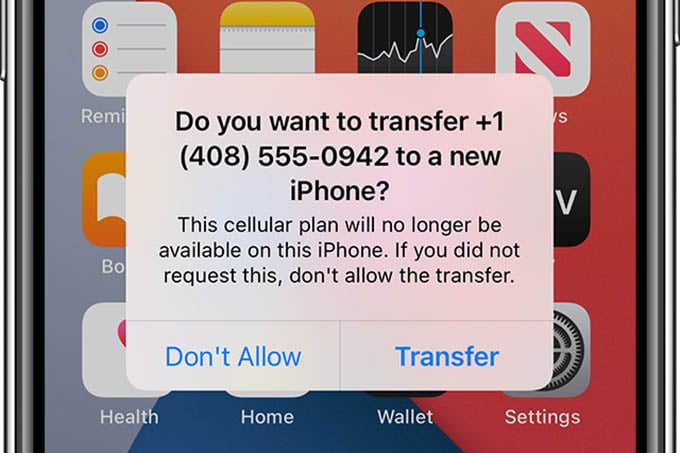

- Place both iPhones nearby.
- From the new iPhone, go to Settings > Cellular > Add Cellular Plan.
- Check for a prompt on your old iPhone to transfer eSIM.
- Choose “Transfer” on the old iPhone.
- Follow the on screen methods on your new iPhone to finish setting up eSIM from old iPhone.
What Are the Things to Be Careful About eSIM
Although the eSIM are easy to handle and carry, it comes with some risk factors. Since eSIM is a digitally saved data, fraudsters or hackers can steal your eSIM by scamming you in different ways. Here are some things to be aware of while setting up eSIM on iPhone.
- Be cautious before resetting your iPhone. It will remove eSIM from iPhone.
- Network Reset will erase the eSIM added to your iPhone.
- Beware of fraudsters who call for your OTPs (especially, keep an eye on phones used by elderly people). Those OTPs might be for activating eSIMs and hackers will own your eSIM if you compromise your OTPs and passwords. That’s a huge risk.
- Accidentally removing eSIM will cost you some time to activate a new one and add it to the iPhone.
- It is not easy to switch your phone often.
Hope you now have a cleared idea about getting and setting up eSIM on iPhone. You can add eSIM from your carrier if they spport the same, and even convert your old SIM card into eSIM as we discussed here.


