
You don’t have to wait for the Android Pie update to get navigation gestures. Even users who do have the update but prefer full-screen gestures instead of the navigation bar can now get them on their Android devices. Everyone in the Android world has been implementing their own versions of navigation gestures. Why? Because OEMs were smart enough to realize a lot of users will now want full-screen navigation gestures on their Android devices.
There are plenty of apps out there on the Play Store that let users get full-screen navigation gestures on any Android device.
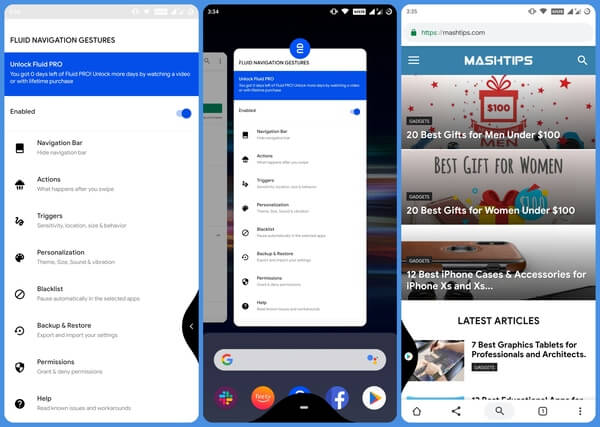
Fluid Navigation Gestures for Android
Fluid Navigation Gestures is a small app by Francisco Barroso that brings full-screen navigation gestures to any Android device as long as it runs Android 5.1 Lollipop or above. There are many apps that try to emulate iPhone-like gestures, or something similar. This app has a unique approach and quite unique animations that make it a personal favorite. Apart from the impressive functionality, the app is also pretty light at just 4.9 MB before installation.

Not only navigation, but the app also lets you perform various other actions using gestures, like launching an app. That is in addition to the gestures used for navigation. There are a total of 10 different actions that you can perform, based on just 2 kinds of swipe gestures. You can swipe, or you can swipe and hold but you can do this from 5 different places on your screen. Combined, this lets you go home, back, to recent apps, toggle split screen, notifications, power dialog, quick settings & keyboard selector, use voice search, or launch the Google search overlay, assistant, apps & shortcuts.
The navigation gestures are very much inspired by the full-screen gestures of Xiaomi’s MIUI and OnePlus Oxygen OS.
Install Fluid Navigation Gestures from Play Store
Grant “Write Secure Settings” Permission
Before you can go ahead and use the app, there’s something you need to take care of. To provide a full-screen experience, the app needs to hide the navigation bar. These days, even Samsung phones have navigation bars.
It’s basically necessary to hide it regardless of which phone you have. However, it is an essential part of the Android interface and the OS doesn’t just allow any app to hide it. We can use ADB (Android Debugging Bridge) to grant the app elevated privileges though. Thus, allowing it the permission it needs to hide or show the navigation bar.
Install ADB on PC
You’ll need a computer with ADB installed. If this is the first time, you are dealing with Android Debug Bridge (ADB) command-line tool, please follow the steps based on your operating system. There are two methods each for downloading and installing ADB and fastboot on Windows and Linux. You can add it to either the Operating System path or a specific directory. If you need any help in installing or setting it up, you can check out the guide we’ve published to install ADB and Fastboot on Windows, Mac & Linux.
Enable USB Debugging on Android
When you have it installed, enable USB debugging on your Android device. The option to enable USB debugging can be found under Settings > Developer options or Settings > System > Developer options if you’re using Android 8.0 or above. The location of Developer options can also vary if your device runs a heavily customized skin on top of Android, such as MIUI.
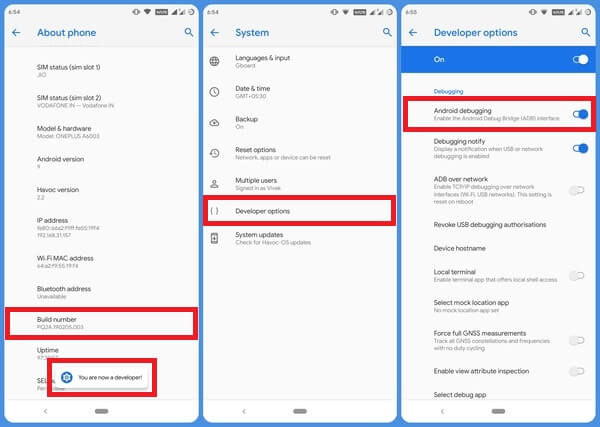

Moreover, Developer options are hidden by default, for they’re not meant to be used by normal users. You can easily enable them by going to About phone and tapping the Build number 7 times in quick succession. Thereafter, you should see a toast message that says, “You are now a developer!”. This will enable Developer options in the settings.
Use ADB to Grant “Write Secure Settings” Permission
You may be a developer but you still need to grant that permission to get the full-screen navigation gestures. Now connect your Android device to your computer with a USB cable.
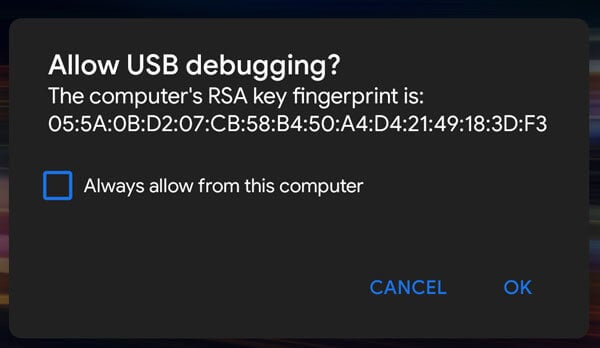

You should now see a prompt on your phone to allow USB debugging permission to your computer. If it doesn’t already, you can push the following command in ADB to trigger the prompt manually.
adb devices
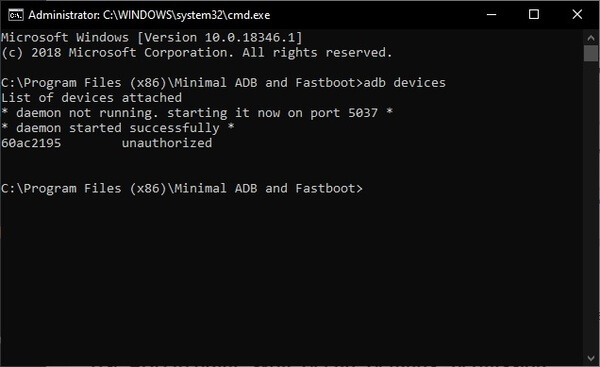

If you’ve granted the necessary permission, the above command should return your device’s serial number as you can see in the screenshot above. This also means that your device is properly connected and detected. On Windows, it might be necessary to manually install your device’s USB drivers. Otherwise, ADB might not be able to detect your device.
With all that out of the way, we can finally grant the Write Secure Settings permission to Fluid Navigation Gestures. Simply copy and paste or type out the command given below into adb and hit enter.
adb shell pm grant com.fb.fluid android.permission.WRITE_SECURE_SETTINGS
If you’re using a Mac or a Linux distro that’s not Ubuntu or its derivative, you’ll have to place a ./ before the command.
./adb shell pm grant com.fb.fluid android.permission.WRITE_SECURE_SETTINGS
With the permission granted, go ahead and launch the app on your Android device.
Enable Full-Screen Navigation Gestures
Your job of granting the app necessary permissions isn’t yet done. For it to function it still requires at least a couple more permissions. These are the permission to Draw over other apps and the permission to use Accessibility service.
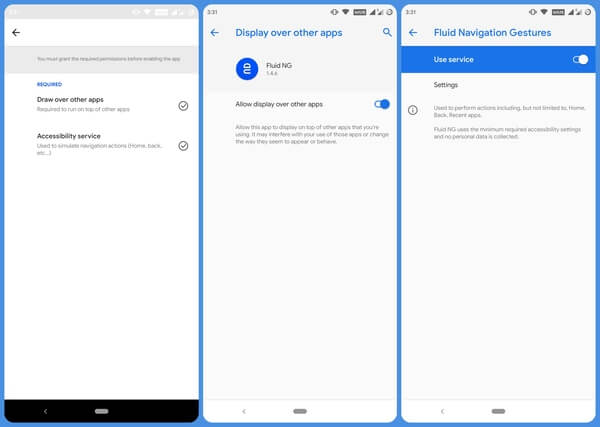
Go ahead and toggle on the first toggle inside the app labeled Enable and you’ll be asked to allow these permissions. Tap on one of the permissions and the app will redirect you to the respective Settings page where it can be granted. Similarly, also allow the other permission and go back to the main screen.
You’ll notice the navigation bar on your device is probably still visible. You can hide it by going to Navigation bar in the app. Your full-screen navigation gestures are ready and working already. You can try swiping from the left or right edge of your screen to go back. Swiping longer will take you to the previous app. Similarly, swiping upwards from the bottom-left of the screen, where the back button used to be, will trigger the back action. Swiping up from the center will take you home while swiping up longer from the center will take you to the recent app menu.
Configure your Full-Screen Navigation Gestures
You can change these default actions in the Actions menu inside the app. Not only that but you can also add additional actions as well as add another place to perform the swipe gesture.
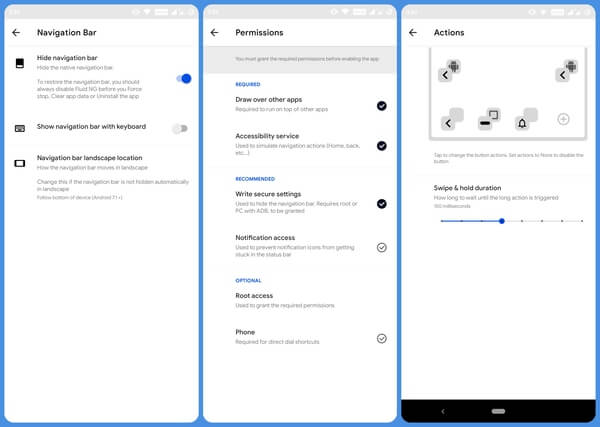
There are many more things you can change such as the trigger sensitivity, and you can check out a list of all the required permissions and reasons for why they’re needed in the Permissions section of the app. Users can blacklist apps so that when certain apps are opened, navigation gestures will be disabled and the navigation bar will be made visible.
This can be useful in apps that don’t play nice with Fluid navigation gestures or full-screen apps and games. To personalize the gestures with colors of your choice, you’ll have to buy the pro version. However, most of the other features of the app are free to use.
Get Full-Screen Navigation Gestures on Android
Apple is by no means the inventor of navigation gestures, by the way. Navigation gestures have existed on touch screen devices for quite some time. There have been many Android apps, and custom ROMs even, that have tried to get rid of the navigation bar in favor of gestures. Being third-party implementations, and raw ideas, they never gained much popularity. But then Apple adopted it, perfected it and popularized it. Except for Google’s implementation in Android Pie, almost every OEM has opted for full-screen gestures.


