
If you have to look after kids who are well versed with playing games on iPhone or iPad, you would have thought at least once about blocking certain content for them. However, it might not be possible to block all the contents by turning off Wi-Fi or Mobile Data. What you need is a complete lockdown, which does not allow your children to move on to other unnecessary parts of your device. Apple did a really good job with the Guided Access feature that helps you attain Parental Control.
In this article, we will guide you on how to get more parental control on your iPhone or iPad by using the Guided Access method.
- What is Guided Access on iPhone for?
- How to Use Guided Access on iPhone?
- How to Exit the Guided Access Mode?
- Set Timer for Guided Access
- Change Passcode and Enable FaceID for Guided Access
- Auto-Lock iPhone During Guided Access
What is Guided Access on iPhone for?
The Guided Access feature on iPhone helps parents or the device owner to set a limit on the screen areas which others can use, especially kids. You can disable functions and touch sensing on any parts of the screen by just drawing on the area you want to block. Once you enable it, children or even any other users might not be able to get out of it without entering the passcode.
The guided access locks up the user within an app, and blocks from switching to any other app. This also lets you disable the usage of side buttons, volume rockers, and other basic functionality in order to avoid a break-in. As a parent, you must be already convinced about the feature on your iPhone or iPad. Then, let us move on to see how to enable and use the Guided Access on iPhone or iPad.
How to Use Guided Access on iPhone?
The Guided Access feature on iOS devices stays under the Accessibility options, which makes it lesser-known among most of the iPhone users. In order to start using the feature from any app, you need to add the Guided Access icon to your Control Center. Follow the steps to add the Guided Access icon to the Control Center on your iPhone.
![]()

- Launch the Settings app on iOS.
- Tap “Control Center.”
- Tap “Customize Controls.”
- Scroll down and add “Guided Access.”
If you just added the Guided Access shortcut icon on the Control Center, you can now start using the feature from any app. You cannot use the Guided Access on the Home page or other system apps. Follow the steps to start Guided Access on iPhone or iPad.

- Open any third-party or non-system apps.
- Pull down or pull up (on older models) the control center on your iPhone.
- Tap the “Guided Access” icon (Padlock with a dotted square around).
- Draw the areas you want to disable on the screen from the next window.
- Tap Start.
- If you are using the Guided Access for the first time you need to set a Passcode to exit from the restricted mode.
- In case you have already set a passcode, remember the same to get out of the Guided Access view.
YouTube Parental Control: How to Block YouTube Channels and Videos
How to Exit the Guided Access Mode?
The Guided access mode blocks the users from minimizing or switching from the current app. Also, the blocked portions of the screen will not be used for doing any actions, but to view. Therefore, the side button on your iPhone is used for exiting from the Guided Access mode.
- Triple-click the side button (lock button) on your iPhone while on Guided Access.
- Enter your passcode to exit.
- If you want to resume the Guided session, tap “Resume” button,
- Otherwise, tap “End.”
The normal app window will reappear and you can use it without restrictions.
Related: Do Not Disturb: How to Use DND on iPhone and Hidden Features.
Set Timer for Guided Access
The Guided Access feature basically sets the screen space limit for the users, and children can use the same app continuously for hours. Are you looking to limit the time in which your little child can use your iPhone or play games? Yes, it is possible to set a timer for Guided Access on your iPhone. Here is how.
- Open an app and go to the Control Center of your iPhone.
- Tap the Guided Access icon.
- Select the area you want to gray mark to block usage.
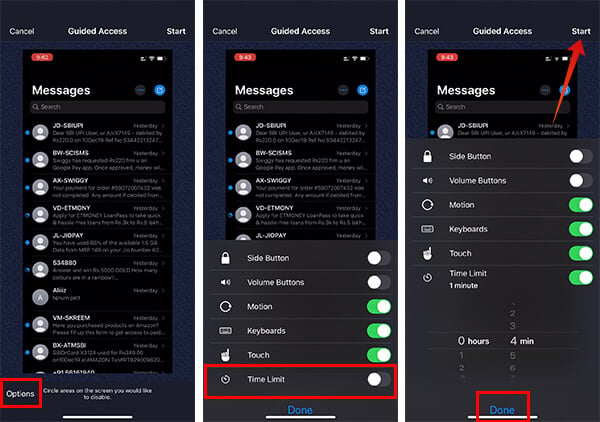
- Tap “Options” at the right bottom corner of the screen.
- you can toggle on “Time Limit” and choose a time that you want to limit the smartphone usage.
- Tap “Start.”
After you enable the timelimit, the device will block the usage past the limit and you will have to exit the Guided Access mode by entering the passcode to bring it back to normal. You can also choose other options like screen rotation, side button, etc. from the “Options.”
Change Passcode and Enable FaceID for Guided Access
Once you set the passcode for the Guided Access, the same will be used further. if your children already got to know about the passcode, it is better to change from the Settings. Here is how.
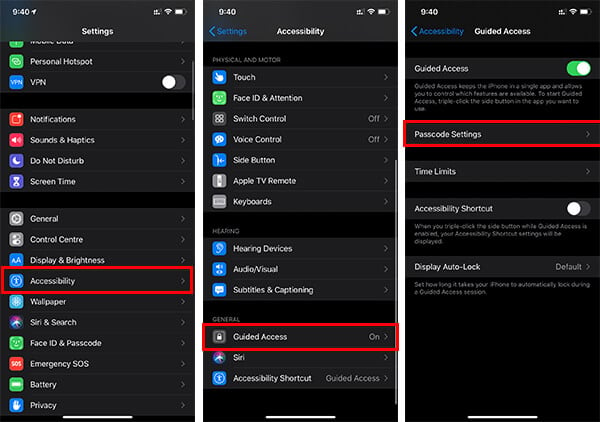
- Open Settings app on iPhone or iPad.
- Select “Accessibility.”
- Scroll down and enter “Guided Access.”
- Tap “Passcode Settings.”
- If you want to change the previous passcode, tap “Set Guided Access Passcode.”
- Toggle on “Face ID” if you want to exit from restricted instantly by using the Face ID.
The passcode you just set will be used further in the Guided Access mode.
Auto-Lock iPhone During Guided Access
You r iPhone will have a default auto screen-lock time limit while in normal mode. However, it does not apply for the Guided Access mode. In case you want to set an auto-lock duration due to inaction, you can set it separately for Guided Access from Settings. Follow the method below.
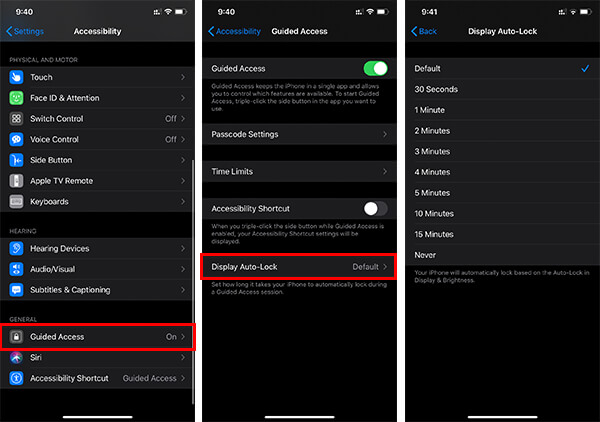
- Open the Settings app on your iOS device.
- Navigate to Accessibility > Guided Access.
- Tap “Display Auto-Lock.”
- If you want to change the default time limit before auto-lock, choose any other options. You can also choose “Never” to avoid the auto-screen lock.
This one single feature on iPhone and iPad allows you to control the smartphone usage by your children to a large extent. Since they will not have access to any other options of the device outside the app, you do not have to worry once you handover the phone to them by enabling the “Guided Access” feature.


