
Till iOS12, the Reminder app was one of the less popular native iOS apps due to its limited functionality. However, Apple has completely re-designed the Reminder app in its iOS 13/iPadOS by adding a bunch of new features including the option to share and view reminders across all iOS devices and Mac. Let’s take a detailed look at the various features of the new Reminder app on iPadOS.
Content
- How to Create a Reminder on iPad
- How to Create a New List in Reminder on iPad
- How to Customize Reminders on iPad
- How to Group Reminder Lists on iPad
- How to Flag a Reminder on iPad
- How to Create Reminders from Mail on iPad
- How to Create Reminders from Safari on iPad
- How to Create Reminders from Mail on iPad
- How to Share Reminders on iPad
- How to Delete Reminders on iPad
How to Create a Reminder on iPad
Well, creating a reminder is not something new on iOS 13/iPadOS. However, you will find some changes in menu or navigation options, if you had used the reminder app in earlier iOS versions. For example, on launching the app you will see four sections titled Today, Scheduled, All and Flagged whereas, in iOS 12, you will see only one section titled Scheduled. Likewise, you will find a lot of new things in the iOS 13/iPadOS reminders app.
Now, let’s see how to create a reminder on your iPad.

- Launch Reminders app from your home screen.
- During its first launch after upgrading to iOS 13/iPadOS, you will see two options: Upgrade Now, Upgrade Later. In case you own a Mac, tap Upgrade Later as the macOS Catalina is yet to be released. Otherwise, you can tap Upgrade Now.
- Under My Lists, tap Reminder.
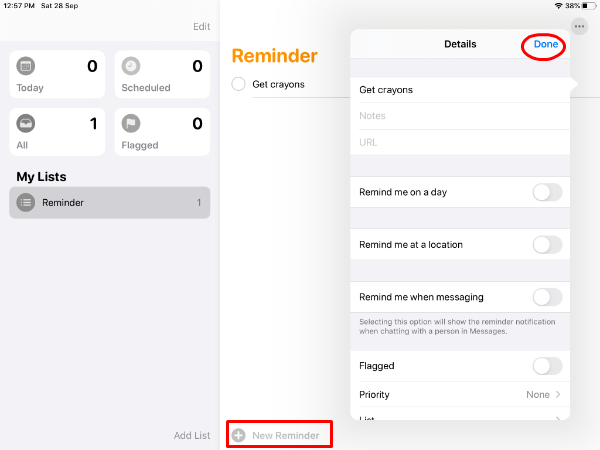
- Tap New Reminder located on the bottom.
- Type your reminder text or use the Microphone icon on the keyword to speak the text. (eg. Get crayons)
- Tap “i” icon on the right.
- You will see a window titled Details with a list of options.
- Tap Notes to add some notes. If you would like to add a website or a page URL, then tap URL. Otherwise, you can skip this step.
- Toggle the switch titled Remind me on a day to the right to set a date for your reminder.
- Tap Alarm to select the date for your reminder.
- Toggle the switch Remind me at a time to the right to set a time for your reminder.
- Tap Alarm to set your desired time.
- Tap Done.
That’s it. Now, you have successfully created a simple reminder. Apple allows adding a lot of customizations to your reminder, which we will see in the upcoming sections.
How to Create a New List in Reminder on iPad
Are you someone who would like to create reminders for a lot of things like shopping, work, health and more? Then, you can better organize your reminders by putting them under relevant lists. For example, if you would like to be reminded of buying a crayon set for your kid, you can create a list named Shopping and add a reminder under that. Let’s see how to do that.
- Launch Reminders app.
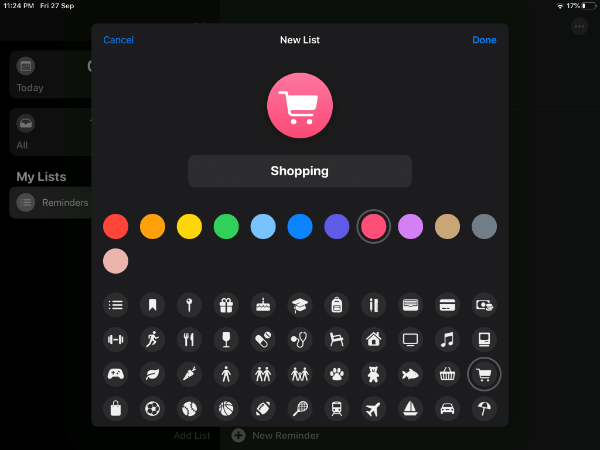
- Tap Add list located on the bottom.
- Enter the name for your list. (eg. Shopping) and tap Done on your iPad keyboard.
- Next, tap a relevant icon (eg.Shopping) and select a color for the newly created list.
- Tap Done.
Repeat Steps 2 to 5 to create as many lists as you like. Selecting a unique color and icon will help you to quickly identify and retrieve a particular list. This feature will be helpful to easily manage multiple lists.
Add New Reminder to List
Now, its time to create a reminder on a particular list.
- Under My Lists, tap the list name (eg. Shopping) under which you would like to create a new reminder.
- Under My Lists, tap Reminder.
- Tap New Reminder located on the bottom.
- Type your reminder text or use the Microphone icon on the keyword to speak the text. (eg. Get crayons)
- Tap “i” icon on the right.
- You will see a window titled Details with a list of options.
- Tap Notes to add some notes. If you would like to add a website or a page URL, then tap URL. Otherwise, you can skip this step.
- Toggle the switch titled Remind me on a day to the right to set a date for your reminder.
- Tap Alarm to select the date for your reminder.
- Toggle the switch Remind me at a time to the right to set a time for your reminder.
- Tap Alarm to set your desired time.
- Tap Done.
Add Existing Reminder to List
Have you created reminders before creating the list? No worries. You can easily move reminders to a list whenever you need it.
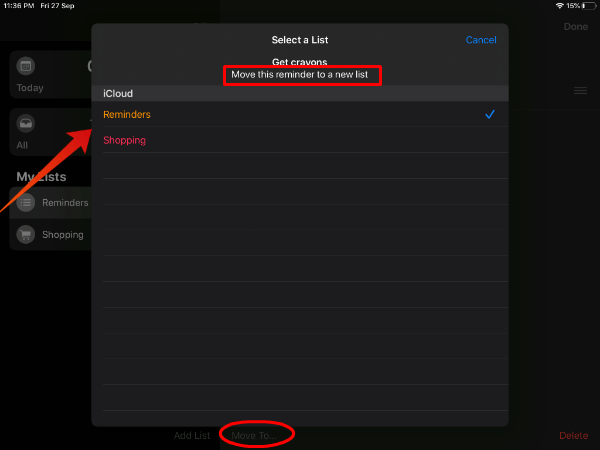
- Under My Lists, tap Reminders.
- Tap three-dot icon on the top right and tap Select Reminders…
- Tap on the reminder you need to move.
- Next, tap Move To… located at the bottom.
- Tap the list under which you wish to move the reminder.
That’s it. Likewise, you can quickly move any number of reminders from one list to another.
How to Customize Reminders on iPad
Apple has added a bunch of customization options to its reminder app on iOS 13/iPadOS. Let’s take a look at them one by one. (Some of these features already exist. It’s just that either their location got changed or underwent some minor changes)
Set Priority Levels
You can set three priority levels for your reminder: Low, Medium, High. If you set a high priority for your reminder, then you will see a !!! symbol near your reminder text. For low priority, it will be ! and !! for Medium priority. To set the priority level, follow the below steps.
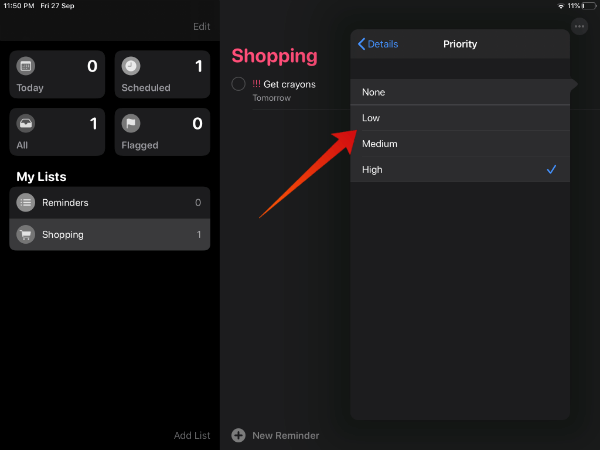
- Under My Lists, select the reminder for which you would like to set priority.
- Tap “i” icon on the right.
- Scroll down and tap Priority.
- Tap any of the three levels Low, Medium, High. In case you don’t wish to set any priority, then tap None.
Location-based Reminders
This feature will be especially helpful if you would like to be reminded of something at a particular location or while getting in/out of your car. Let’s assume that you wish to add a reminder to get Crayons whenever you visit Walmart.
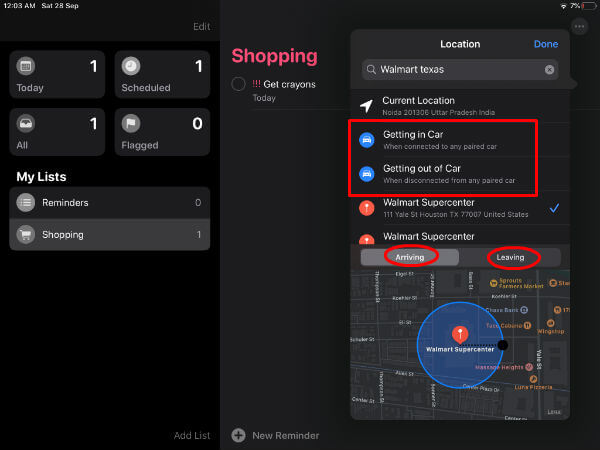
- Under My Lists, select the reminder (eg.Get Crayons) for which you need to add location.
- Tap Location icon located on the left of your iPad keyboard.
- Tap Custom.
- Enter or search the address of the location (eg. Walmart).
- Tap Arriving or Leaving so that you will get a reminder when you arrive at or leave the location.
- Tap Done.
Adding People to Reminders
This is another interesting feature. Let’s imagine that you wish to send a birthday gift to your friend. And, you forget to ask her address every time you chat with her. Now, if you create a reminder “get address” and add your friend on that, then iOS will automatically remind you whenever you send a message to her. Let’s see how to do that.
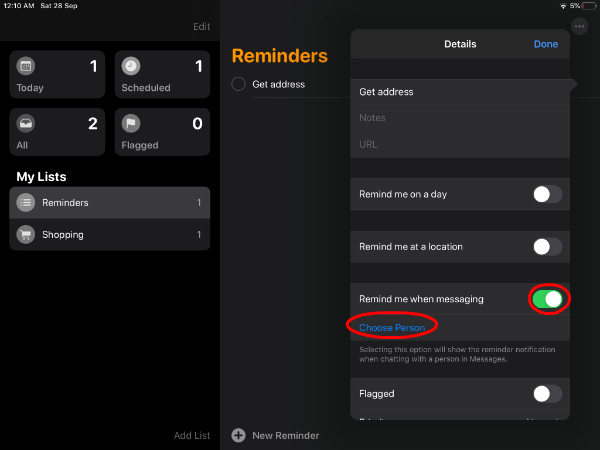
- Follow Steps 1 to 4 on the section How to Create a Reminder on iPad (eg. Get address).
- Toggle the switch Remind me when messaging to right.
- Tap Choose person.
- Tap the name of your desired contact from the list.
- Tap Done.
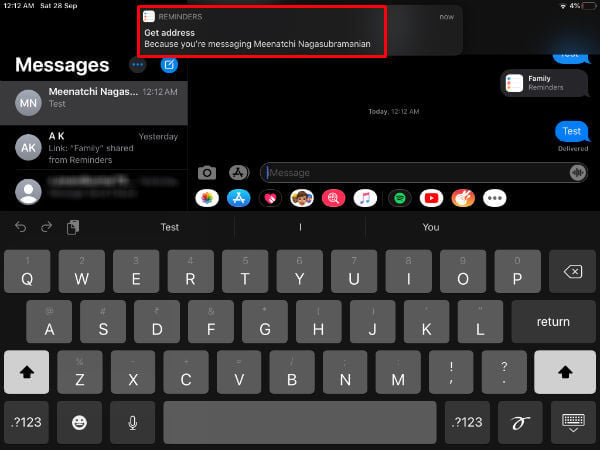
Now, when you send a message to that contact, you will see a reminder. Do remember that this reminder will be shown only for the first time you send a message to your contact, after creating the reminder.
Adding Images
Let’s consider the same example of buying crayons at Walmart. Let’s assume that your kid asked for a particular brand and package of that crayon. If you are someone who has a poor memory, then you can add the crayon image to that reminder so that you can buy the exact model. Let’s see how to do that.
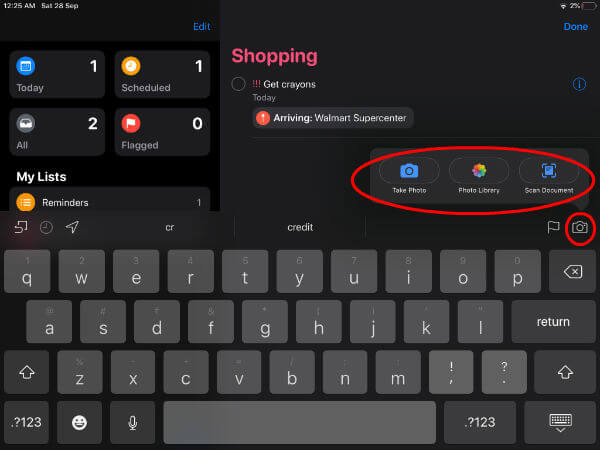
- Under My Lists, select the reminder (eg. Get crayon at Walmart) for which you need to add an image.
- Tap Camera icon on your iPad keyboard.
- Tap Photo Library/Take Photo/Scan Document to attach the image.
That’s it. Now, you will be reminded to buy the exact product at the shopping location.
Recurring Reminders
Would you like to be reminded of doing something regularly? Like, to call your mom every Sunday? Of course, you can easily do that by following the below steps.
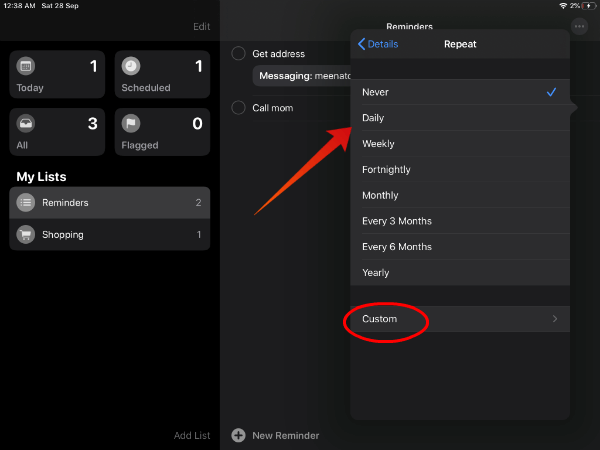
- Follow Steps 1 to 8 on the section How to Create a Reminder on iPad (eg. Call mom).
- Tap Repeat to select the time interval from the list of options shown. In case you need a different time interval than the listed options, tap Custom to set the number of days.
- To set an end date for the reminder, tap End Repeat.
- Next, tap End Repeat Date to set your desired end date. (By default, the option is set to Repeat Forever)
- Tap Done.
How to Group Reminder Lists on iPad
Do you find it difficult to manage multiple lists of reminders? Not a problem. The new reminders app allows you to easily group lists. Let’s imagine that you are a freelancer who works with multiple clients. If you have created separate lists for them, then you can quickly group them under a group, let’s say work.
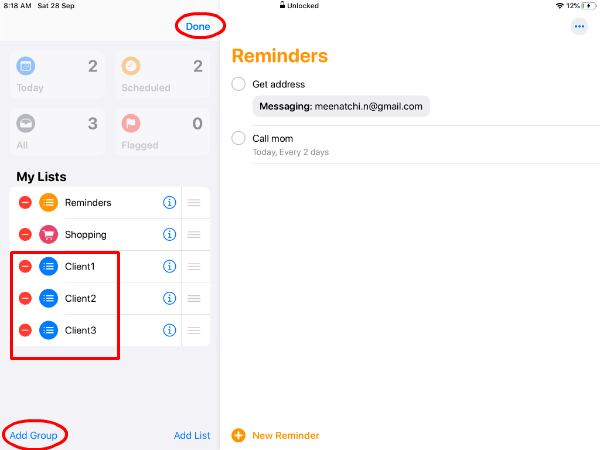
- Tap Edit located on the top.
- Tap Add Group located at the bottom.
- Enter a name for the group. (eg. Work)
- Tap Include.
- Next, tap Green + icon for on the lists you would like to add.
- Tap New Group to exit that screen.
- Tap Create.
- Tap Done.

Now, you can find all your lists under one group. Likewise, you can create a group for Family, Friends and other things.
Related: 7 Top Safari Features on New iPadOS
How to Flag a Reminder on iPad
If you would like to quickly locate some important reminders, you can add a flag so that it will be displayed under the label Flagged. Let’s see how to do that.
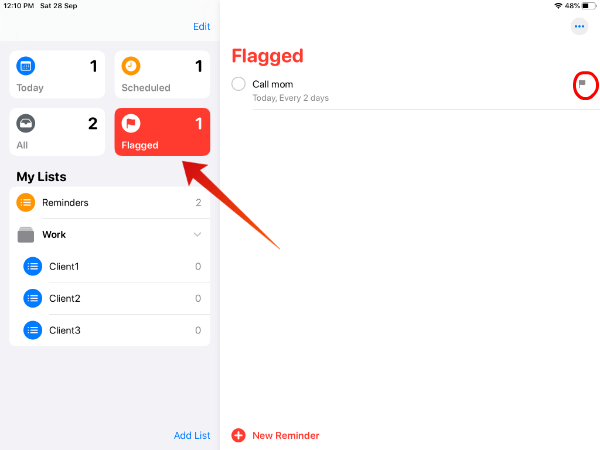
- Under My Lists, select the reminder that needs to be flagged.
- Tap i icon.
- Tap Flag located on the right of your keyboard.
- Tap Done.
Now, you can quickly retrieve the reminder from the Flagged section of the reminder app.
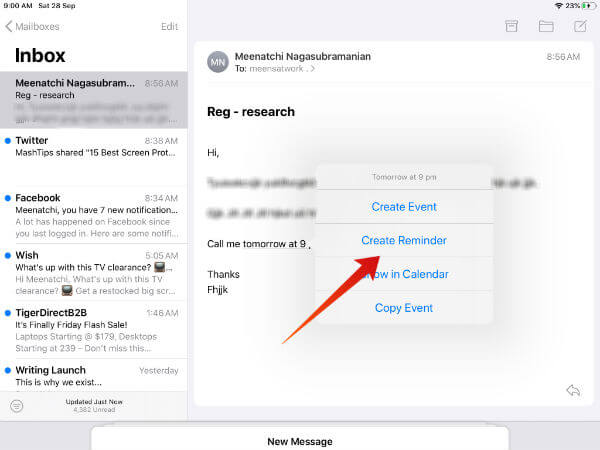
How to Create Reminders from Mail
In earlier versions of iOS, you can create an event directly from the Mail app. In iPadOS/iOS 13, Apple has added support to create reminders as well. This feature will be handy to schedule reminders for meeting invites from your inbox. For example, let’s say that your client has sent an email to give him a call at some time like shown below.
Just tap at the text “Tomorrow”. Now, you will see a small pop-up screen. Tap Create Reminder from the list of options to create a reminder.
How to Create Reminders from Safari
This cool feature will be useful to set reminders for a future event directly from Safari. Let’s assume that you came across a live music event that is scheduled to happen in a nearby location and you don’t wish to miss that.

- Just tap and hold anywhere on the text until you see a list of icons on your screen.
- Tap Share.
- Next tap Reminders.
- Tap Details to add other options like priority, time, flag and more.
- Tap Done to exit that screen.
- Tap Add.
Likewise, you can easily add reminders for any kind of event right from Safari.
How to Share Reminders on iPad
Sharing reminders is not a new feature of iPadOS as it was available on earlier versions. However, Apple has added more sharing options in iOS 13. Follow the steps below to share your reminder.
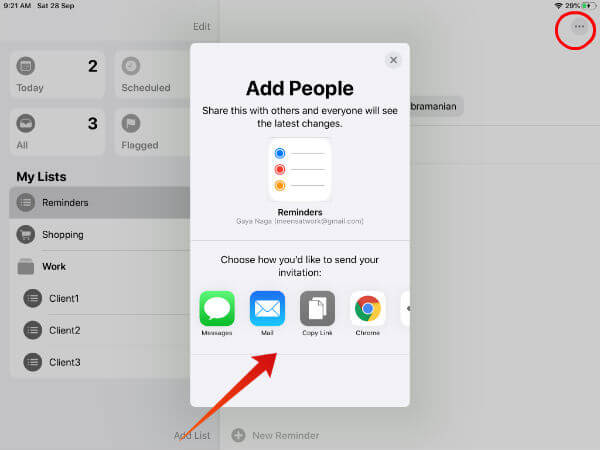
- Under My Lists, tap the reminder you would like to share.
- Tap three dot/ellipsis icon located on the top right.
- Tap Add People.
- Select the option on how you would like to share. (eg. Messages)
- Type the email/phone number or select from your contacts.
- Tap Send.
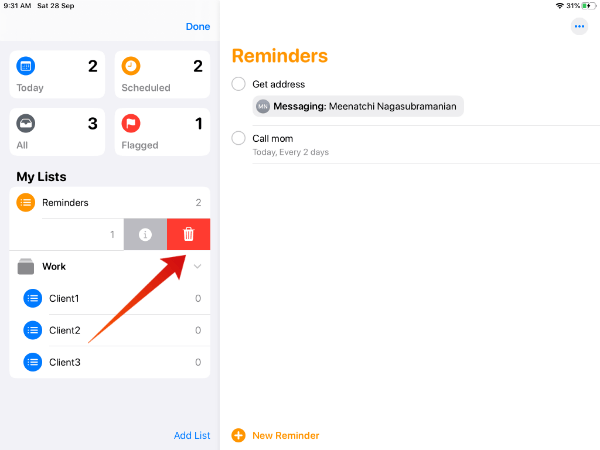
How to Delete Reminders on iPad
Deleting reminders works in the same way as earlier versions. Either you can delete an individual reminder or the entire list. Under My lists, swipe left on the list you wish to delete and tap Delete icon. Next, tap Delete on the confirmation pop-up to delete the list.
In case you wish to delete only selected reminders instead of the entire list, then follow the below steps:
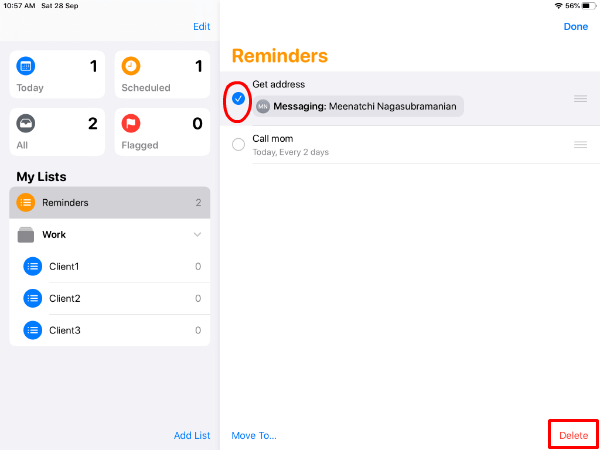
- Under My Lists, tap the list from which you need to delete.
- Tap three dot/ellipsis icon on the top right.
- Tap Select Reminders...
- Tap checkbox for the reminders that need to be deleted.
- Tap Delete located on the bottom right.
- Tap Done.
Now, the reminders are no longer listed on your iPad.
Well, no doubt the much-improved Reminders app is a great option to remind things you can forget. However, it is wise to use that to remind only things you cannot miss instead of creating dozens of reminders and flood your device.


