You might have heard about the latest buzz regarding its two-factor authentication feature. According to Twitter, SMS-based 2FA will no longer work for Non-Twitter Blue subscribers. Do you wish to avoid paying for Twitter Blue just for the sake of 2FA? No worries. Instead of using Google Authenticator or other apps, you can use the built-in option iOS authenticator app to set up 2FA for Twitter, Instagram, and other services.
In this article, we’ll show you how to set up and use the iOS built-in authenticator for Twitter and other apps, step by step. We’ll also highlight some of the benefits of using this feature, including increased security, ease of use, and streamlined authentication. This guide will help you get the most out of your iOS device and protect your online accounts at the same time.
Table of contents
How to Set Up 2FA for Twitter Using iOS Authenticator App
As per the information available on the Twitter blog, the SMS-based 2FA will not be available for non-Twitter Blue users from March 20, 2023. It is highly recommended to change the 2FA method before that deadline. Let’s see how to do that.
Step 1: Select Authenticator App on Twitter

- Launch Twitter app on your iPhone.
- Tap your profile icon on the top left.
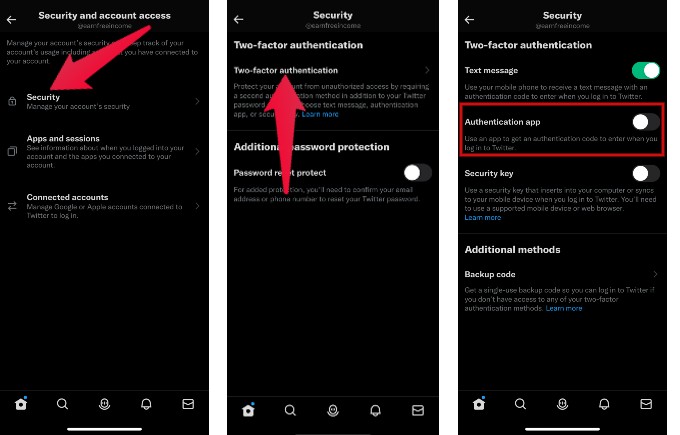
- In the new screen, tap Settings and Support at the bottom and tap Settings and privacy from the options.
- Tap Security and account access in the Settings screen.
- Tap Security from the list of options shown on the new screen.
- In the Security screen, tap Two-factor authentication.
- Tap Authentication app on the new screen.
- You will be prompted to enter your Twitter password for confirmation.
- Tap Get Started in the description screen.
- Tap Link app on the new screen.
Step 2: Link iOS Authenticator App to Twitter
- Now, you will be redirected to the Autofill passwords on your iPhone. (If you have not saved the login credentials of Twitter before, you need to do that by tapping the + icon in the Settings->Passwords menu)
- Once you tap the Twitter credentials from the list of options shown, you will see a 6-digit code on your screen.
- Copy that code and paste it on the provided in the Twitter app.
- Finally, tap Done to save the changes.
That’s it. From now on, you don’t need to look for SMS or other third-party apps as you can get the verification code on your iPhone itself.
How to Set Up 2FA for Instagram Using iOS Authenticator App
Are you an Instagram influencer or user? Whatever it may be, you need to keep your account secure to prevent unauthorized access. If you have not enabled 2FA on Instagram, you can refer to our article on How to Enable Instagram Two-Factor Authentication to Secure Your Account.
At the time of writing, there is no restriction to using SMS-based 2FA on Instagram. Still, if you would like to change that to the built-in iOS authenticator app, you can do that. The procedure is very similar to that of Twitter explained above. Instead of SMS, you need to select the option Authenticator App and follow the onscreen instructions to set up 2FA.
Likewise, you can use this built-in iOS option for your other social media apps or any app if they support two-factor authentication.
Suppose you need to avoid juggling multiple authentication apps for your social media and other online accounts. In that case, there’s good news: iOS comes with a built-in authenticator that can handle it all. By enabling two-factor authentication (2FA) on your iOS device and configuring it for your various accounts, you can use your iPhone or iPad as a secure and convenient way to verify your identity and protect your data.