
Amazon Fire TV Stick does not have an option to take screenshots. Though you can capture the Fire TV screen using your smartphone, screens are better visible as screenshots. There are, however, methods to take screenshots on Amazon Fire TV Stick with some workarounds.
If you have a PC, let us take a look at the steps to take screenshots on Amazon Fire TV.
What You Need to Take Screenshot on Amazon Fire TV
Amazon Fire TV is basically an Android device. Although it does not have an option to take screenshots, there are some workarounds. Being an Android device, we can use the ADB (Android Debug Bridge) from a computer to capture screenshots.
Yes, you need a Windows PC to take a screenshot on Amazon Fire TV or Fire TV Stick. If your mind starts to ask what else needs to capture the Fire TV screen, here is a list of what you need to take screenshots of Firestick.
- ADB Debugging Enabled Fire TV / Fire TV Stick
- WiFi network which you can connect both Fire TV and PC
- Windows PC with WiFi connection
- ADB Tools (on PC)
Some of the above terms may sound unfamiliar to you. Don’t worry, we will make it through each of them and will successfully take screenshots and even screen record the Fire TV.
Related: A Complete Guide to Use Alexa Speaker to Control Fire TV or Fire TV Stick
Enable ADB Debugging on Fire TV
First, you need to enable ADB Debugging on your Fire TV to start taking screenshots using a PC. For that, switch on your Amazon Firestick and make sure that it is connected to the same Wi-Fi network as your computer. Otherwise, it will not be possible to take screenshots.
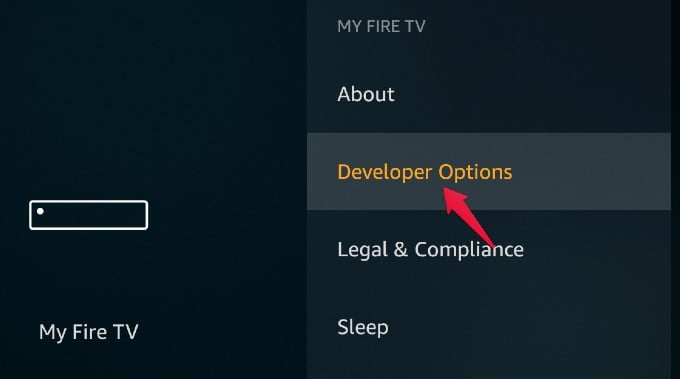
Using your Fire TV remote, navigate to the Settings menu and select My Fire TV.
In the list of options displayed on your screen, select Developer Options.

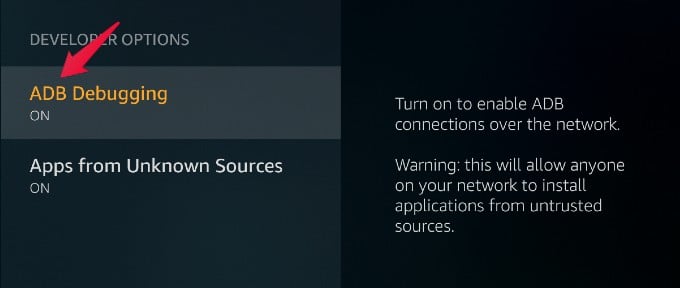
Check and make sure that the option ADB Debugging is set to ON.

Next, you need to know the IP address of your Fire TV for connecting with your computer. For that, use the Back button of your remote and go back to My Fire TV. Go to About > Network.

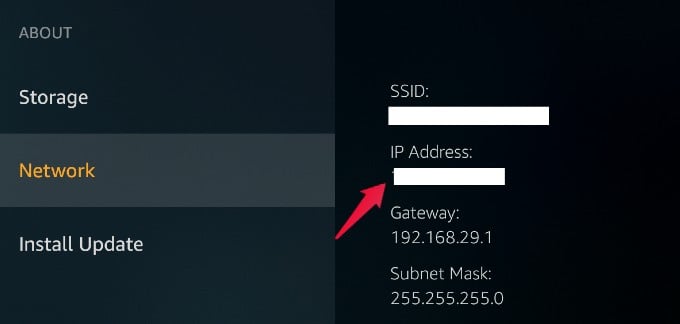
Make a note of the IP address on a piece of paper or somewhere on your computer as we need it in the further steps.
Related: How to Link Fire TV to Echo Dot and Alexa Devices
Connect Fire TV to Computer Using ADB
Now you have the IP address of your Fire TV, it is time to connect your PC with the Fire TV. You need to use the command line on your PC to capture Fire TV screenshot and save on your computer. We need to use the ADB tools for this.
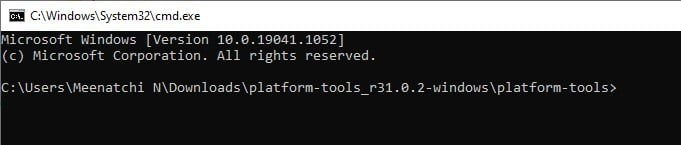
As the first step, download SDK Platform Tools for Windows from the Android Developers website. A zip file named “platform-tools-rxxxx-windows.zip” will be downloaded on your computer.
Open and extract the ZIP file on the File Explorer on your PC. Once you open the extracted folder, click on the address path bar at the top of the window (which shows the path to the current folder, for example, This PC > Downloads > platform-tools-version-windows). Type “CMD” on the address bar and hit Enter on the keyboard.

Once the Command Line window opens, enter the below command to establish a connection with your Fire TV Stick. Before typing in, make sure your PC and the Firestick are on the same WiFi network. Replace “IPAddress” with your Firestick’s IP address noted earlier.
adb connect IPAddress
If the connection is successful, you will see a message “Connected to IPAddress.”


If you see any error messages or something else in the command line, try reconnecting to the same WiFi network or restarting your computer. We will talk about the troubleshooting methods later. Assuming you managed to connect the PC with Fire TV, let’s move on to the further steps. Oh, and do not close the Command Prompt window yet.
Related: 8 Best VPNs for Amazon Fire TV Stick in 2021
Take Screenshots on Amazon Fire TV
Now that you have connected your Amazon Fire TV Stick with your computer using ADB, it is now time to take the screenshots on FireTV and save them to your computer. For that too you need to use the ADB commands in the same Command Prompt window.
To capture screenshots on your Amazon Fire TV Stick, enter the following command to the command prompt window:
adb shell screencap -p /sdcard/filename.png
Replace “filename” with the name you want to save the screenshot with. If you use any previously used names, the old screenshot will be replaced with the new one.
This step just captures the screenshot and saves it within the Fire TV. Unlike Android TVs or other smart TVs, there are no file manager tools to manually find the saved screenshot within the Fire TV. That being said, we need to use another command to save the Fire TV screenshot on your PC. Type the below command and press Enter on the keyboard:
adb pull /sdcard/filename.png
Make sure you replace “filename” with the original filename you gave in the first command above. You will see a success message on the CMD window upon saving the screenshot from Fire TV as shown below.


You can find the Fire TV screenshots you took in the same folder as you opened the CMD window. The screenshot images can be found among the files you extracted to the folder.

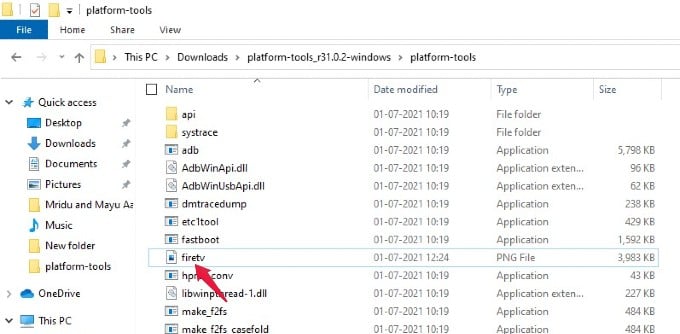
In case you wish to save the Fire TV screenshots to a different folder, add “/folder-name” at the end of the above command. Here is how it will look like:
adb pull /sdcard/filename.png /folder-name
You should create a folder with the same name before executing the above command. You can use all commands, in the same way, to save Fire TV screenshots in any folder you want.
Related: How to Change DNS on Fire TV Stick
How to Screen Record on Amazon Fire TV
Besides taking screenshots, you can also record your Fire TV screen as a video by using the ADB tool. This feature might come in handy if need to show a demo or presentation of some features of Fire TV to someone.
To start screen recording your Fire TV screen, paste the below command to the Command Prompt window:
adb shell screenrecord /sdcard/filename.mp4
This will start recording your Fire TV screen right away. A thing to note is that it will NOT record any TV shows from Netflix, Amazon Prime, or other OTT platforms. They are content-protected and it is illegal to record any such programs using any other methods as well.
To stop recording the Fire TV screen, you simply have to press Ctrl+C keys together on your PC keyboard. The screen record footage will now be saved to the Fire TV storage, which you have to manually save to the computer using the below command:
adb pull /sdcard/filename.mp4

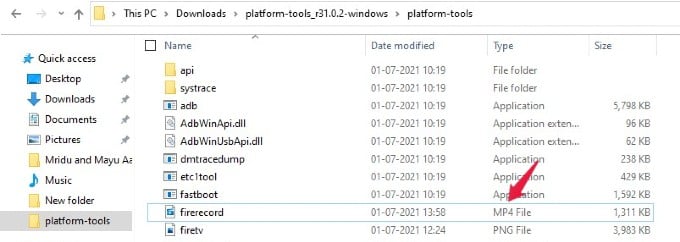
This will wirelessly transfer the screen recording video of your Fire TV to your computer. You may need to wait for a few minutes to finish saving the video on your computer. Similar to screenshots, you can always save the screen record videos in any folder you want by adding “/folder-name” at the end of the command (adb pull /sdcard/filename.mp4 /folder-name).
Related: How to Cast iPhone to Fire Stick TV
Screenshots are not a common thing you might want from your TV. But when you need to capture a moment or snap a screen to show somebody else, the above method comes in handy to take a screenshot on Amazon Fire TV using just your computer. Since it requires just WiFi, you do not need to unplug the Firestick or plug extra wires for this.


