
Unlike Android devices, Apple iPhones have very limited options in file management, compression of files and handling file types other than pictures and videos. With the latest iOS 13 update, Apple has brought many new features to the iPhone and one of them is native support for compressed files. The Files app on iOS can be now used to handle Zip files on the iPhone.
In this article, you will find how to ZIP Files and Photos and Open Zip files on your iPhone running iOS 13 and iOS12.
- How to Open a ZIP or RAR File on iPhone?
- How to Preview a Zip or RAR File on iPhone
- How to Create Zip Files on iPhone?
- How to Zip Photos and Camera Role Files on iPhone
- How to Extract Zip Files on iOS 12?
- How to Create Zip Files on iOS 12?
- Unzip Compressed Files Using Third-Party Apps
- Zip Files Using Third-Party Apps on iPhone
How to Open a Zip or RAR File on iPhone.
Until Apple announced the Files app for iOS devices, the file handling sector was one of the most difficult parts for iPhone users. It is now possible to open and extract Zip files on iPhone, that runs iOS 13 or later. This does not require any third-party apps, but the inbuilt Files app on iPhones. Follow the below steps to open a Zip or RAR file on iPhone.

- Before getting started with the steps, make sure your iPhone has iOS 13 onboard. Otherwise, update to the latest version.
- Open the Files app on your iPhone.
- Find the RAR or Zip file you want to extract or open.
- Tap the File to automatically extract the contained folders and files on the same directory.
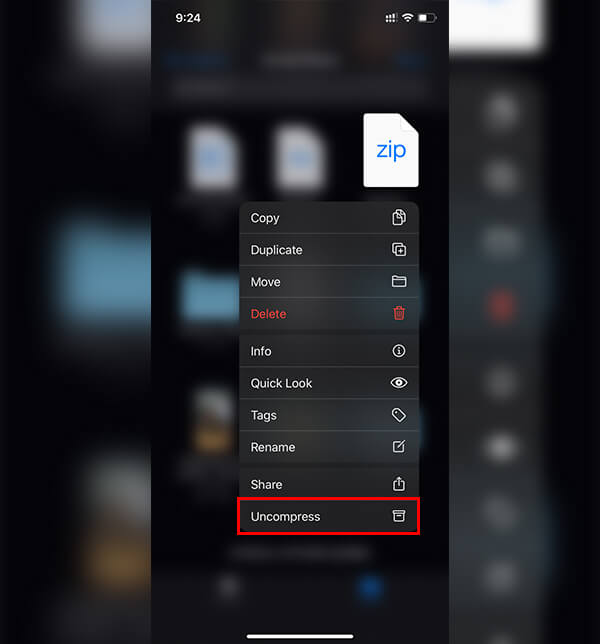
- If that does not work, long touch the zip file and choose “Uncompress.”
You can then scroll and find the extracted files from the same folder. As of now, there is no prompt asking for the extraction target destination.
With each further update, Apple added more features and file handling techniques for iPhones and now the compressed file support is here. Previously with iOS 12, you could only open standard text files, supported documents, images, and videos on an iPhone. Though, they have now added direct support for the most popular compressed file-formats – Zip and Rar.
Related: 7 Best Mac Apps to Unarchive/Archive Files with Password.
How to Preview a Zip or RAR File on iPhone
In the meantime, if you want to preview the zip file content before extracting it on to the folder, follow these steps.
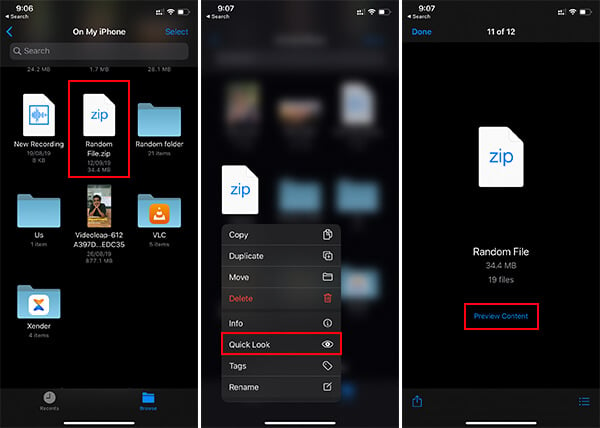

- Open the Files app and discover the Zip/Rar file you want to preview.
- Long tap or force tap the compressed file to see the options.
- Choose “Quick Look.”
- You could find the file size and number of files contained in the zip file.
- Tap “Preview Content” to see all the files on the full screen. You can then swipe sidewards to see all the files.
The Quick Look feature for the compressed file in iOS 13 works similar to that of the Quick Look on macOS, and you can see all the file contents without even extracting them on to a file folder.
How to Create Zip Files on iPhone
With iOS 13, you can now create a zip file by compressing multiple files into one zip or RAR file. Even though the previous version of iOS lacked the zip file handling feature, the newer addition makes it much easier than ever on a smartphone. Here is how you can create zip files on iPhone by choosing multiple files.
- Open the Files app on your iPhone.
- Go to the directory containing the files you want to compress.
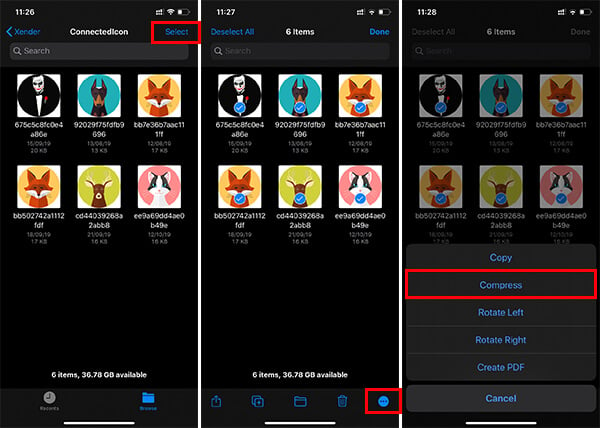
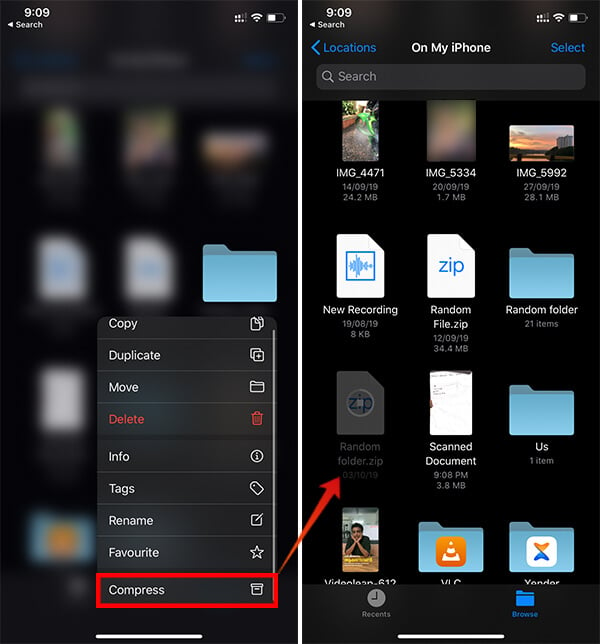
- Tap “Select” on the top right corner.
- Select the files you want to compress.
- Tap the three dots icon on the bottom bar, at the rightmost edge.
- Tap “Compress.”
- You can find the archived zip file created in the same directory.
Tapping the same zip file will extract all the files from the archive. There is not any need of installing third-party apps to create zip files on the iPhone, with iOS 13.
Related: Cannot Open Zip Files on Android? Use These Apps to Unzip Files on Android
How to Zip Photos and Camera Role Files on iPhone
Although, you cannot create an archive by compressing images directly from the Photo Albums or Camera Roll. Zipping the photos on iPhone is a bit different than regular files. Here is how you can zip images from the Photos app and save it using the Files app.
- Open Photos app on your iPhone.
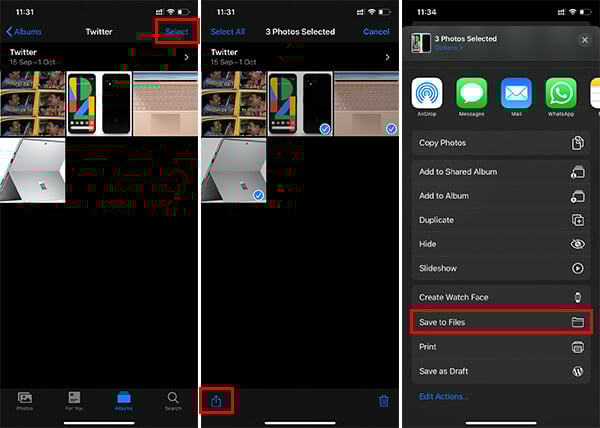
- Tap “Select” button at the top right corner.
- Choose the images you want to compress.
- Tap the Share icon at the bottom.
- Scroll down and choose “Save to Files.”
- Tap on the “New Folder” icon from the popup window.
- Provide a folder name and tap Done.
- Choose the folder.
- Tap Save.
- Now, your photos are saved to the Files app. Open the Files app and find the folder you just saved all the images from the Photos app.
- Long tap or force tap the folder for more options.
- Choose “Compress” from the menu.
Your folder containing selected images from the Photo Album is now in compressed format on your iPhone now. Besides, you can share it with people over WhatsApp and other media as a single zip file of these photos. You can also zip other media files on iPhone by moving them into individual files.
How to Extract Zip Files on iOS 12
Since Apple has stopped software update for iPhone 6 and older models, many users are still on iOS 12. The above tutorial is based on iOS 13, and if you are on an older version, you do not have direct support for zip file formats. However, there are certain iOS Shortcuts you can make use of, in order to open and extract zip files on the iPhone. For that, you must have an iPhone running at least iOS 12, and this is not for the older generations.
Here is how to create an iOS Shortcut to unzip a file on the iPhone.
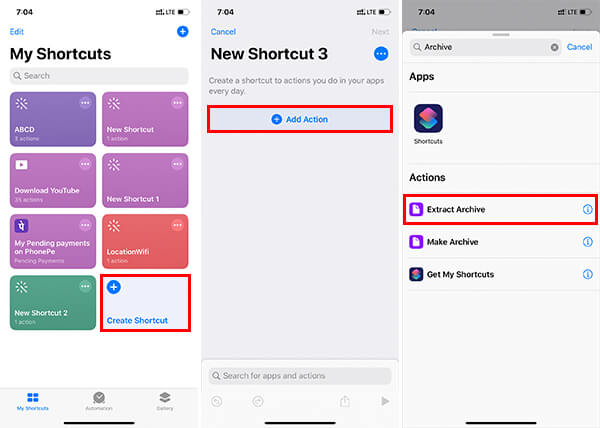
- Open Shortcuts app on iPhone.
- Tap Create Shortcut.
- From the add action window, search and select “Extract Archive.”
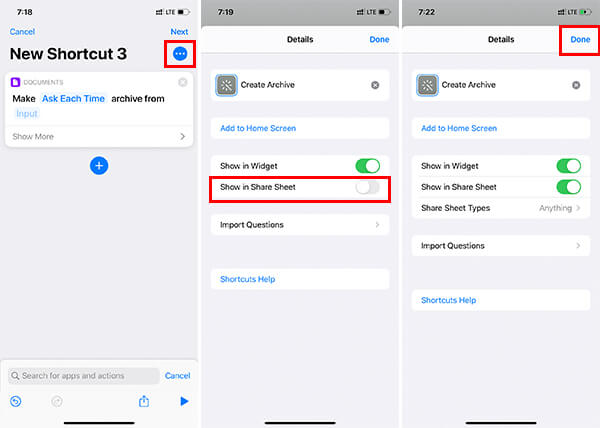
- Tap the three dots icon along with the Shortcut name.
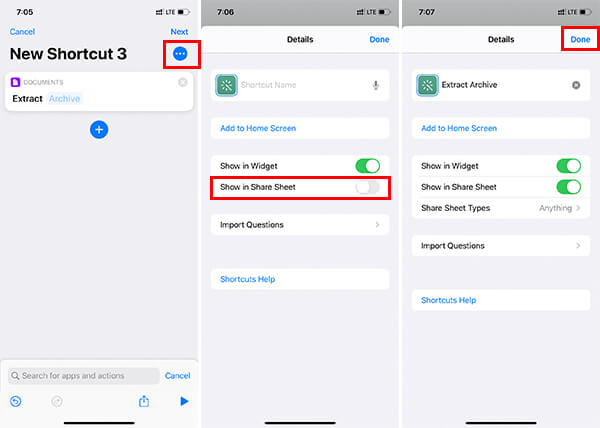
- Provide a shortcut name, for example, “Extract Archive.”
- Toggle on “Show in Share Sheet.”
- Tap Done.
- Tap Done from the next window to save Shortcut.
After creating the shortcut, you can easily unzip a compressed file from the Files app, and here is how.
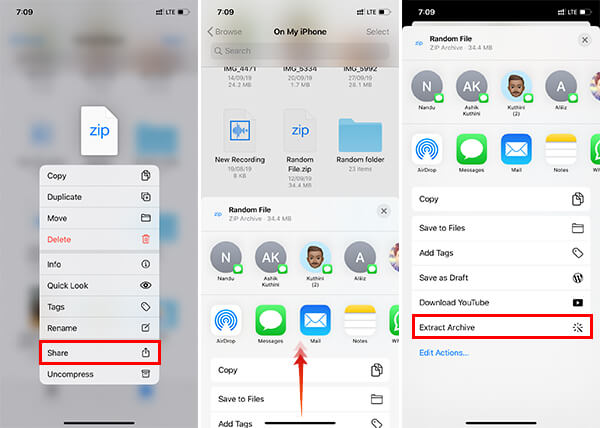
- Open the Files app and discover the zip files you want to extract.
- Long tap the file.
- Choose “Share.”
- Tap “Extract Archive” from the share window.
- You will find the extracted copy of the zip file on the same directory on the Files app.
How to Create Zip Files on iOS 12
Similar to lack of native support for archive files, on iOS 12, you do not get an option to choose multiple files and make them into an archive zip file. Therefore, in case you want to create zip files on iOS 12 on the go, iOS Shortcut is the best way. Follow the below steps to find how to create an iOS Shortcut to create a Zip file.
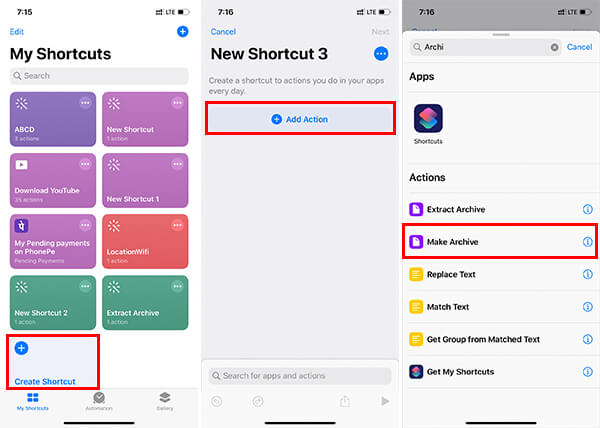
- Open Shortcuts app and tap Create Shortcut.
- Tap Add Action.
- Search and add “Make Archive.”
- The default command will be “Make .zip archive from the input.” Tap on “.zip” to choose the format.
- Select “Ask Each Time.”
- Tap the three dots menu.
- Provide a Shortcut name. For example, “Create Archive.”
- Toggle on “Show in Share Sheet.”
- Tap “Done.”
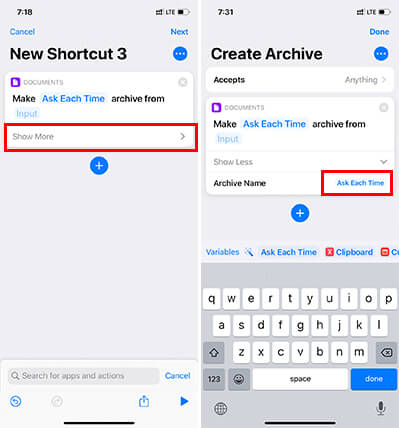
- Tap “Show More.”
- Choose “Ask Each Time” as Archive Name.
- Save the Shortcut.

If you just created a shortcut to create a zip file from multiple file inputs, here is how you can run it and create a zip file instantly from your iPhone.
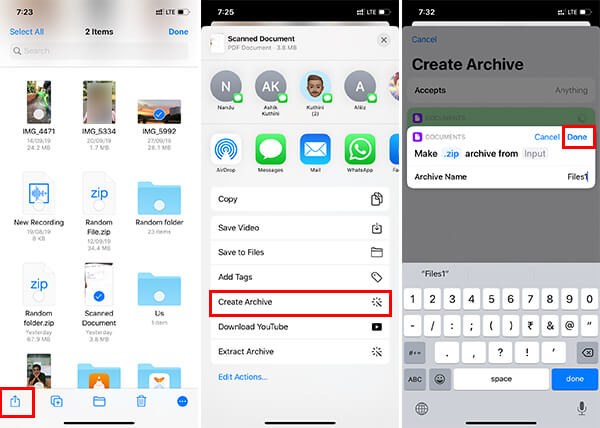
- Open the Files app.
- Tap “Select” and choose the files you want to add to the archive file.
- Tap the Share button at the bottom.
- Pull up the Share menu.
- Tap “Create Archive.”
- Tap “.zip” and choose the file format.
- Provide the Zip file name.
- Run the shortcut by tapping “Done.”
The newly created zip file will be saved in the Files app, you can share across various apps. However, if you need to unzip the same zip or RAR file, you need to make use of the iOS Shortcut as mentioned above.
Also Read: 7 Best Mac Apps to Unarchive/Archive Files with Password.
Unzip Compressed Files with Third-Party Apps
Are you on an iPhone running older versions of iOS, which neither does have the Shortcuts app, nor the zip file support? There are certain Apps available on App Store for iPhones running iOS 11, particularly. In this case, you can make use of them to unzip an archive file on the iPhone. For instance, we are using iZip, a popular tool available for iPhone users, which helps you unarchive the zip and RAR files.
Follow the method to know how to unzip zip files on iPhone with iOS 11 using iZip app.
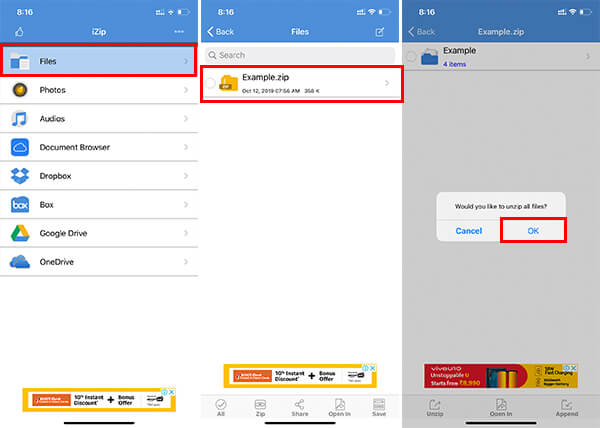
- Install the iZip app from the App Store.
- Open app and grant permissions.
- Tap “Files” to see the compressed files on your iPhone.
- Tap the file name.
- Confirm to unzip all files.
- Find the extracted files from the same directory.
Zip Files with Third-Party Apps on iPhone
Using the iZip, you can even create archives by picking up your photos and compressing them on to a zip file. Here is how.
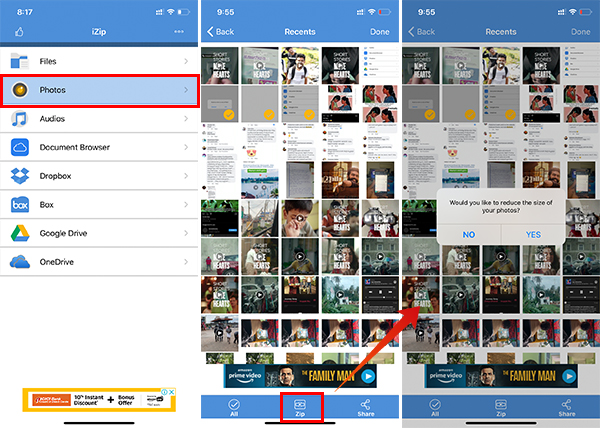
- Open the iZip app on your iPhone.
- Tap”Photos.”
- Open a folder from your Photos and Select the photos.
- Tap the “Zip” icon at the bottom.
- Choose whether to compress the photos or not.
- Find your compressed file from the app itself.
File handling and zipping or unzipping archives are no more a hassle on iOS devices and hope all the above-mentioned methods help you with understanding more. Finally, if you have more other possible ways to manage zip files on iPhone, feel free to share through the comment box.


