
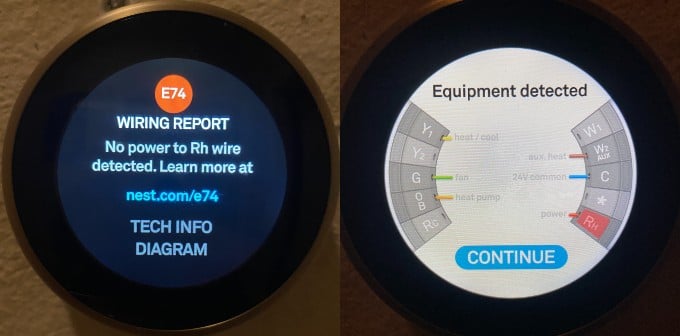
No power to RH wire detected? If you are a Nest Thermostat owner you may see this error on your display. Even the traditional HVAC controllers will stop working at this point. Thanks to the smart thermostat controllers, they can pinpoint the error.
How do you fix this e74 error on your Nest thermostat? What’s the reason for this Rh Wire power loss error? We will see in detail.
When we go this error for the first time, we got panicked, we thought we are going to lose another couple of hundred dollars to the Ac Service guy. Anyway, that’s not the case always, Most of the time this is going to be a simple fix.
Check Your RH Wire Connection
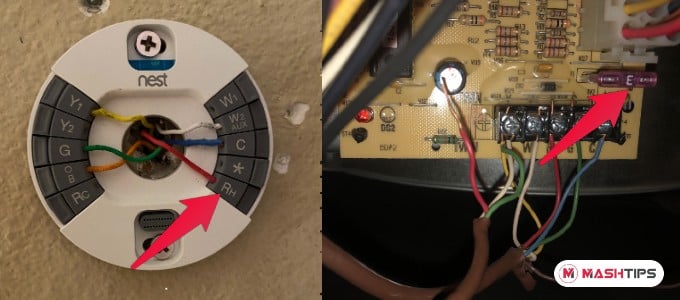
When you get this error, you can check the connection diagram and see the RH wire missing display, Since no power to the RH wire, it’s marked as Red.

You can take off the display part and check the RH wire. Make sure your wire is tight enough and properly inserted there if you are installing the thermostat the first time. Follow the steps below if your thermostat was working fine and the issue started now.
Check HVAC Float Switch
The condensate overflow switch located near the Air Handler unit, inside your home. This is to protect your home from possible water overflow from the HVAC unit. If your drainage pipe is not clean, or if there has any clog, the overflow switch will disconnect the power and turn off the AC.
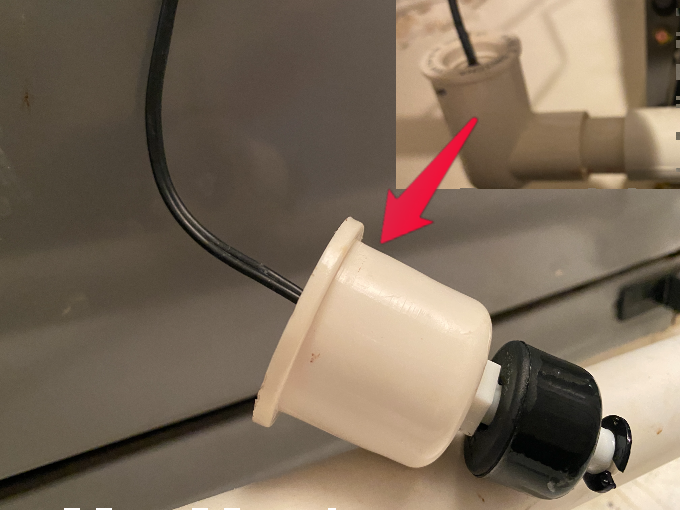

As you see in the image, there is a floating mechanism that will disconnect the internal switch when it floats in the water and move up. This works as an AC switch.


- APPLICATION: Detects clogged air conditioner condensate drain and shuts off the system; using the...
- EASY INSTALLATION: The SS2 can be installed on the auxiliary outlet of the primary drain pan;...
- EASY MAINTENANCE: The SS2 float is adjustable and allows for quick access to the switch allows for...
To make sure that the reed switch still working, you can hear a tiny clicking sound when you move the float back and forth.
You can confirm the issue by following the steps;
- Make sure the AC drainage pipe is clean.
- Take out the float switch and move the float to the bottom.
- Wait for few seconds and check the RH wire status on the Nest Thermostat display.
If this fixed the issue, you have to drain out all water from the AC unite water collecting pan and make sure no block in the drainage pipe. Once you clean the system, put back the float switch and your AC starts to work as usual.
Check Nest Thermostat Features

Check HVAC Control Unit Fuse
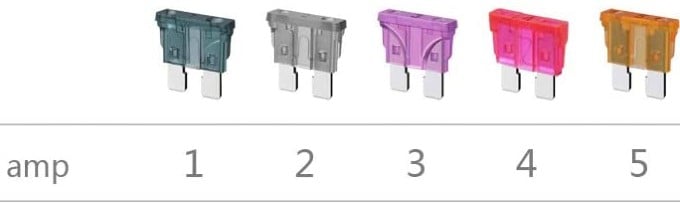
We found on our system, the control unit fuse was blown. This may occur very rarely and we experience it. Most of the time if you see a fuse failure, they may have some other issues with your HVAC unit.

The color code for the fuse meant for the current rating. When you replaced the fuse, make sure to turn off the AC power. And get the same rated fuse for the unit.


- Size: 0.75*0.74*0.2 in, Material:Zn alloy/Plastic.
- Clear Identification, Amp numbers carved on the blade fuse for easy recognition.
- Function: Protect your car and your electrical device from shorting circuit and overloading when...
We found some products from Amazon, that comes with a range of fuses that you can get. Please check if there has an underlying issue, with the help of a licensed AC technician before you replace the fuse. If you are not licensed to do perform this task, get help from your AC technician.
Replace the HVAC Contactor Relay.
This is with your AC main unit outside. This may cause by aging and the relay contacts may cause to generate some sparks,. Also, a faulty relay coil may cause the to blow the fuse out from the AC control unit.

- Single , (1) Pole 40A 24V C140A Contactor
- Brand New , Individually Boxed, Unused.
- 40 F/L inductive Amps, 50 Resistive Amps, 24V coil voltage.
We recommend getting professional help from a licensed technician to replace the relay. Most of the time, when you replace the relay you can replace the control unit fuse too. The contactor relay may vary depends on your model and the capacity of the unit. Just to get some idea, we are listing one similar product here.
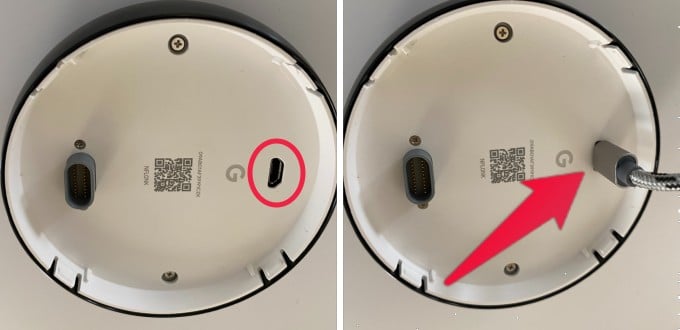
Charge Nest Thermostat with USB
Well during this time, the internal battery will run to, if you take more than one day to fix this. Once the RH power back, the thermostat unit will charge the battery and turn on the display. But if you see the display is still out, you can manually connect t the display unit to a micro USB port as shown in the picture.

The display will come up in a couple of minutes and boot the system. During this time, if you want to cross-check that the RH still has the power;
- Get a multimeter.
- Set unit to AC ~
- Connect the probs to RH and C wires.
- The meter will display the AC voltage between the RH and Common wire.
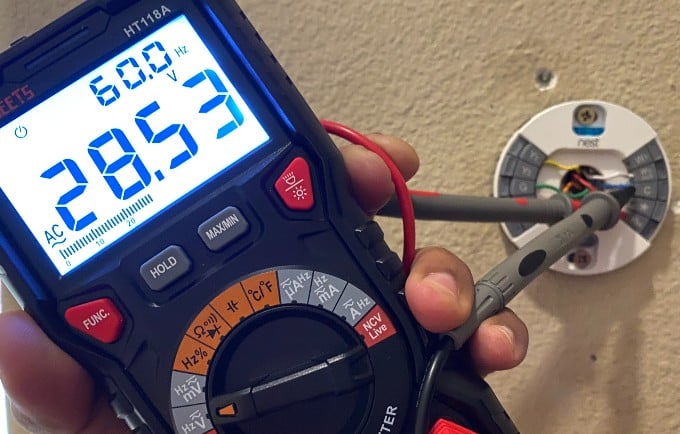

The voltage will be more than 15V AC, and it slightly varies depends on the AC unit. Once you make sure all goo, you can insert back the Nest Display unit and get back to work!.

- WIDE APPLICATIONS: KAIWEETS HT118A Multimeter measures up to 1000V DC voltage and 750V AC voltage,...
- EASY OPERATION: Switch the dial to the function you need, and the LED lights on the jacks will shine...
- MULTI-FUNCTION: Non-contact voltage testing and Live function with sound and light alarm. Flashlight...
Most of the time, the RH Power Loss issue will get resolved in the first part. Ned to clean the drain pipe and empty the water out. That would be enough. But if you want to replace the fuse or relay, please get help from a licensed AC technician.
Hope this saves you some time and at least a couple of hundred bucks to fix the Nest Thermostat (E74) No Power to RH error.


Why i still have the e74 errors after I did all of this. clean the line, change fuse, board…etc.
the e74 error still show in the nest thermostat.
Did you get a chance to check the voltage at the terminal?
Thank you for the helpful guide! I was facing a similar issue with my Nest thermostat and your troubleshooting steps made it much easier to identify the problem with the RH wire. I appreciate the clear explanations and pictures. Keep up the great work!
Thanks for the detailed guide! I was having trouble with my Nest thermostat not powering on, and your step-by-step instructions helped me pinpoint the issue with the RH wire. It’s so reassuring to know it’s an easy fix. Keep up the great work!
I had the same message – it would happen during the middle of the forced air heating cycle and power to the thermostat would restore soon afterwards. It kept doing this all morning. I have a natural gas furnace and recently replaced the air filter with a hepa 5 filter. The system made a whislting noise around the filter and it seemed to restrict airflow. I checked all the items in the article and then decided to switch back to a regular air filter and that did the trick. I beleive the system has a cutoff if the airflow is not strong enough or if the heat in the air handler gets too hot which might be caused by a restricted airflow. So, if you are heating with gas and getting the no power signal during the middle of your heating cycles you may need to change to a less restrictive air filter.