
The Voice Memos App is a native Stock App available on all the iOS devices like iPhone, iPad, iPod Touch or Mac. However, the built-in voice recorder app has been improvised a lot on the latest iOS 12 release to convert that to a full-fledged voice recorder and editor. This built-in Voice Memos app not only allows you to create a recording. Indeed, there are many built-in app features with it to trim audio as you like and sync with iCloud. Plus, you can share the audio with your friends or family via Email, iMessage, WhatsApp, Telegram and much more.
Let’s see how to efficiently use the iOS voice memos to record the lecture or speech, process and backup or share with your team.
Content
- Where to Find Voice Memos on iPhone?
- How to Record a Voice Memo?
- How to Trim Voice Memos?
- How to Delete a section of Voice Memo?
- How to Replace part of a Voice Memo?
- How to Share Voice Memos?
- How to Delete Voice Memos?
- How to Recover Voice Memos?
- Use iCloud to Sync Voice Memos?
Where to Find Voice Memos on iPhone?
Once you record voice memos on iPhone or iPad, the recorded voice will automatically save to iOS memory. By default, all your voice memo recordings will get stored on the iOS directory ../Media/Recordings with the file extension .m4a. You can view all your recordings just by opening the Voice Memos app on your iPhone. Alternatively, you can also view them by connecting your iPhone or iPad to the computer.
Also Read: How to Save iPhone Voicemail to Computer or Cloud Drives?
How to Record a Voice Memo?
You can use the Voice Memo app to record notes, song, speech or any form of recording you like. Let’s imagine that you need to record a small voice clip and send that to your friend. Let’s see how to do that.
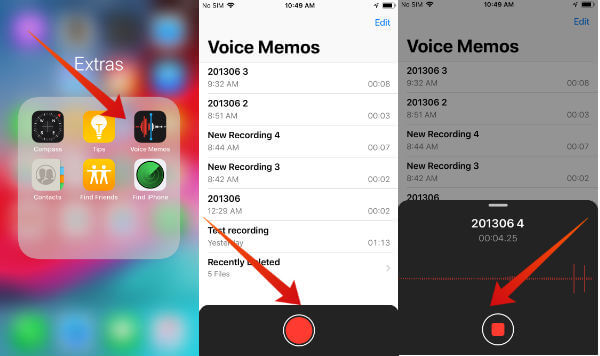
- First, open the Voice Memos app (located on the Extras folder) on your iPhone. Or you can just ask Siri to open the voice recorder.
- Tap the Record (red circle) button to start your recording.
- After you finish the recording, tap the Stop (red square on a circle) button.
- Now, your saved recording will get listed on the screen and you can play that by tapping the Play button.
Once you finish, iOS will give a default name for the recorded voice memo. Are you wondering under what name your recording will get saved? Let’ see.
Setting Filename for Voice Memo
By default, iOS selects the file name for your Voice Memo with two different options. One is simple name format and another one will attach the details of your location in the file name. Let’s have a look on these naming conventions:
- Simple Naming: New Recording, New Recording 2 and so on.
- Location Based Naming: Location, Location 2 etc where Location indicates your current location. Generally, it will be the zip code of your location. (At least, that’s how it worked for me). If you would like to use the Location-based naming, then you need to make sure that Settings->Voice Memos->Location-based-naming is turned ON.
The location-based naming is convenient when you refer these voice memos later. Don’t you like any of the above naming formats? No problem. You can keep whatever name you like for your recording.
Rename Filename for Voice Memo
Would you like to give a unique name for your Voice Memo based on its content? Follow the below steps to do that.
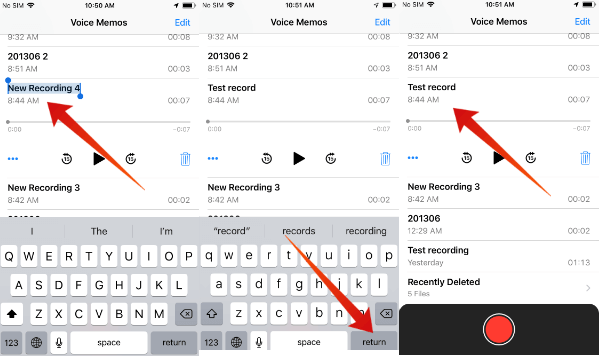
- Open Voice Memos app on your iOS.
- Now, you will see the list of all your recordings on the screen. Go ahead and tap the recording that you would like to rename.
- Enter your desired name for the recording and tap the return key on the on-screen keyboard to save the new name. That’s it. Looking pretty simple? Right.
How to Enable Location Based Naming for Voice Memo on iPhone
How to Trim Voice Memos?
Thanks to iOS 12, now you can easily trim the voice memos either at the beginning or end. Let’s see how to do that.
- Launch the Voice Memos app from your device.
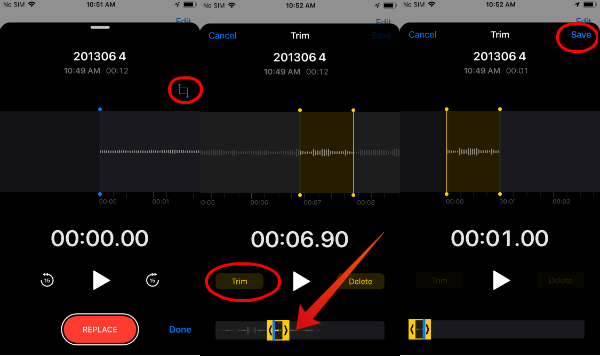
- Next, tap the recording that you would like to trim. Here, you will see a ‘three dots’ just below the filename.
- Go ahead and tap the three dots. Now you will see a popup with three options near the bottom of your screen. Tap Edit Recording from that list.
- Here, you will see a blue color icon (looks like a kite with an extra rope) on the top right of your screen. Tap that icon.
- Now, you will see the Yellow handles with arrows on both sides on the bottom of your screen. If you would like to trim from the beginning, just drag the arrow on your left so that you can set the starting position. Likewise, drag the arrow on your right to set the end for your recording.
- Then, tap Trim button. (Except for the yellow selection, the rest of your recording will be deleted).
- Next, tap Save button to save your recording.
- Finally, tap Done button to finish your editing.
How to Delete a Section of Voice Memos?
Let’s assume that you would like to get rid of a part of your voice memo as it didn’t meet your expectation. Is it possible? Yes. iOS 12 allows you to delete only a section of your voice easily.

- Follow Steps 1 to 4 from the previous section.
- Using the Yellow handles, select the portion of the recording you would like to delete.
- Then, tap Delete button.
- Next, tap Save button on the top right of your screen.
- Finally, tap Done button to finish your editing.
This pretty convenient rather than deleting the entire voice memos to correct only a part. You can remove only the wrong part and stitch together with newly recorded voice.
How to Replace Part of a Voice Memo?
Stitching needs some additional work and bit time-consuming. Let’s try the new feature, to replace the wrong part of voice clip. How to replace only a part of your existing audio with a new one? You can do that by following the steps below:
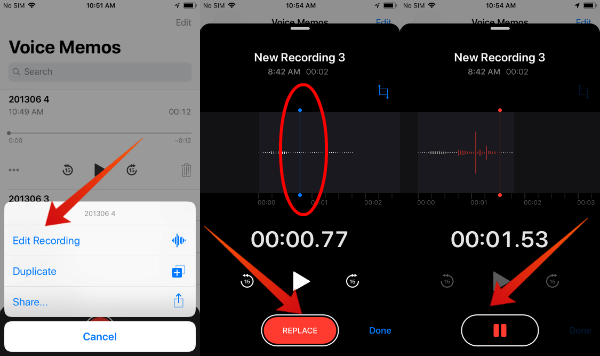
- Open Voice Memos app and select the recording you would like to edit.
- Next, tap three dots -> Edit Recording.
- Then, swipe the blue playhead to the left or right and keep that on the starting position from where you would like to start the recording again.
- Next, tap Replace button to start your rerecording. (iOS will start overwriting your memo at this point)
- Once you have finished the recording, tap the Pause button. (You need to do this quickly. Otherwise, it will overwrite a bit extra on your existing recording).
- Finally, tap Done button to finish your re-recording.
No need to go for any third party app to replace or combine voice memos. Apple itself offers you to replace the part with a new voice memo. Pretty convenient.
How to Share Voice Memos?
So far, we have seen how to record and edit the voice memos. Now, let’s see how to share the voice memos. iOS allows you to share the memos using almost all the sharing apps available on your iPhone. Besides sharing, you can also store the voice memos to Google Drive or other storage options.
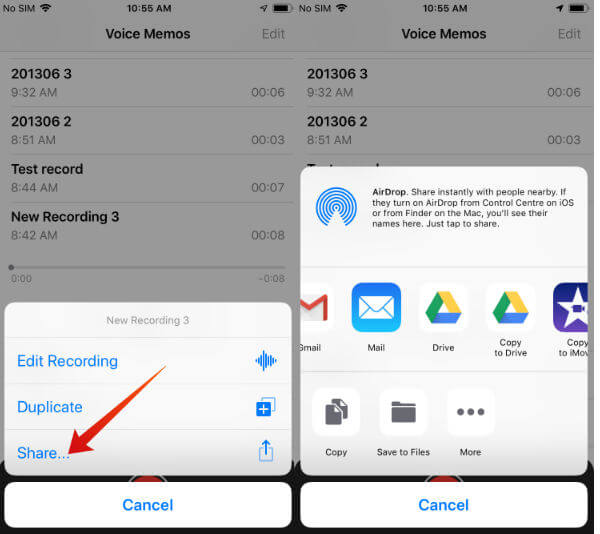
- First, open Voice Memos app from your iPhone.
- Next, select the recording that you would like to share with your friends/family.
- Tap three dots->Share… option.
- Then, choose your desired way to share like Gmail, iMessage, WhatsApp, AirDrop and more. Or you can store the memos to another storage location as well.
How to Delete Voice Memos?
Got too many recordings on your device? Don’t worry. You can clear up space on your iPhone by deleting the memos which are not needed anymore.
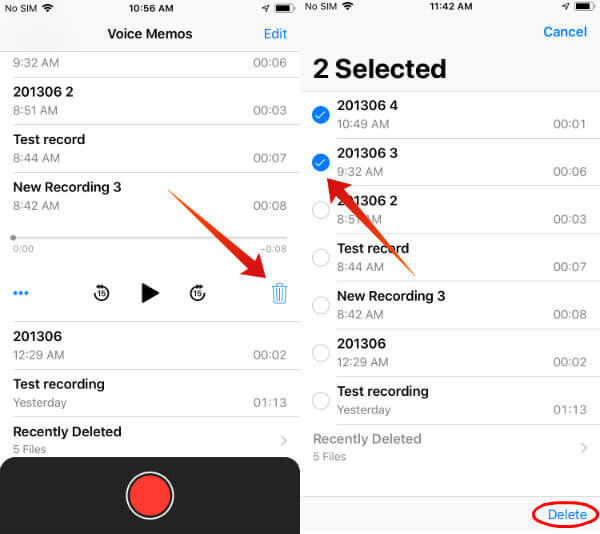
- Launch the Voice Memos app.
- Select the recording that you would like to remove and tap Delete icon.
- If you would like to delete a bunch of files, then tap Edit button on the top right of your screen. Select all the recordings and tap Delete on the bottom right.
Have you deleted a wrong file? No need to panic. You can easily recover deleted iOS voice memos from the iPhone recycle bin with a single tap.
How to Recover Voice Memos?
By default, iOS will store all your deleted voice memos on the Recently Deleted folder for 30 days. You can customize this Delete option from iOS Settings->Voice Memos->Clear Deleted. There are three options available over there. Immediately, Never, After 1/7/30 Days. You can choose which option you want, and the “Immediately” option will clear your voice memos permanently from iPhone memory.
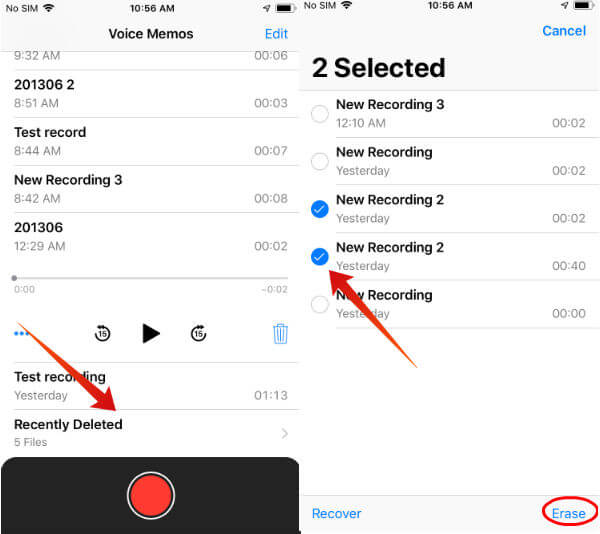
- Open Voice Memos app and tap Recently Deleted.
- Select the recording that you would like to restore and tap Restore. (You can tap Erase to delete the file permanently from your iOS device).
Use iCloud to Sync Voice Memos
To use voice memos across multiple iOS devices, you need to enable the iCloud sync option. For that, navigate to Settings->(your profile icon)->iCloud. Scroll down to find the option Voice Memos and turn the switch position to the right.
Now, you will be able to view your recordings on any iOS device, provided if you use the same Apple ID to log in to the device. Plus, you can back up the memos using the iCloud backup option.
Related: How To Transfer Recordings from iPhone to Computer?
Have you ever used the voice memo additional apps on your iOS? Please share your experience with comments.