Do you need to control your iOS device using your voice? Till iOS 12, you need to call or activate Siri to speak any kind of voice command. However, Apple has added a new accessibility feature called Voice Control in its upcoming iOS 13/iPadOS release. Now, you can use your voice to navigate anywhere on your device without using your fingers. Plus, you can also dictate or edit the text using your voice. This new accessibility feature can be used as an alternative for Siri.
In this article, let’s see how to set up and use Voice Control on iPad.
How to Enable Voice Control on iPad
By default, Voice Control will be disabled on your iPad or iPhone. Hence, you need to turn that ON manually to speak your voice commands.
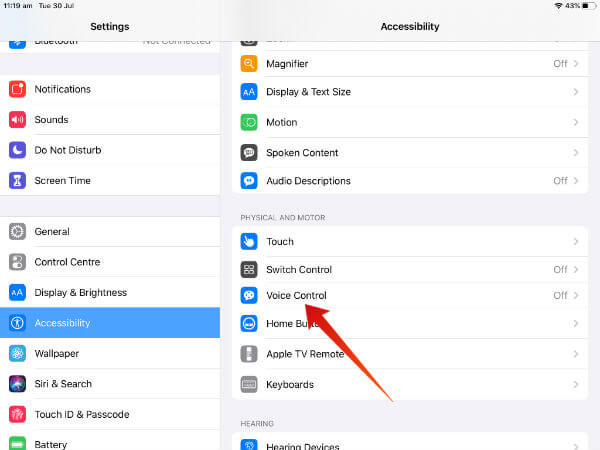
-
- Tap Settings.
- Tap Accessibility->Voice Control.
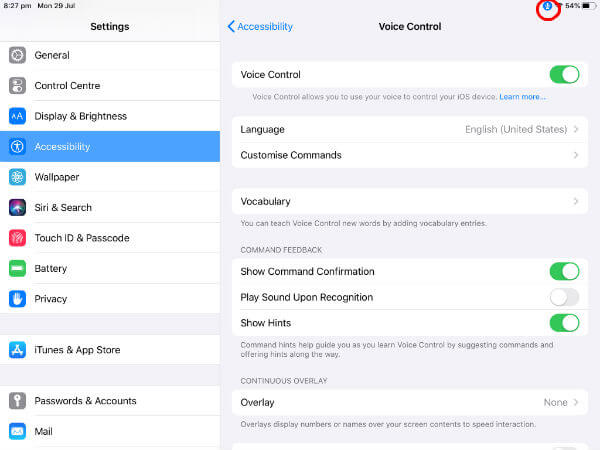
- Toggle the switch labeled Voice Control to the right.
- While turning on Voice Control for the first time, you will see a Welcome screen. Go ahead and tap Continue.
- Tap Allow if you don’t mind sharing your voice samples to Apple for improving the voice control. Otherwise, tap Don’t Allow.
Once you had enabled Voice Control, you will see a Blue color Microphone icon on the top right of your screen (near the Battery Indicator icon). The icon changes to Grey color (Sleep) while you are away from your device. Because Apple has added a cool checkpoint called Attention Awareness in Voice Control. When you turn away your head from the Camera, Voice Control goes to sleep mode. And, it will be activated again after you look back at your screen.
Now, let’s see how to control your iPad or iPhone with your voice.
How to Use Voice Commands on iPad
Apple has created an extensive list of voice commands under various categories as shown. Whenever you say a phrase exactly or very similar to the command in the list, your iOS will automatically take the corresponding action. For example, under Device, you will find commands like Take screenshot, Turn down volume, Turn up volume, Mute sound and more. So, if you just say “Take screenshot”, your iOS will take the screenshot and you don’t need to fiddle with your fingers for that anymore.
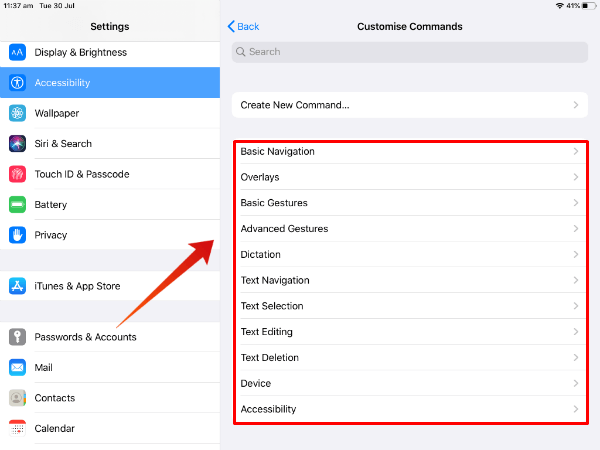
To view the list of all built-in commands on your iPad, tap Settings->Accessibility->Voice Control->Customise Commands. Here, you will see a list of 10+ categories. Just tap on a category to view the list of all commands under that. For example, if you tap the category titled Device, you will find a similar screen like below:
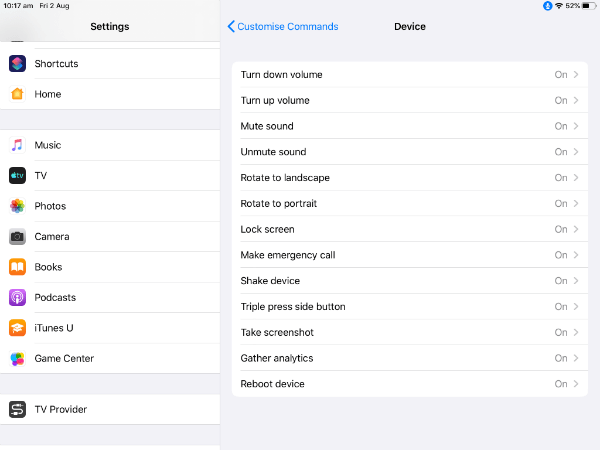
Now, let’s take a look at some of the useful commands under various categories. Before going to that part, you need to know about the two keywords <item name> and <number> in your command. To understand how that works, tap Settings->Accessibility->Voice Control->Overlay. By default, this field will be set to None. Go ahead and tap Item Numbers. Now, all your menu options and apps will be assigned a number like below:
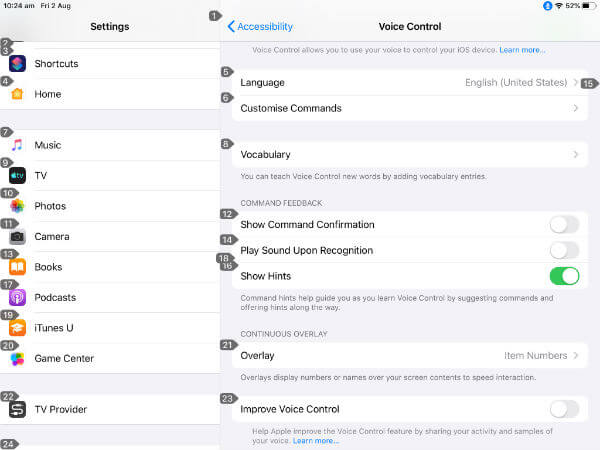
Here, in the above screen, the setting Vocabulary is assigned the number 8. Hence, if you say Tap 8, it will open the Vocabulary menu. Instead of number, if you wish to use names in your command, then you need to select Settings->Accessibility->Voice Control->Overlay->Item Names. Item Names will display the same name of the menu option again and makes your screen a bit messy. In my view, Item Number is better than Item Names.
Now, it’s time to take a quick look at some of the useful commands.
Basic Navigation
- Open <application name> : To open an app on your iPad. For example, if you say Open YouTube, your iOS will open the YouTube app.
- Tap <item name>: You can use this command to quickly navigate through a long list of menu options. For example, while you are in the Settings menu, you can just say Tap Voice Memos to open the settings for Voice Memos.
- Search Web for <phrase>: You needn’t open Safari to search for something. Let’s say you would like to know the cost of iPhone XR. Just say the command Search Web for iPhone XR price. Now, your iOS will automatically search the keyword on Safari and will display the search results.
Basic Gestures
Without using your fingers, you can instruct iOS to move everywhere on the screen by using the following commands:
- Scroll <direction>: Scrolls your screen in the specified direction.
(Up / Down / Left / Right) - Swipe <direction>: Swipes your screen in the specified direction.
(Up / Down / Left / Right) - Two finger swipe <direction>: Swipes the screen in the specified direction for two-finger distance.
Besides the above commands, you can also say Zoom in, Zoom out, Single tap, Double tap, Long press, and much more.
Text Editing
If you are using an external keyboard for your iPad, then you won’t find it difficult to type or edit text. Thanks to iOS 13/iPadOS, Apple has a bunch of voice commands which will help to increase your typing/editing speed.
- Move to beginning of sentence – To move your cursor to the beginning of your current sentence. Instead of sentence, you can also use word, line, paragraph or selection. Likewise, you can instruct the iOS to move to end as well.
- Replace <phrase> with <phrase> – It does the same thing as Ctrl + H (Search and Replace).
In addition to the above, you can also select or delete the text using your voice.
Dictation
By default, the Dictation mode gets enabled when you activate Voice control. So? If you are too lazy to type an email, open Mail app and start dictating the text.
How to Create Custom Voice Commands on iPad
In addition to the default commands, you can also create your own commands to insert text, run a shortcut and more. Let’s think of a common scenario where you need to enter your name, email and communication address while filling forms online. Instead of typing your address, let’s create a voice command to do that.
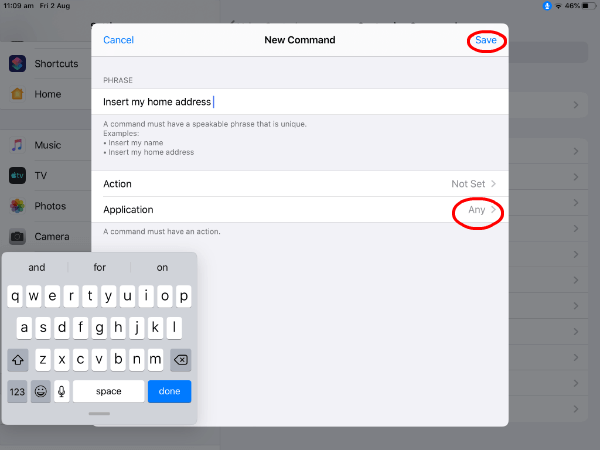
- Tap Settings->Accessibility->Voice Control.
- Tap Customise Commands->Create New Command…
- Enter the command phrase. Eg. Insert my home address.
- Tap Action->Insert Text.
- Enter the address of your home on the box provided.
- Tap Application->Any so that you can use the command on any application. Alternatively, if you wish to use your command only for a particular app (like Mail), then you can select that app.
- Finally, tap Save to save your command.
Now, you have created the command successfully. How will you use it? Whenever you need to insert your home address, just say ‘Command Mode‘ followed by ‘Insert my home address‘. That’s it. Your address will get inserted automatically.
How to Turn-off Voice Control on iPad
You can turn off Voice Control by using either of the two options.
- Navigate to Settings->Accessibility ->Voice Control and Toggle the switch labeled Voice Control to the left.
- Just say “Turn off Voice Control” to your device.
Now, Voice Control is disabled and you will not see the Microphone icon on your iPad anymore.
Well, Voice Control is really a helpful feature for people with limited abilities to quickly navigate and do things on their iOS devices much easier than before. Especially, old or senior people will find this feature very helpful to control their device using voice instead of fingers.
