
No matter how many layers of security have you set there is still a slight percentage of vulnerability. May it be a Ransomware attack or a sudden hard-drive failure, there is a chance of your files and data to get lost. So it is better to have a copy of your files backed up, and Windows has that covered with an in-built Backup option.
It is better to have a copy of your files backed up, and Windows has that covered with the inbuilt Backup option. It is a matter of a few steps that let you take a complete backup of your PC. However, on Windows 10, Microsoft is giving you different choices to secure your data.
We recommend you to use dedicated external hard disks to backup your data. You can get a 2 TB External Hard disk from Amazon for less than 70 bucks. We do not recommend external SSDs for system backup, however, those who are looking for amazing speed and performance, there is Samsung 1TB SSD from Amazon.
We are going to list all the possible options on Windows 10 to Backup Restore your files, based on your choice, select the best one that matches your requirements.
Windows 10 File Backup
You will need an external storage device to back up your files. Once that is done head over to settings then to the Update & security section. From the left panel of the window that appears click on the Backup option which is right below the Windows Defender option.
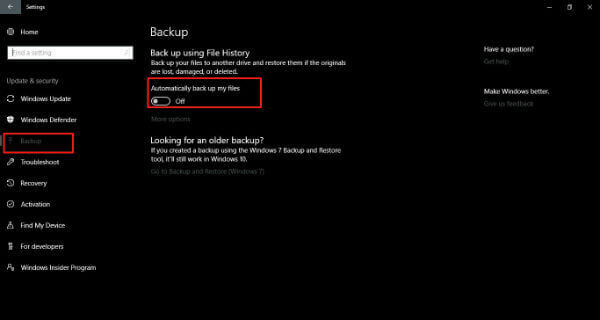
Now select the Add a drive option with a ‘+’ symbol on its side to see all the external devices connected to your system (If you are setting for the first time). Select the preferred device, and the previous option ‘Add a drive‘, would be changed to ‘Automatically Backup My Files’ which is switched on by default.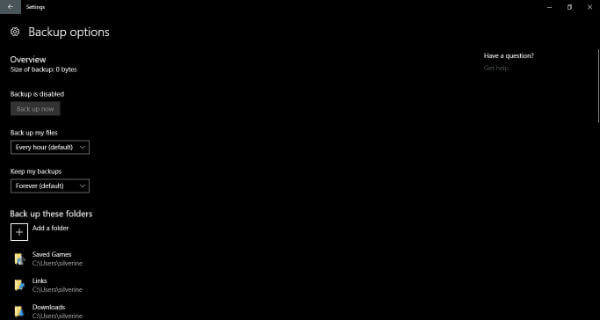
Clicking the More options button provide you additional options such as Back up now, scheduling backup duration and how long to keep the backed up files. Also, there is an option to add other folders other than the files in Users folder of the system (the default file that would be backed up).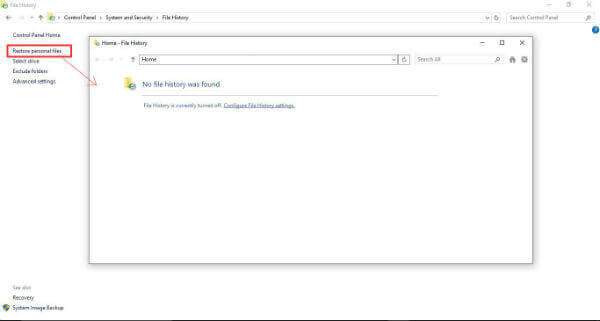
Now to restore the files backed up go to the Control Panel. In the Control Panel select ‘Save backup copies of your files with File History’ option under System and Security Section. From the section select the Restore personal files option.
Related: How to Auto Backup Windows 10 Folders with Dropbox and Google Drive
Windows 10 System Image Backup
The above steps will back up your files, but it is still good to back up your system files/image. Thus if something is to happen to your system you will have a copy of your system image to get things done, without reinstalling the whole thing and with your settings.
To back up your system image click on the Go to Backup and Restore option in the Backup section that we have seen earlier. Click on the Set up backup option, this will prompt you to select a backup drive. After selecting the drive you prefer you can either let Windows choose what to back up or you can choose yourself.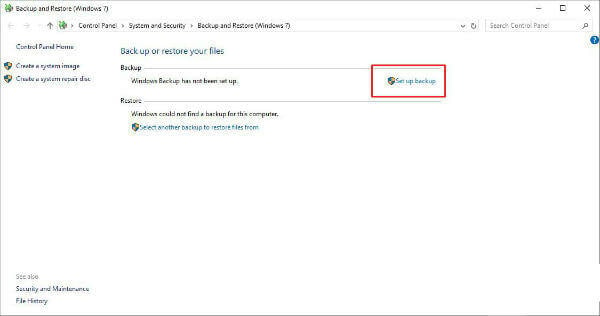
If you let Windows choose then the files will be saved on your desktop and also in your libraries. This can cause a shortage of storage space. To avoid this we could use the Let me choose an option.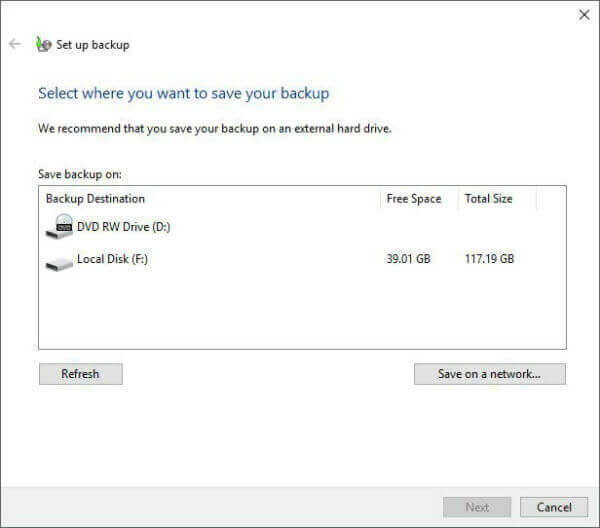
Now click on the Save settings and run backup button, which will perform the first backup. Now we have to see how to restore the same.
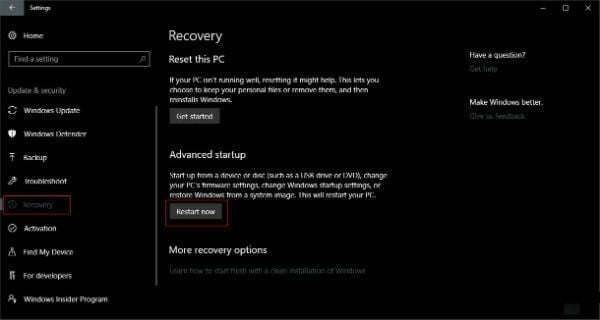
Go to Settings then to Update & Security. From the side panel select the Recovery option. Then click on the Restart now button under the ‘Advanced startup’ section. Continue by selecting the system image preferred to restore
Windows 10 System Restore
System Restore is a feature in Windows 10 that helps you to resume from a previous working state. This is possible because Windows automatically saves restore points whenever a major change happens. These changes can be a Windows install or installation of an application. It is less likely to happen but if anything wrong happens to your system this feature helps to get back to a working state of the same.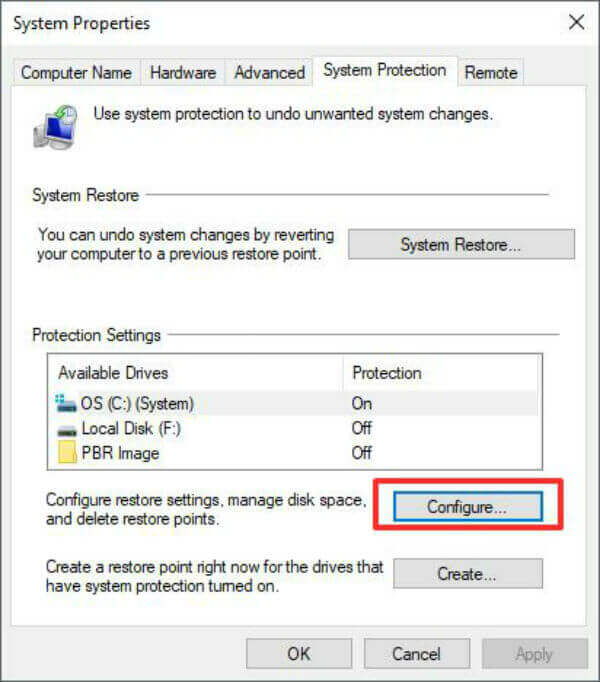
Even though system restore is a useful feature it is off by default in Windows. So we have to turn it on manually. To turn on this feature open up the System Properties(use the search box) then go to the System Protection tab. Now click on the Configure button. Select the Turn on system protection option. You can also manage the amount of disk space used for system protection by adjusting the slider for ‘Max usage’. Then click OK.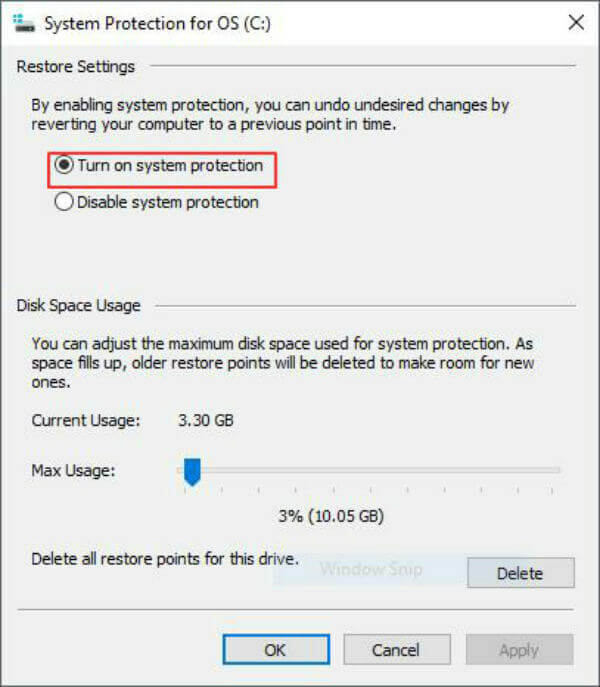
If you wish to create a restore point manually click on the System Restore button in the System Properties wizard. Follow the on-screen instructions and at one point you will be prompted to select desired Restore Point.
Windows 10 System Repair drive
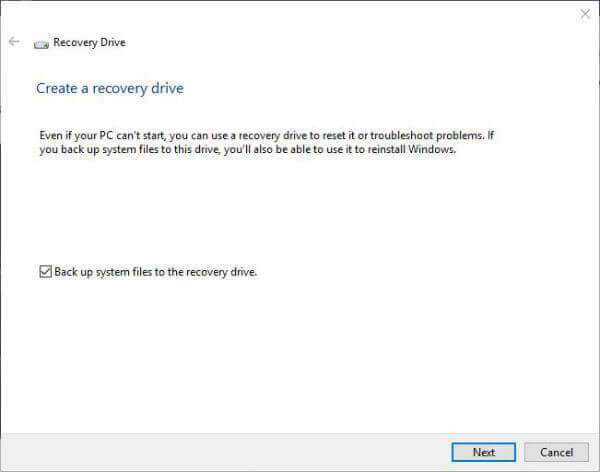
Windows has a provision to create a system repair drive which would help in troubleshooting or restore your computer. How to create a system repair drive? First, open up the Settings. Now type in the word ‘restore’ into the search box of the Settings page. From the suggestion list that appears, select the Create a recovery drive.
Now a Recovery Drive window will appear. Click on the Next button. The next window will inform the capacity required for the flash drive you are supposed to use. After connecting the USB drive click Next button.
The contents of your drive will be erased during the process, so you should be absolutely sure before you click the Create button. The creation of recovery drive will start and will take some time to complete, but you can freely use your computer during that time.
These backup option is going to save your Windows machine. In case of any startup issue that cannot be resolved by Backup and Restore, we can use the system recovery drive by simply booting up the device from it. We can run diagnostic tools from the system recovery drive to find and resolve the issues.
I personally like to backup only my very important files on the cloud. The rest of them can get deleted for all I care.