You might be receiving hundreds of emails per day from known contacts and unknown contacts regularly. Sometimes checking all the emails may not be possible and so, you might be missing to check some important emails from the known contacts as soon as it arrives.
In such situations, everybody wishes to have your incoming emails sorted to some designated folders so that you can read the important ones from the known contacts. It is possible to sort your emails from known contacts into different folders using Thunderbird. It facilitates faster reading and response of your emails and avoiding chances of delay for the important emails.
You can sort the incoming emails in your Thunderbird email client in both POP and IMAP configurations. If you are configuring the mail account as POP and wants to sort your emails using Thunderbird, then it will be applicable to your PC inbox only. Instead, you can configure the Thunderbird as IMAP so that your internet email folders will get sorted accordingly. To know how to configure your email accounts with Thunderbird, please check the following pages.
After configuring the email account for IMAP access in Thunderbird, you can start setting up the sorting configuration. It is so simple that you can do it without any hassles. The basic idea described here is to create and run a custom filter to do the sorting work for you.
To start with, Open your Thunderbird and create the required folders online. This can also be done by directly logging into the account.
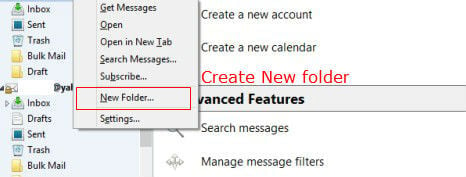
To create new folders with Thunderbird, Right Click on top of the required account and then Click on “New Folder”. A new folder will be created and you can rename the folder instantaneously. Create required folders like “family”, “friends”, “office” etc. as much as you need. Note that these folders will be created in your mail account along with Thunderbird, as your account configuration is IMAP access. So when you log in to your email account next time don’t get surprised that a lot of new folders are available.
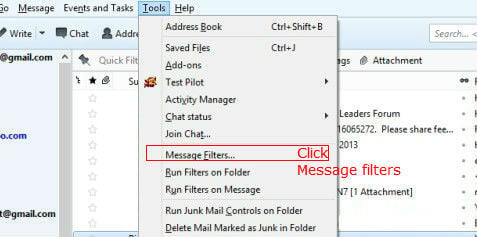
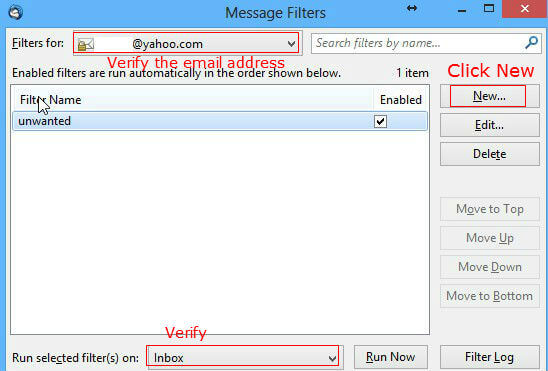
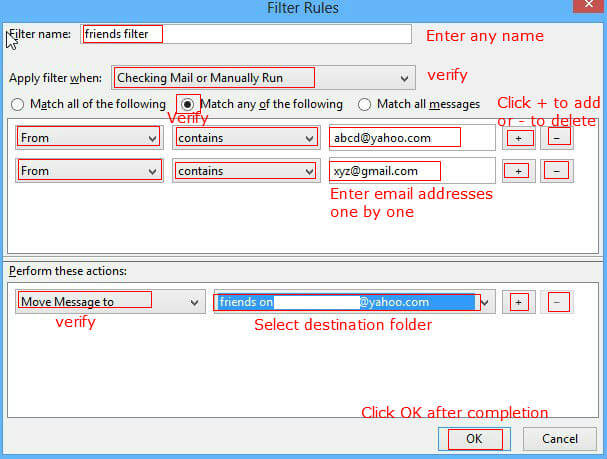
After creating required folders in Thunderbird now Click on “Tools”. From that menu Click on “Message Filters”. A new window will appear named as Message Filters. In that window, verify that the filters are created for the correct email account in “Filters for” field. Now click on “New” to create a new filter. In the Filter Rules window, give a filter name and don’t forget to give “Checking Mail or Manually Run” in the “Apply filter when” field as shown in the figure.
In the next field, select “From” & “Contains” using the drop-down menu and enter your friend’s email address in the next field ( if you are configuring the filter for your friend’s emails). You can enter more email addresses similarly by clicking the “+” button. If any email addresses are to be removed from the list, then just click on the “-“ button to remove it. Now in the “Perform these actions” field, just select “move the message to” & the “ required folder ( eg: ‘friends’ folder )@emailaddress.com” from the drop down menu to move your message to the appropriate folder. After completing this, click “OK” to save this.
Similarly create more filters for the required destination folders like family, office etc. All your filters will be listed in the Message Filters window for the corresponding email account.
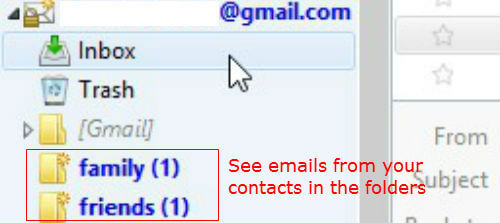
Now the configuration for email sorting is over. You have to close and reopen Thunderbird to take the changes in effect. Now, when you opens Thunderbird, it will check the emails from the given addresses and if found, it will move the emails to designated folders. Instead of Inbox, you can check the unread emails in the corresponding folders viz. family, friends, office etc. All your other emails from the unknown contacts will come in your Inbox and that can be checked later when you are getting enough time.
The emails will be moved to your online account too if you are running Thunderbird before you logging into your account online.
This method can also be adopted in other email clients by using their filters properly. The procedure may be little different but you can configure the message filters similarly in other clients too.

Hi! I’ve been checking these details and this is very useful post for me.