Taking backup of your iPhone occasionally is a good idea to avoid data loss. It is not always practical to take a backup of your iPhone always using the lightning cable. If you have a Windows PC, you backup the iPhone over WiFi to your laptop without bothering about the process.
Let us take a look at how to backup your iPhone to Windows PC over WiFi.
Backup iPhone Over WiFi to Windows
As we backup the iPhone to Windows using the lighting cable, we are using the iTunes here to back up over WiFi. Mac users can use the Finder window to backup iPhone over WiFi. Connect both your iPhone and Windows PC to the same WiFi network before going through the steps below.

- Install and open iTunes on your Windows PC.
- Connect your iPhone with Windows PC using the USB-to-Lightning cable.
- Click on the iPhone button at the top left of your screen.
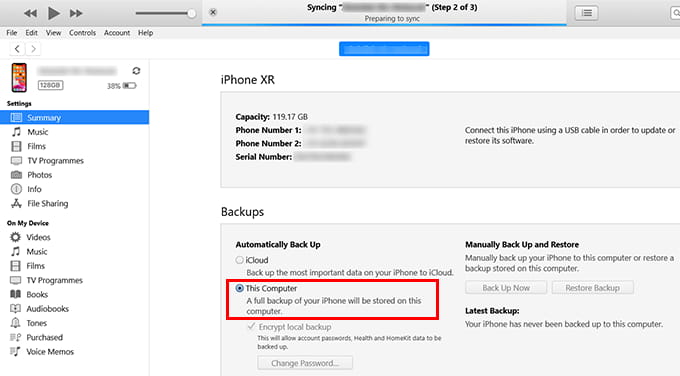
- From the next window, click on the Summary on the left pane.
- Under “Backups” choose “This Computer” to save backups to your PC hard disk.
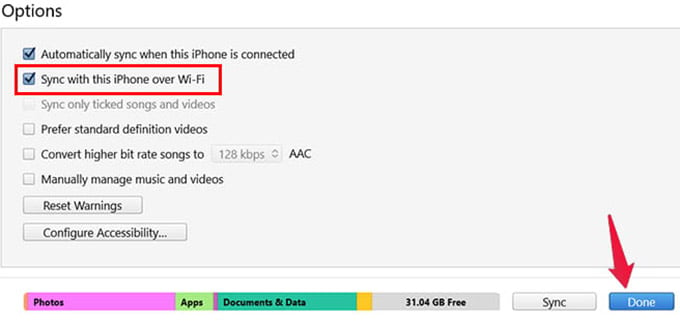
- Check the option “Sync with this iPhone Over WiFi” under the “Options” section.
- Click Done.

Now, disconnect your iPhone from PC. You can still find your iPhone connected and synced in iTunes on your PC. While the iPhone and your Windows PC are on the same WiFi network, you can sync and backup iPhone data wirelessly.
![]()
Go to the Control Center on your iPhone to see the backup icon, to make sure the wireless backup is working fine.
Your iPhone will backup to your Windows PC while you continue working with your computer and phone. Whenever you manually backup your iPhone before an update or reset, it will finish quickly as you already have previous backups.
Taking an iPhone backup over WiFi to Windows is not the fastest solution to take a full backup. But, this enables you to backup your iPhone without any worry.
