Do you have kids in the house? Nowadays, kids have technology in their DNA. They can learn to operate iPhones and iPads at a surprising rate. While this is not necessarily a bad thing, it can be a cause for concern.
There are plenty of educational sites and apps on the App Store, but they’re also an adult, violent, and graphical content. Such content can plant the wrong ideas in your kid’s mind. Rising violence and cyberbullying among teenagers is a clear indicator of this.
This is why it is important that you learn to block websites on iPhone and iPad before handing over the reigns. Let’s see how you can do it.
How to Block Adult Content in Safari
Safari is the default browser that comes pre-installed on all iPhones and iPads. Most people use it including your children. It will be wise to begin blocking sites on Safari, with adult and violent content here.
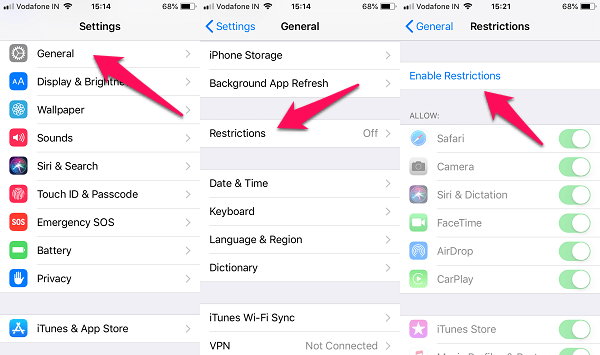
- Go to iPhone Settings.
- Tap on General.
- Select Restrictions(you will notice Restrictions is set to Off by default).
- Click on Enable Restrictions.
- Choose a password and confirm it the second time.
- Enable or disable restrictions on an app basis.
- Toggle Safari on.
- Scroll down and tap on Websites.
- Click on it and select “Limit Adult Content” option.
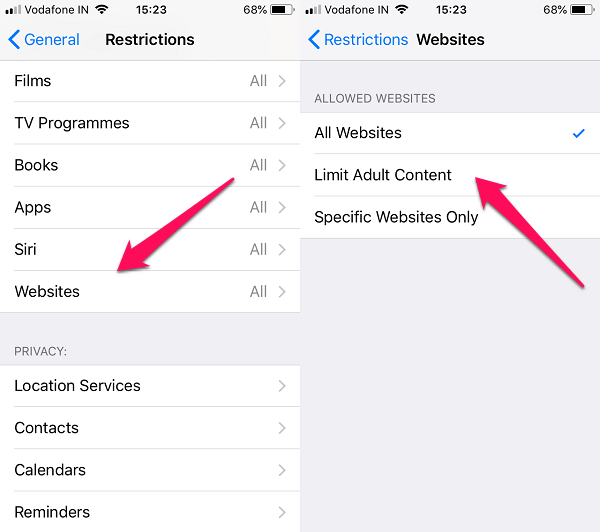
Safari will block all Adult Websites from loading on iPhone or iPad. Now your kid won’t be able to open adult sites on Safari.
Also Read: How to Set Netflix Parental Controls on Kids Profile?
How to Whitelist (Allow) Specific Sites in Safari
It may happen that Safari is now blocking certain sites that do not contain adult content. If you think so, you can enter the URL and name of that site in the Always Allow section to whitelist it.
- Go to iPhone Settings.
- Tap on General.
- Select Restrictions(you will notice Restrictions is set to Off by default).
- Click on Enable Restrictions.
- Choose a password and confirm it the second time.
- Enable or disable restrictions on an app basis.
- Toggle Safari on.
- Scroll down and tap on Websites.
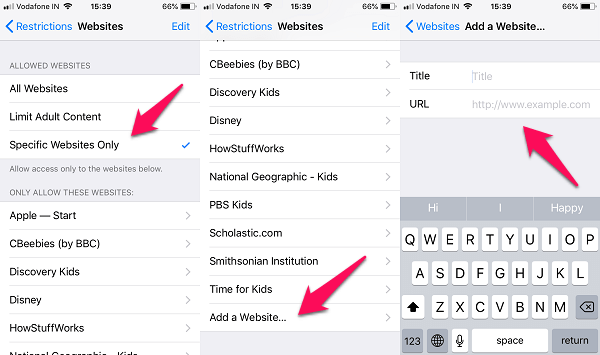
- Select Specific Websites Only. (When you click on it, a small list of sites will appear. These are the sites that have been whitelisted meaning it will not be blocked).
- Tap on Add a Website from ALWAYS ALLOW.
- Enter your kid’s favorite site to allow him/her to access it.
How to Block Specific Sites in Safari?
While the default block function works alright, there may be some sites that may slip through the cracks. You will have to be due diligent here. If you see your child accessing such a site in spite of restrictions, you will have to block it manually. I call it the blacklist.
- Go to iPhone Settings.
- Tap on General.
- Select Restrictions(you will notice Restrictions is set to Off by default).
- Click on Enable Restrictions.
- Choose a password and confirm it the second time.
- Enable or disable restrictions on an app basis.
- Toggle Safari on.
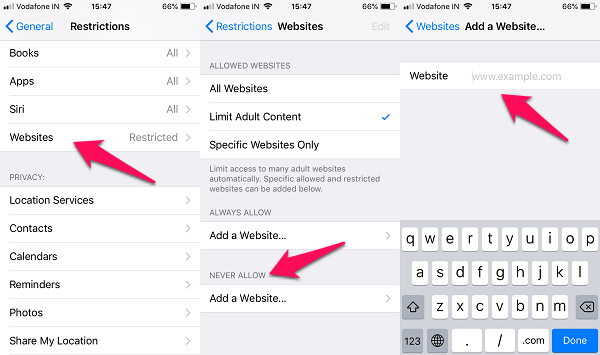
- Scroll down and tap on Websites.
- Tap on “Add a Website” from NEVER ALLOW.
- Type the WebSite URL to add in the block list.
- Enter your kid’s favorite site to allow him/her to access it.
You have the ability to create a negative list that will be blocked specifically. To do this, click on Add a Website under Never Allow. You will find this option on the same screen under Websites option.
Note that many sites these days have a mobile site that works on a sub-domain. Usually, they begin with the letter M. For example m.websitename.com. You will have to enter them separately.
Also Read: Best Parental Control Apps for iPhone & Android
4. Block Websites With OpenDNS
You can configure your DNS settings to block access to certain sites directly. This will only work when your iPhone or iPad is connected to your WiFi network. Apple doesn’t allow to change DNS settings on the mobile network. This shouldn’t be a problem since your kids will be using your iPhone inside the house most of the time. They are kids, after all.
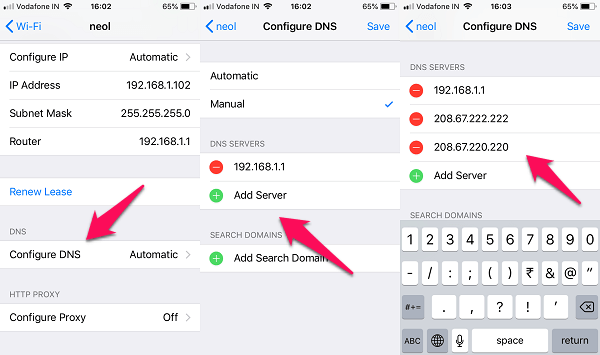
Go and open iPhone Settings;
- iPhone Settings.
- Tap on the ‘i‘ button next to the WiFi name you are connected to.
- Scroll down to select Configure DNS under DNS heading.(By default, it should be set to Automatic).
- Tap on Configure DNS.
- Enter new OpenDNS server IP manually. (enter 208.67.222.222 and 208.67.220.220, that’s the Open DNS Server IP).
- Remove the default 192.168.1.1 IP address from the list. (Click on the ‘-‘ sign next to it to do it).
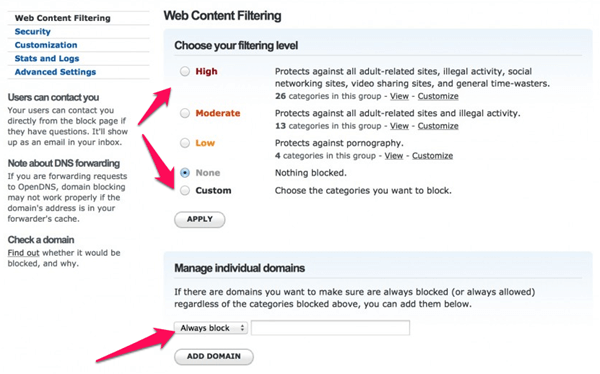
You can now block websites on a DNS level. Go to OpenDNS site and create an account if you don’t have one already. It is free for consumers with limited needs.
Also Read: How to Block Websites with OpenDNS on home WiFi?
4. Mobicip Parental Control
Not many people know this but there are quite a few parental apps available on the App Store. I will be covering Mobicip Parental Control app.
As the name suggests, you can set parental controls in the app and allow your kids to browse the web safely. Download the app using the link below from the App Store. You will need an account to use this app so sign up via the app.
If you are using Mobicip, you don’t need to restrict Safari which we set up in the steps above. Go back to Restrictions and toggle Safari off.
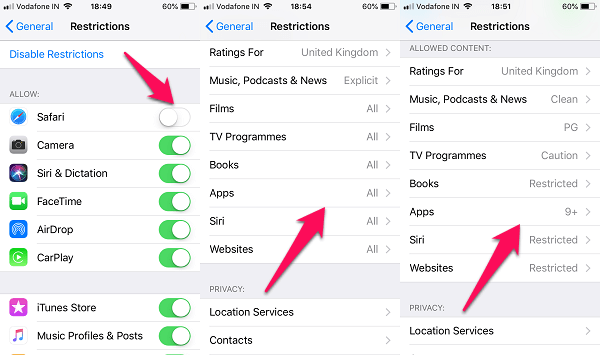
Now scroll a little down to find Allowed Content heading. Here, you can set criteria for individual content categories like movies, books, music, and movies. Set the necessary restrictions based on your child’s age, sex, and maturity. You can always change these settings if you find that the restrictions imposed needs to be decreased or increased.
You can now use Mobicip to set screentime which dictates the number of hours your kid can use the device. After that, the screen will time out. All the apps that he has used will be listed here for you to monitor.
You can find their physical location using GPS and supervise streaming service providers like YouTube and Netflix. You can also check their browsing history and if you find sites with objectionable content, simply add it to the blacklist under Restrictions as we discussed before in the above steps.
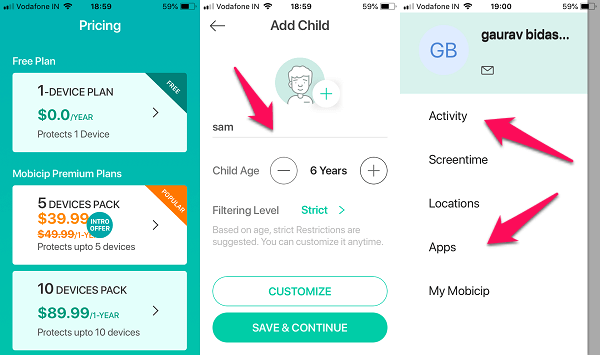
What if you have more than one kid in the house? Mobicip will allow you to create multiple profiles and set different restrictions for both the profiles. What’s more, you can also control your kid’s iPad from your iPhone remotely.
Mobicip is a freemium app where the first device is free to set up. More profiles and devices will come at a subscription.
Download Mobicip Parental Control: iTunes
Block Websites on iPhone and iPad
Choosing the right solution will depend on many factors such as the number of kids you have in your place, number of devices you own, how much time your kids spend with their iPads, and what kind of content are they browsing.
Answering these questions will help you apply the correct measures to help protect your kid’s innocence and keep him/her away from harm’s way.

“Restrictions” does not exist on iPad 2018. Now what?
Please make sure you updated to iOS 12.