Your computer has a short-term memory section called RAM, which you must be aware of. However, most of us do not bother much about the amount of RAM we have on our computer or Mac until it starts to feel sluggish a bit on the performance side. Do you know how much RAM you have on your Mac or PC? Well, it is necessary to know about your system’s hardware, especially RAM, to run larger applications.
Here is how to check how much RAM you have on Mac and Windows PC.
- What RAM Do I Have in My PC
- How to Check RAM Speed
- How to Check RAM on Windows 10
- Check RAM Usage on Windows 10
- Tools to Check RAM on Windows 10
What RAM Do I Have in My PC
RAM stands for Random Access Memory and is used to store the necessary data on the relatively faster buffer ton access easily while using your computer. Not only the amount of memory, but the generation and type of the RAM chip highly affect the performance of your PC. Most of the computers and laptops being sold these days come with DDR4 SDRAM modules. Motherboards and laptops from 3-4 years back are supposed to have at least the DDR3 RAM slot. The major thing that changes with the generation is the clock speed. Also, DDR4 RAM slots support bigger RAM modules.
Your RAM type matters mainly when you are using a Windows PC so that you can install applications that support your hardware too. Here is how to see what type of RAM do you have on your PC.
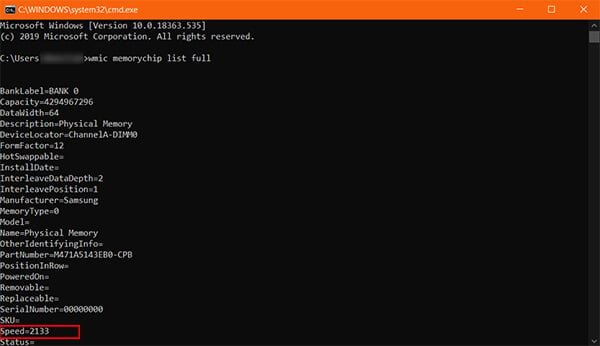
- Open Command Prompt window on your Windows PC.
- Enter the following command:
wmic MemoryChip get /format:list - Find the RAM details as a list on your command prompt.
Command Prompts to Find out Windows 10 RAM Details
You can try a couple of Windows commands to see the RAM and details on Windows 10.
- To determine the memory manufacturer, run the following command.
wmic memorychip get devicelocator, manufacturer - To check the memory part number give the following command
wmic memorychip get devicelocator, partnumber - To check memory module capacity give the following command
wmic memorychip get devicelocator, capacity - To check the total available memory(installed) on Windows 10 PC give the command
systeminfo | findstr /C: "Total Physical Memory" - To check the complete memory details give the command given below.
wmic memorychip list full - To check the memory form factor, give the command
wmic memorychip get devicelocator, formfactor - To check the memory speed, give the following command
wmic memorychip get devicelocator, speed - To check the memory type, give the following command
wmic memorychip get devicelocator, type
Related: How to View Hidden Files, Folders, and Drives in Windows 10
Find out RAM DDR3/DDR4 on Windows
RAM, as we know, is a memory, that holds the information for a short time, while we are logged into the system and work. How efficient the memory is will depend upon the data transfer speed it has. This transfer speed usually measured with SDR, DDR. Let’s know more about DDR.
Double Data Rate or DDR generally segregates into two categories, DDR3 and DDR4. In both DDR3 and DDR4, the rate of data transfer is usually measured in Gigabytes of information the RAM processes per second.
However, the question is how to check which type of DDR a PC has got. Well, there are many ways to find it out. Let’s check that out.
Use the Task Manager to Check DDR3/DDR4 RAM
You could find every detail regarding other technical information from there. If you just want to see the RAM type and nothing else, go to the Task Manager.
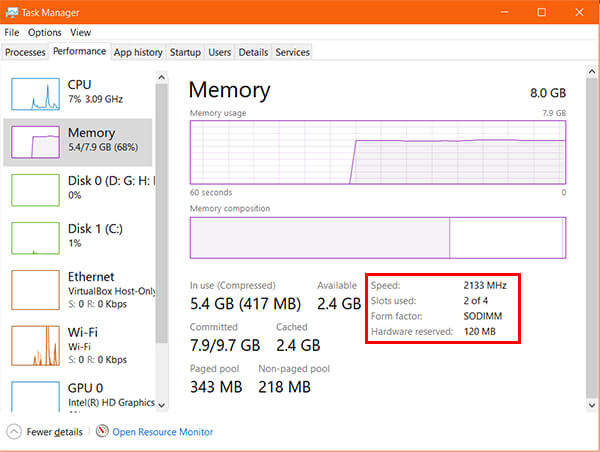
- Open Task Manager on Windows 10. Use the shortcut Ctrl+Shift+Esc to open the window.
- Go to the Performance tab.
- Click “Memory.”
- You will see the Speed, Memory type, form factor and hardware reserved memory of your RAM.
How to Check RAM Speed
The RAM Speed of your computer actually depends on the motherboard. So vendors use compatible RAM modules. This generally goes from 1333MHz up to 2133MHz. To check your RAM speed on your Windows PC, follow the steps.
- Right Click on the Taskbar and click Task Manager.
- Go to Performance tab > Memory.
- Find out the value against “Speed.”
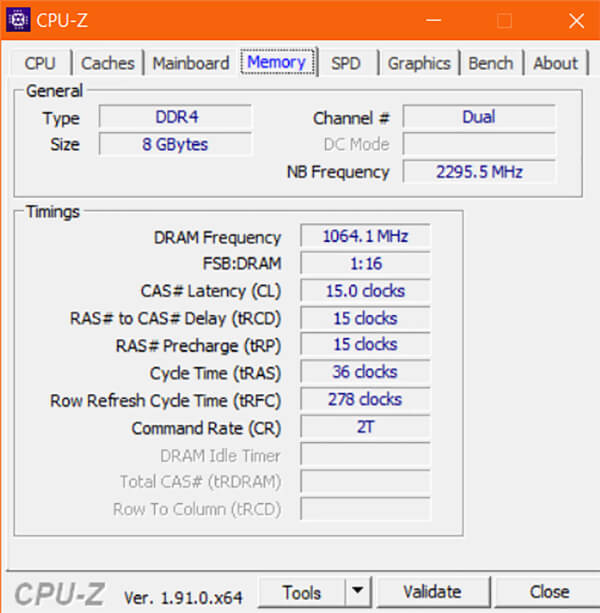
The task manager generally gives you the overall refresh rate of the memory used. In case you want to find out more information regarding your RAM chip, you can use third-party tools like CPU-Z. It will show you the real-time performance and clock speed of your hardware devices including RAM.
Related: Low Memory Hard Disk! Expand Windows Memory with this Low-Cost Solution
How to Check RAM on Windows 10
Back when Microsoft released the initial versions of the Windows Operating System, there was only limited information available for the users. The System Information on Windows OS allowed the users to check the hardware and software specifications of their computer systems. However, with Windows 10 OS, you could find out the amount of memory you have in various ways and here are they.
Check Windows RAM on Windows 10 Settings
If you are still looking at how to check RAM on Windows 10, the Settings app has all the basic information about your PC.
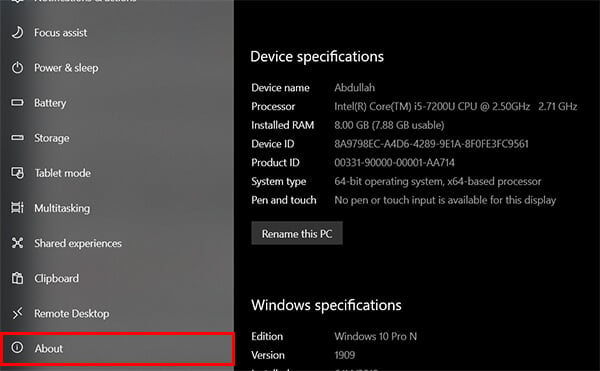
- Open Settings from Windows 10.
- Go to General.
- Click About from the left pane, the Window will list out the available memory.
Check RAM Using Task Manager
The task manager app has it all listed out, and here is how to check how much RAM you have on Windows PC.

- Open Task Manager using keyboard shortcut Ctrl+Shift+Esc.
- Go to the Performance tab.
- Click Memory and you will see the installed Physical Memory and available VRAM on your system.
Use System Information for Windows RAM
Microsoft System Information tool is a built-in utility for Windows Operating System, to collect information regarding your PC. It contains every single information regarding an I/O to the CPU threads.
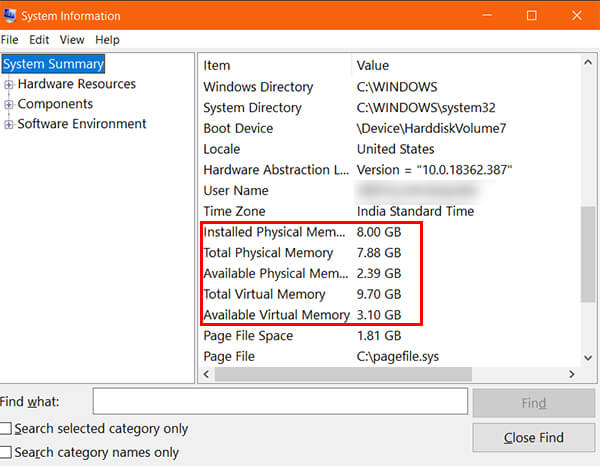
- Press Windows Key+R to open Run window.
- Type “msinfo32” and hit enter.
- From the opened window, find the RAM details from the System Summary group.
Check RAM from Control Panel
System Information on Control Panel contains the RAM and processor information. Here is how to look into that.
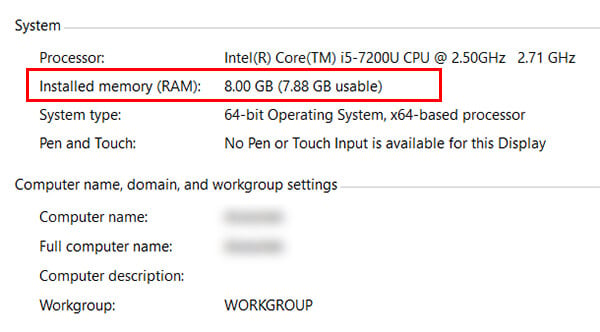
- Open Control Panel windows on your Windows PC.
- Click System and Security.
- Go to “System” and find the available memory.
Related: 7 Ways to Fix Time Not Updating or Syncing in Windows 10
Check RAM Usage on Windows 10
There are apps that eat a lot from your available physical memory, and they tend to slow down your system eventually. The Adobe products, Google Chrome browser are a few of the RAM eater apps.
Opening these apps for a longer time means that you are feeding them too much memory and slowing down your computer performance. In order to prevent that, you should be aware of how much memory is taken by each app and should close the inappropriate tools. Here is how you can find out the RAM usage on Windows 10 using Task Manager.
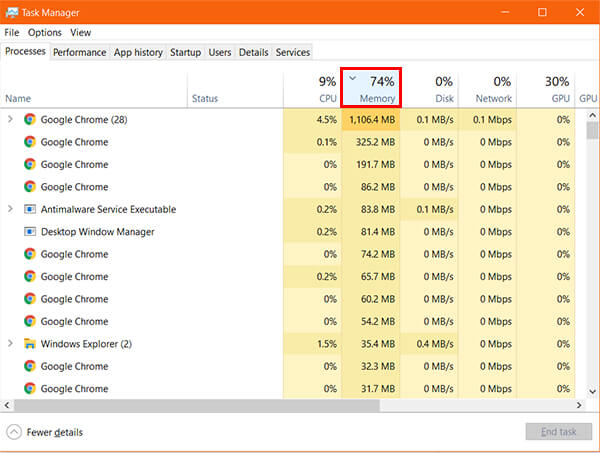
- Right Click on the Task Bar and click Task Manager.
- From the processes window, click on “Memory” to sort the list by memory usage.
- You could find out the total percentage of memory usage by each app and its background processes.
- If you want to force stop any of them, select the application and click the “End Task” button at the bottom.
You can also get additional RAM usage information from the Resource Monitor tool. Follow the steps to know-how.
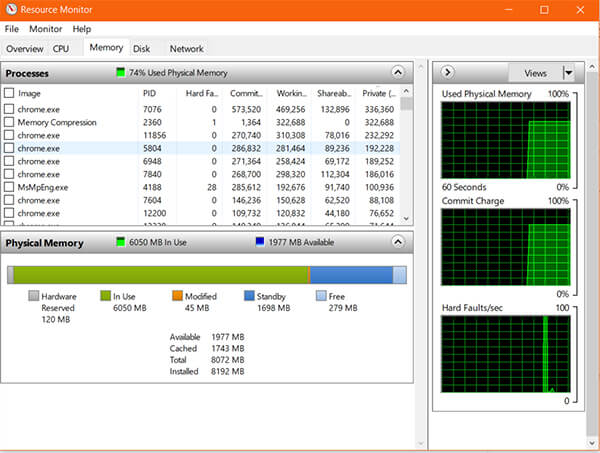
- Open Task Manager > Performance.
- Click on Memory.
- Click the Open Resource Monitor.
- Go to the Memory tab and see the detailed information regarding your RAM usage.
Related: 9 Ways to Fix Keyboard Language Keeps Changing on Windows 10
Tools to Check RAM on Windows 10
Most of us are now familiar with the inbuilt options that let us check the available RAM and the Memory usage of our Windows system. Apart from these, there are several third-party tools that show you the advanced details about memory usage. Some of the are listed below.
The performance of your PC highly depends on the amount of RAM, type of RAM used and the memory buffer your RAM has. Therefore, most of the computer users look at the RAM specifications before buying even a laptop. It even mostly leads many users to upgrade the RAM to any higher available options.
