
We always will have some PDF documents saved on our iPhones containing bank statements or work stuff. Though saving those files on your phone will help you to quickly access them, it is not safe if someone gets access to your iPhone or iPad. To keep your data secure, it is better to password protect PDF files on your iPhone in case it contains sensitive data.
First off, there is no need of installing a third-party app on your iPhone for this. We will show you how you can lock a PDF file with a passcode on your iPhone easily.
How to Lock PDF Files on iPhone or iPad with Passcode
As said above, you don’t really need any third-party apps to password protect the PDF documents as you can use the inbuilt option available on your iPhone to lock PDF files. For this to work, your iPhone should have iOS version 15 or newer. Let’s see how to lock PDF files on iPhone without any tools.
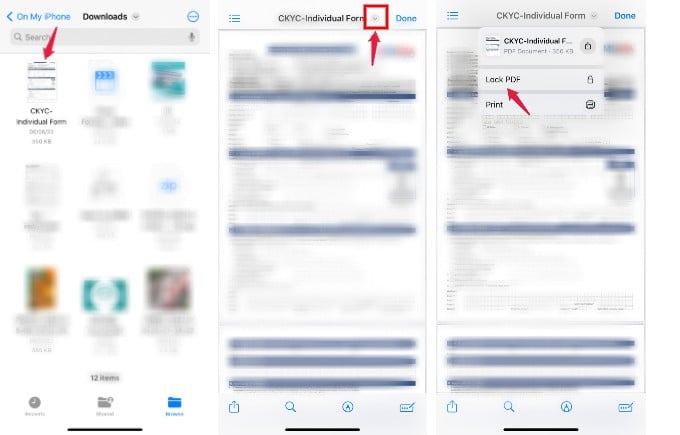
Open the Files app on your iPhone and navigate to the folder where the PDF file is stored. Next, open the PDF file for which you need to set a password. Then, tap on the small down arrow located at the top.
From the drop-down menu shown, tap Lock PDF.

In the new screen, you will be prompted to set a password for the file. You can enter anything as the password, but remember to put a tough one so that others won’t guess easily.
Once you finish entering the password, tap Done on the top to save the changes.
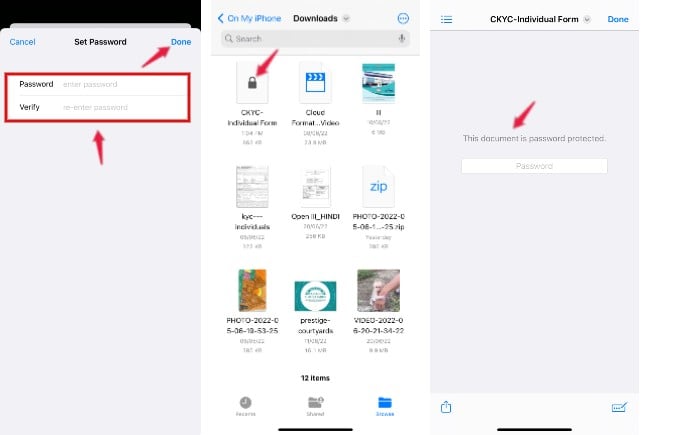
Now, if you go back to the location of the PDF file, you can see a padlock symbol on the thumbnail to indicate that it is a locked file. You will need to enter the set password to open the PDF file. Even you cannot open the file if you ever forget the password.
If your iPhone is running an older version like iOS 15, you can see the Lock PDF option while sharing PDF documents. Open the PDF file on your device and tap the Sharing icon.

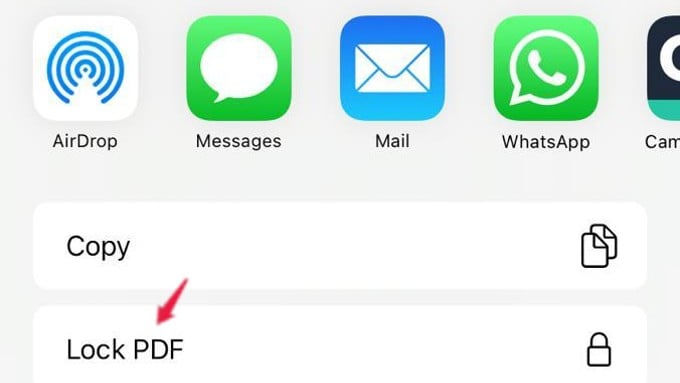
Tap Lock PDF from the Share Sheet. The rest of the steps are just as same as said above. You should enter the password whenever you want to open the PDF file. You can also share the PDF file after setting password protection from your iPhone or iPad. Your iPhone lets you draw shapes over protected PDF documents and save them as well.
How to Unlock Password Protected PDF on iPhone
Have you downloaded a protected PDF file on your iPhone or iPad and now you want to open it? Without a password, you cannot open a protected PDF on your iPhone. Let’s see how to do that.
On your device, open the Files app and browse to the folder where the locked PDF file is located. Next, tap to open the file.
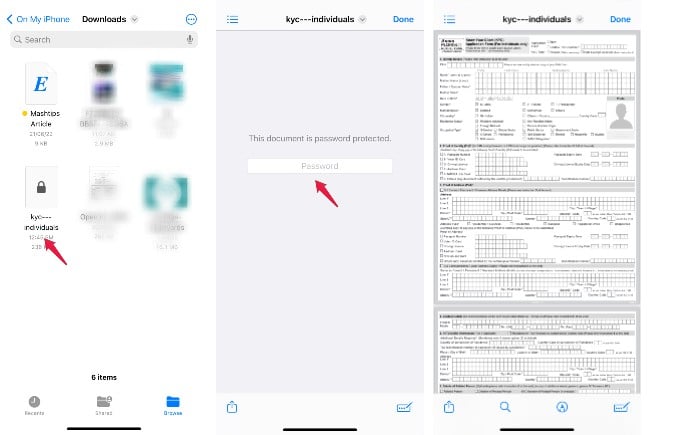
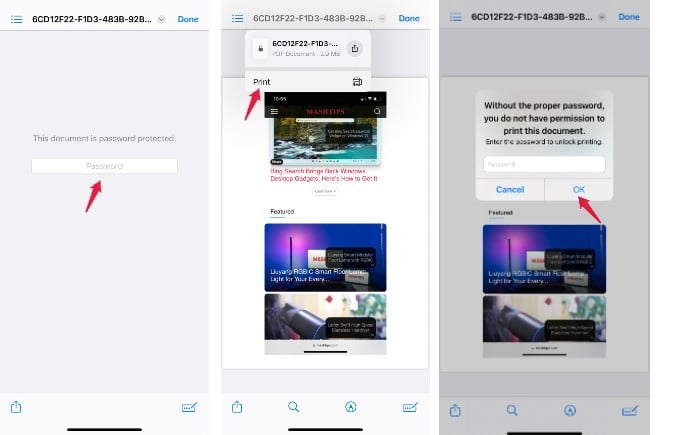
From the next screen, you will see a message ‘This document is password protected and you will be prompted to enter the password. Type the PDF file password and then, tap the “Go” button on the keyboard.
That’s it. Now, you can read the PDF file as you have opened it now. But you will be asked to enter the password once you close the file and try to open it immediately.
Remove Password from PDF on iPhone or iPad
The problem with a protected PDF is that every time you want to open the document, you will need to enter the password. Do you find it annoying to remember and enter passcodes every time? There is a workaround for you.
After opening the locked PDF on your iPhone or iPad, you can remove the password and save it as a normal PDF document. To remove password from a PDF file on iPhone;
Launch the Files app on your iPhone or iPad and open the PDF file by entering the password. Next, tap the small down arrow on the top (or the Share button on older iPhones).
Then, tap Print from the pop-up menu. Here, you will be prompted to enter the password again. After typing the password, tap OK.
Then, you will see the new screen Print Options with a preview of the file displayed at the bottom.
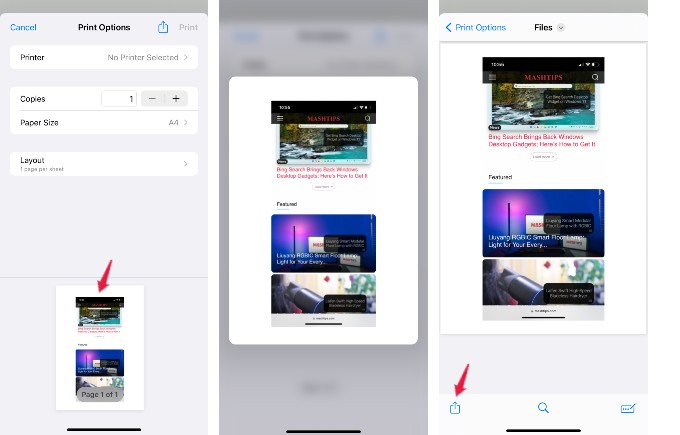
Now, long-press (haptic press) the document preview at the bottom of the screen. Next, tap on the preview that pops up on your screen. Then, tap the Share icon located at the bottom and select Save to Files.

Once you have selected the folder for saving the file, tap Save on the top right.
Navigate to the folder where you have saved the PDF file. Can you see? Now, it is not password protected and you can easily open the file without any hassle. Since this workaround uses the Print function to convert password-protected PDF into a normal one, you might see changes in orientation or quality in some files.
Remove Password from PDF Using Third-party Apps
Of course, the above workaround to removing PDF password on iPhone and iPad is a bit complicated. If you don’t want to do all of these, or if you have multiple PDF files you want to remove passwords from, there are third-party apps to remove PDF passwords. In this example, we are using the app PDFElement.
Download: PDFElement (Freemium)
Once you install the third-party app, follow the below steps to unlock a PDF file and remove the password permanently.
On the Home screen of the app, tap + icon on the bottom right. From the pop-up menu that is displayed on your screen, tap Files and select the PDF file for which you need to remove the password.

Then, you will be prompted to enter the password to unlock the PDF file. After entering the password, tap Unlock button. Now, the file will be displayed on your screen. Next, tap the three-dot icon located on the top of the screen.
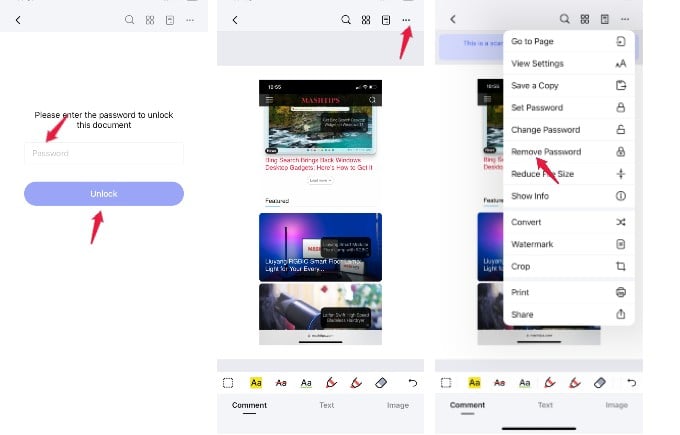
From the list of options shown, tap Remove Password. Then, you will see a message ‘Password removed successfully‘.
Finally, tap the Save icon on the top left to save the PDF file without a password. The free version allows you to save the file, but with a watermark. There are a handful of third-party apps that will allow you to remove passwords from PDF files on iPhone or iPad like:
How to Password Protect Photos on iPhone
If you wish to lock your photos, there is no option to set a password for an individual image or a photo album on your iPhone. To keep your images private, the only available option is to hide the photos so that they are stored in a separate folder named Hidden. In case you don’t how to do that, you can refer our guide on How to Completely Hide Photos on iPhone.
Though the folder is hidden, it can still be accessed by anyone who has access to your iPhone. To prevent unauthorized access, iOS 16 has a privacy option which is enabled by default.

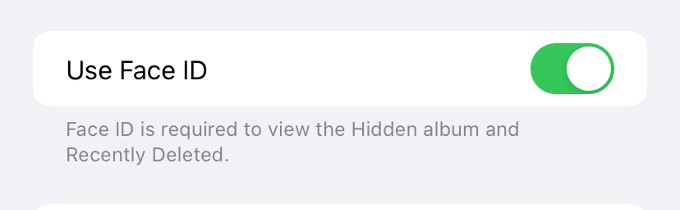
On your device, go to Settings > Photos. Here, make sure the field Use Face ID is set to ON or green. Now, the photos are password locked and the Hidden folder can be viewed only with a Face ID or Touch ID unlock.
Files apps on iPhone and iPad have come long, especially in document handling. Apart from setting passwords for PDF files, you even scan documents, create PDF files, zip or unzip files, and more.


