
Did you accidentally delete any file on Ubuntu? In this tutorial, we’ll show you how you can recover deleted files in Ubuntu Linux. We’ve all had that experience of deleting something that we didn’t intend to. This is why every OS has a Recycle Bin or Trash where deleted things are stored for a while as a safety measure. This makes it easier to recover deleted files. Some people like to hold Shift while deleting things though. This deletes the files completely, skipping the recycle bin. If you accidentally delete a file like that, or if you accidentally delete something from the Recycle Bin too, there’s not a lot of hope but there is some.
The Linux user can easily recover deleted files, even in Ubuntu and in general, Linux. Let’s see a couple of solutions to recover a deleted file on Ubuntu.
Recover an Accidentally Deleted File
When a file is deleted completely, it is still hasn’t really been deleted. The OS simply refuses to actively allocate hard disk space to the file and will overwrite over it whenever required. So unless the OS overwrites upon a deleted file, it can still be recovered. If you Google, mostly you’ll find tools and guides for recovering deleted files on Windows. That’s not surprising given the operating system’s popularity. On Linux, there aren’t as many tools but the process is still quite straightforward and simple if you know how.
Also Read: How to View Saved Wi-Fi Passwords on Linux (Ubuntu)?
Install TestDisk Data Recovery Utility
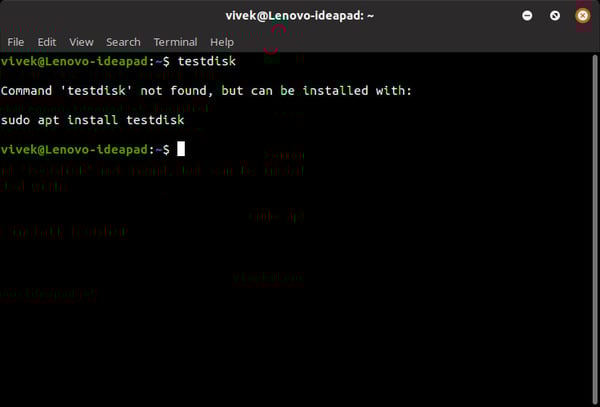
TestDisk is a free and open-source data recovery utility. It’s designed primarily to recover lost data, storage partitions, etc,. TestDisk can be used to recover deleted files in Ubuntu Linux. TestDisk is a command line utility, which makes it daunting to use for some people. But this file recovery tool isn’t exactly difficult to use. In fact, all you have to do to get started is open a Terminal and enter testdisk to get started.
Most Linux distributions already include the tool in their official repositories. Therefore, if you don’t have it already, you can install it easily by entering the following command in the Terminal. If you enter “testdisk” in the Terminal and don’t have it installed, you’ll be told to type this same command.
sudo apt-get install testdisk
Although we’re focusing on Ubuntu Linux here, “TestDisk” can be used similarly on any other Linux distribution. The above command can also be used on other Linux distributions based on Ubuntu such as Linux Mint, Elementary OS, etc. Arch Linux users can install it from AUR while users of other Linux distributions can follow the link given below.
Download Link: TestDisk
Run TestDisk on Linux
As just mentioned above, TestDisk can be easily launched by simply entering testdisk in a terminal once the utility has been installed. Let us see how to recover deleted file after running this utility.
Recover Deleted Files in Ubuntu Linux
Once “TestDisk Data Recovery Utility” starts, you should see a screen that looks something like the one shown below. Since this is a command line utility you have to be careful about the option you choose. Since TestDisk version 7.0, the tool automatically highlights the next logical step. It’s usually right but it can be wrong as well. It always prints out some text so make sure you read that too before making a choice.
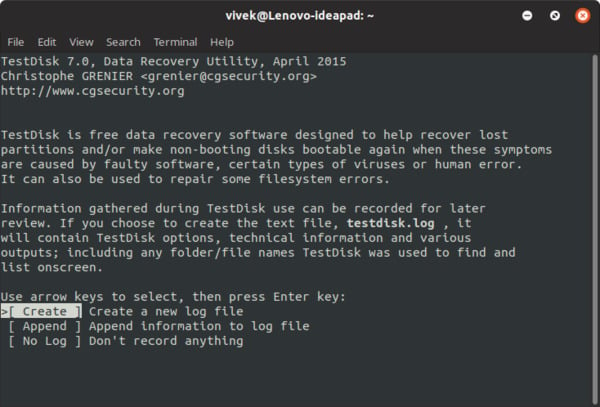
As you can see in the screenshot above, you have the option to create a log file or append the information to an existing log file. You can also choose to not create one. Creating a log file can help you find help online on the Ubuntu or Linux forums in case things don’t go according to plan.
Also Read: How to Run Windows Programs on Linux?
Select Disk to Check for Deleted Files
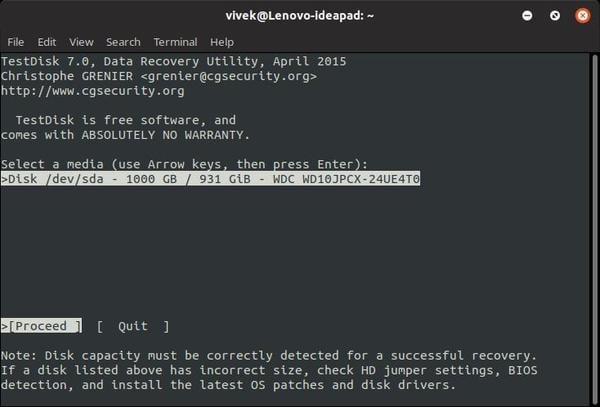
Once you make the choice, you’ll be asked to enter your password after which TestDisk will restart with root privileges. You’ll again be asked to create or skip creating the log file. Then you can select the disk from which you want to recover the lost files.
Select a Partition Table
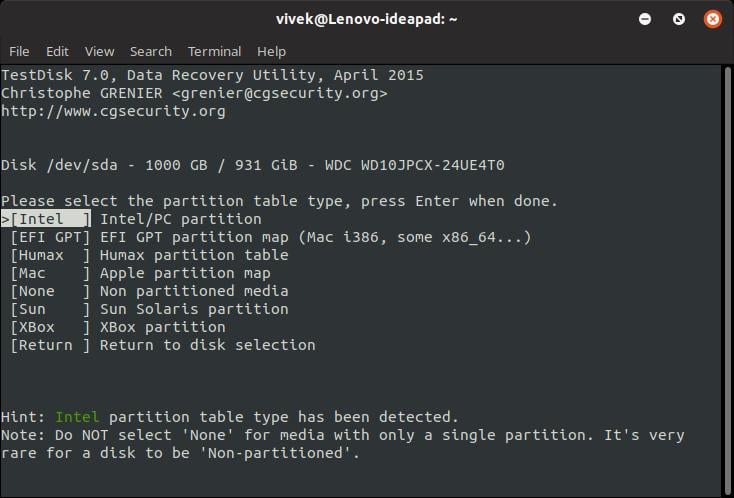
You’ll then be asked to select the partition table, but don’t fret because TestDisk Data Recovery Utility automatically detects the partition table type and lets you know. This is why it is important to read the text that is being shown.
Select the Advanced (Optional)
Once the partition table is selected, you’ll be provided with all the options that TestDisk can be used for. Yes, TestDisk can be used for a whole lot of other things other than recovering deleted files in Ubuntu Linux. Of course, if you read everything that was shown in the Terminal, you’d know.
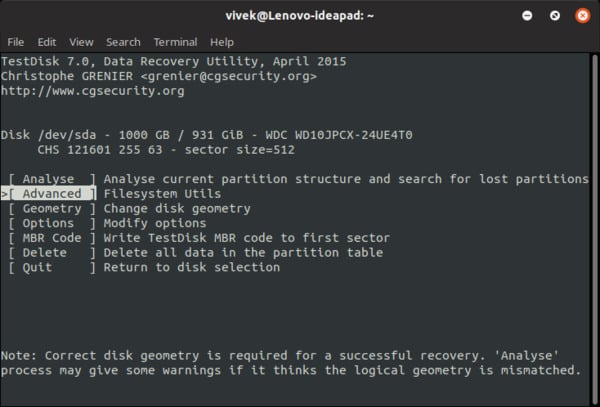
The options presented can be confusing but if you know what you want, the choice can be pretty obvious. We’re not trying to recover a lost partition, so it doesn’t make any sense in analyzing the disk for it. Similarly, we’re not trying to change the disk geometry, modify anything, etc. The only reasonable choice is the Advanced option which contains Filesystem utilities.
Undelete a File Deleted
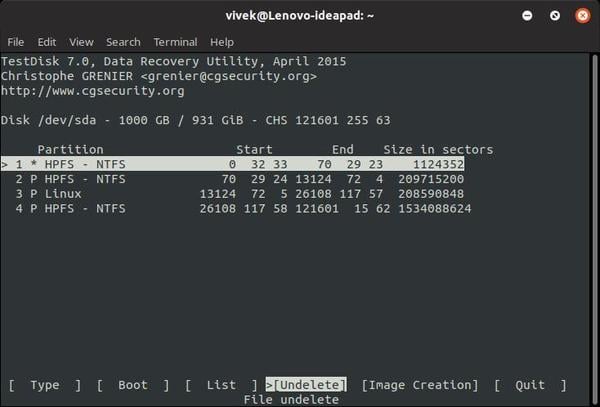
On the next screen, highlight a drive using the up and down arrow keys. Then select Undelete using the left and right arrow key and hit Enter. As soon as you do, TestDisk will start scanning for deleted files.
Recover Deleted Files
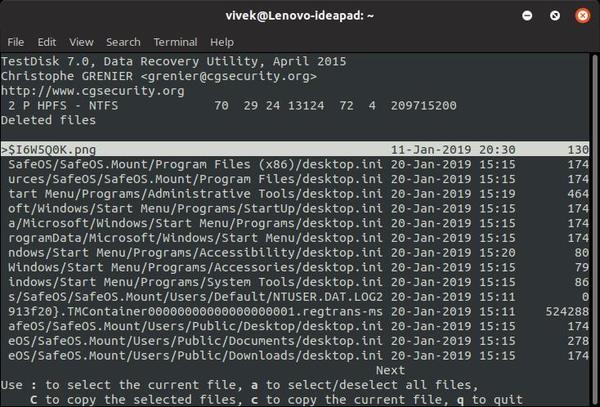
When it is done scanning, TestDisk will present you with a list of deleted files that can be recovered. Highlight the file that you want to recover using the arrow keys and press c on your keyboard.
Next, you can select where exactly the recovered file should be saved using the arrow keys. You should be familiar with the input and selection process by now.
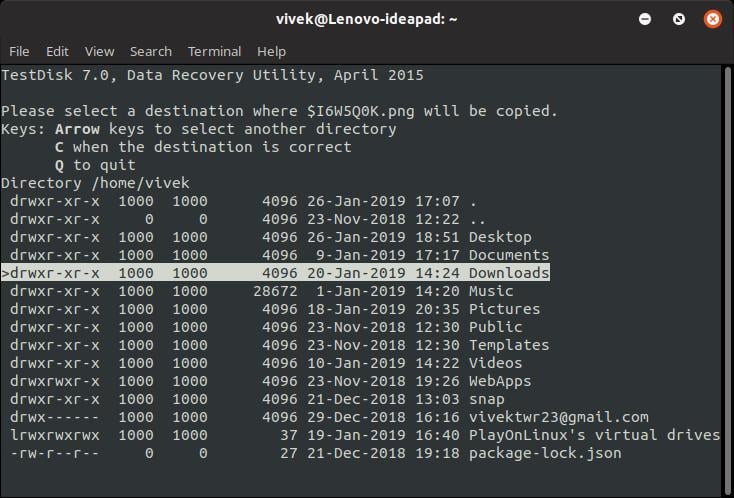
The default option is to recover deleted files in the home folder which is generally the best choice since navigation within the command line utility can be tricky. Most users will find it much easier to later navigate to the home folder using a file explorer and place the file wherever they intend to.
As you can see in the screenshot above, the selected file has been recovered in the selected location. Once the first file has been recovered, TestDisk will take you back to the file selection screen. Here, you can highlight a file you want to recover and press “c” over and over to recover every deleted file you want to recover.
When you’re done, you can simply close the terminal window. Pressing q to quit or selecting quit from the TestDsik options does not close the program. It simply acts as a back button. This can be useful in case you find yourself somewhere in the command line utility where you don’t want to be.
Alternative Solutions to Recover Deleted Files in Linux
For those who don’t want to depend on this free tool, there a bunch of other Linux tools to scan and recover the deleted file.
Foremost
Foremost can be installed on any Debian based Linux distro such as Ubuntu and its derivatives like Linux Mint. The command to install it is given below.
sudo apt-get install foremost
Once Foremost is installed, create a folder where you want to restore the deleted files.
mkdir /root/restored
Now, run the foremost command and restore the deleted file. For this example, we’re going to restore all the deleted JPG files. With foremost, this can be done in a single step using the command below.
foremost -i /dev/sda3 -t jpg -o /root/restored/
The above command will scan for any deleted jpg files on the /dev/sda3 partition and restore them to the folder we just created. You can similarly restore a number of other types of files. For the full list, check out foremost Linux man page.
Scalpel
Scalpel is a filesystem-independent recovery tool for Linux and Mac OS. It can also be installed on Windows by compiling it with MinGW. On Ubuntu and its derivatives, it can be installed using the following command.
sudo apt-get install scalpel
When installed, navigate to the /etc/scalpel/ folder and open the scalpel.conf file in a text editor of your choice. You’ll notice everything has been commented out in the file. You will need to uncomment the file type that you want to recover. Save the file when you’ve done that. The command to restore the deleted file is given below.
sudo scalpel [device/directory/file name] -o [output directory]
Photorec
Photorec is the easiest utility to use of the bunch mentioned above. Moreover, it even gets installed by the testdisk utility so if TestDisk isn’t doing it for you, you already get another easy to use tool with it. Like TetDisk, Photorec has a text-based UI but you won’t have to use actual commands as you had to with the aforementioned tools. To run Photorec, use the command given below.
sudo photorec /dev/sda3
Here, /dev/sda3 is the partition that you want to scan for a deleted file. Next, you’ll see a text-based interface similar to TestDisk’s where you have to select a disk. After you make the selection, you’ll be asked to select the partition table type. Highlight it using the up and down arrow keys and highlight Search using the left and right arrow keys, then hit Enter.
When you do, you’ll have to select the filesystem, and then an output folder where the recovered files will be stored. This is all the same as TestDisk. You’ll also be asked whether you want to scan the whole disk or only the free space. Choosing to scan the whole disk will obviously be more time-consuming.
Digital Storage has been a boon to professionals and even the common folks. The world has over 7 billion people most of whom create new documents and take new photos at a never seen before rate. Storing them all physically would have been a management nightmare. Not to mention, physical copies can also accidentally get damaged or lost in more ways than one. Digitally stored files can also be accidentally deleted or lost. And fortunately, you can recover and there are a lot of built-in solutions and tools available to retrive the deleted files in Linux.
Neat. I’ve been wanting to get into data recovery for some time. I used a different recovery program in MacOS (back when I still was using MacOS) that would basically just go through the free space on the disk and pull and data from there into new files. This utility seems to be a lot more sophisticated.