
Having a one-click switch to turn off or kill internet connectivity in Windows PC is a lifesaver, especially in situations where something suspicious starts on your computer on its own. Creating a custom kill switch on your Windows 10 will assure you that you can instantly turn off the internet connectivity.
In this post, we will guide you on how to create a kill switch in Windows 10 and 11. Let’s get started.
Why Do You Need a Kill Switch on Windows PC?
There are several benefits of having a shortcut to instantly turn on or off your internet. This will help you save your valuable data whenever you feel like something suspicious is happening with your system. By “suspicious activity” we mean when your computer starts downloading files on its own, or it starts displaying too many pop-up ads.
You can also consider the kill switch as a panic button that you can use so that you don’t have to get into the hassle of pulling out network cables or turning off your WiFi or even the router itself.
Related: How to Reset Network Settings on Windows 11
Create a Kill Switch in Windows PC
Windows PCs do not come with an instant way to turn off your internet connection. With this workaround, you can turn off your network adaptor so that your PC automatically gets disconnected from the internet. So, let’s check out how it’s done.
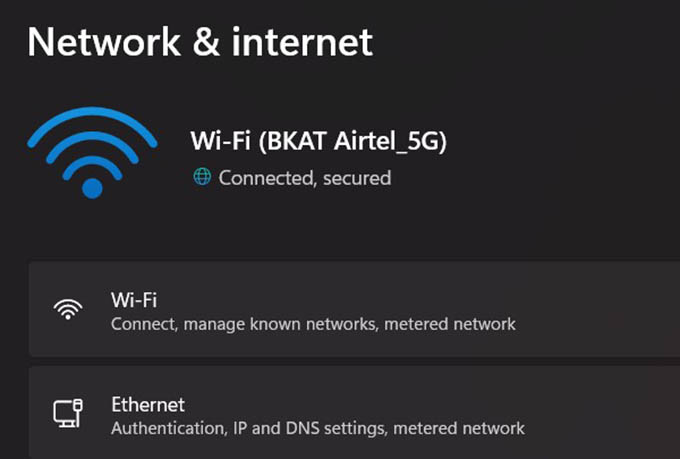
Open the Windows 10/11 Settings by pressing the Windows + I shortcut key, and go to “Network & Internet“.
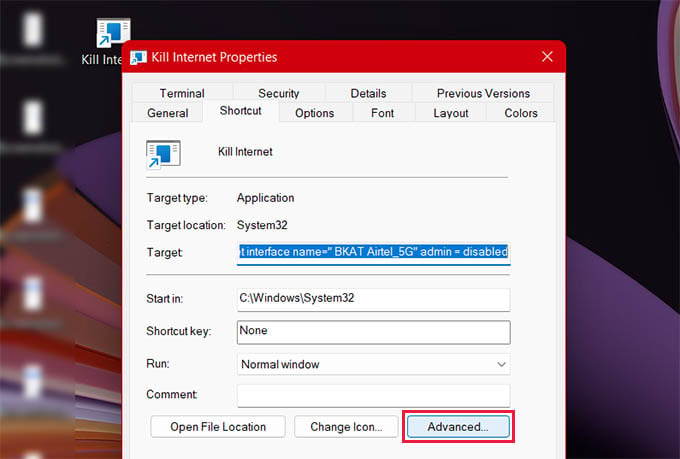
Note the name of the Network Adaptor mentioned under the Network Status. In my case, it is “BKAT Airtel_5G” which is the WiFi network I connected to. If you use a wired connection, then your network adaptor name might be “Ethernet.”
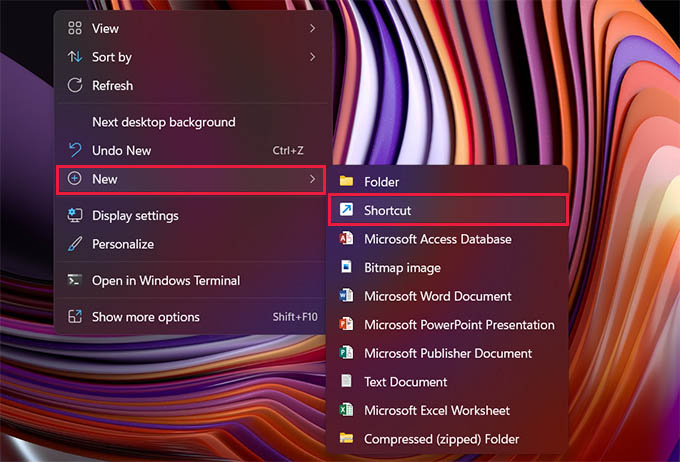
Now, go to the Desktop and right-click on a blank area. Select New, and then click on Shortcut.
n the location box that pops up, enter the following address. Remember to replace the “NET” with the name of your network adaptor. C:\Windows\System32\netsh.exe interface set interface name="NET" admin = disabled. As mentioned my network adaptor name is ” BKAT Airtel_5G”, so for me, the code will be C:\Windows\System32\netsh.exe interface set interface name=" BKAT Airtel_5G" admin = disabled.
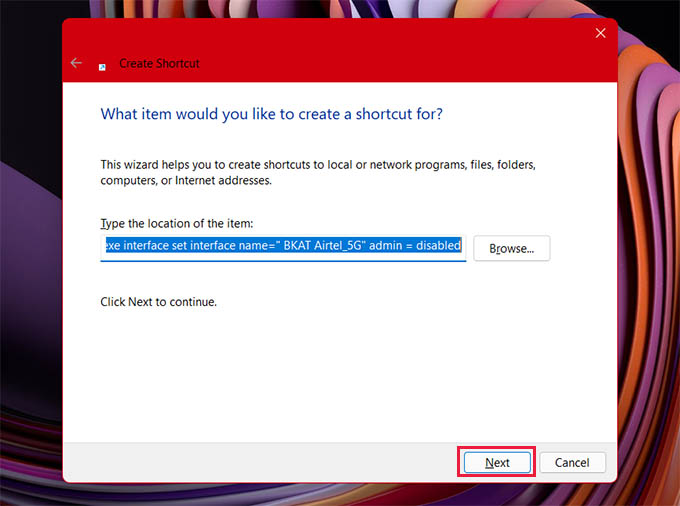
The above code will only work for you if your Windows is installed in the “C” drive. If it is installed in some other drive, replace “C” with the drive letter.
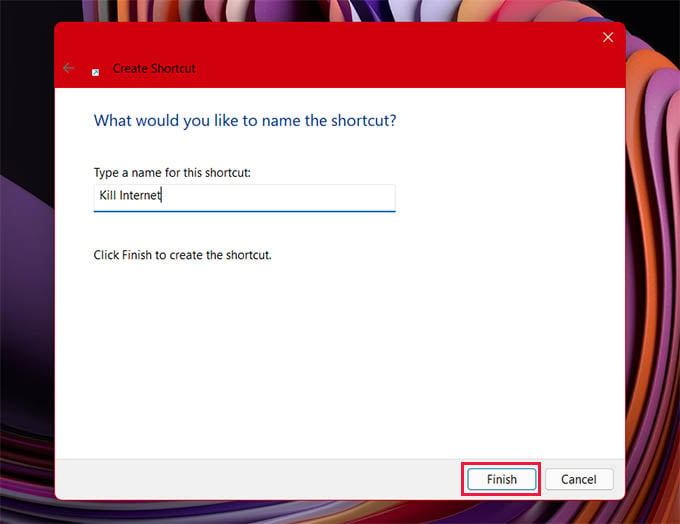
Click on Next, and give some appropriate names to your shortcut. For example, “Kill Switch”, “Disconnect internet” or something of your choice. After that, click on Finish.
Once you are done with the above method, right-click on the newly created shortcut and select Properties.
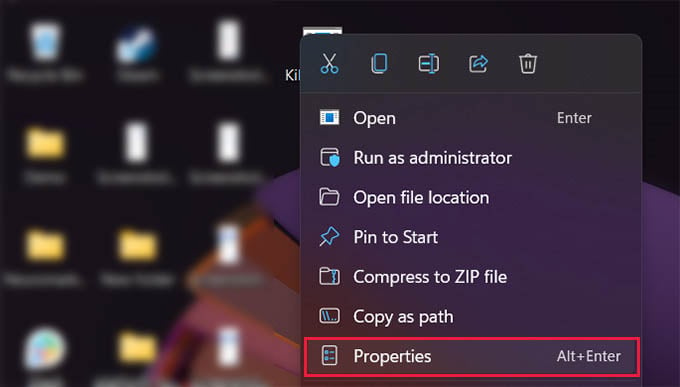
In the Properties window, click the Advanced button.
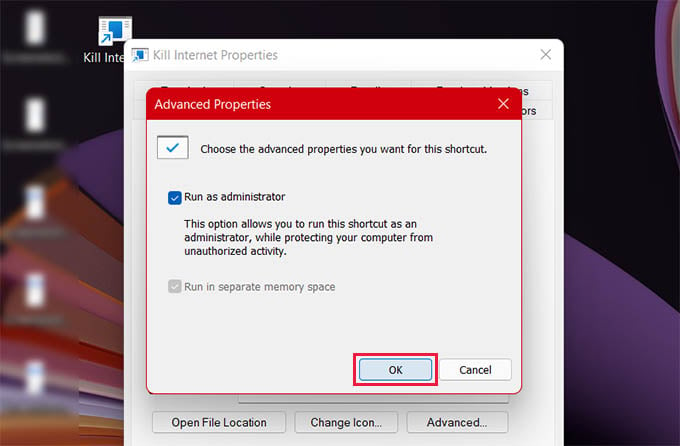
On the pop-up screen, check the option Run as administrator. After that click on “OK“, and then “Apply” to finish the process.
Now you just created the internet kill switch for your PC. But hang on. Do not use the kill switch yet, as you will first have to create a reconnect switch so that you can instantly enable an internet connection on your computer.
Related: Upgraded to Windows 11? Here are the Best Windows 11 Tips and Tricks
Create an Internet Reconnect Switch in Windows PC
Now you created a kill switch to instantly get disconnected from the Internet. But a kill switch is incomplete if you don’t have a shortcut to re-enable the internet. Let’s take a look at how to create a reconnect switch.
Right-click on a blank area on your desktop and click on New > Shortcut.
In the location dialogue box that pops up, enter the following code: C:\Windows\System32\netsh.exe interface set interface name="NET" admin = enable
Again, make sure to replace “NET” with your network adaptor name.
Now click Next, and give an appropriate name to your shortcut like “Enable Internet“. Then click on Finish.
Right-click on the newly created shortcut, i.e “Enable Internet” and then go to Properties > Advanced.
Check the option Run as administrator for this shortcut as well. Complete the process by clicking on “OK” and then “Apply“.
That’s it. Now you have both, kill switch, as well as internet enabling the switch. It is time to test the internet kill switch and reconnect the switch on your Windows 10/11 PC.
Related: How to Get Airdrop on Android & Windows
How to Use Internet Kill Switch in Windows PC
To kill the internet of your computer or laptop in one click, here is how you can do it with the shortcuts we just made.
Go ahead and double-click on the kill switch shortcut to turn off your internet. Click on “Yes” to the permission asked by Network command Shell. That’s it, the kill switch will turn off your network connectivity.
If you want to reconnect your internet, just double click on the “reconnect” shortcut And click on “Yes” to the permission act by Network Command Shell.
We had created the kill switch for one network that we regularly use. If you are the kind of person who switches places or travel often and connects to multiple WiFi networks at home or office, you need to create a kill switch for each of these networks. That’s very much the same way and simple to do. You only need to replace the “NET” part in the above-mentioned codes with the network name you want to create a kill switch for.
So, this was all about the internet kill switch on Windows PC. We hope this trick will help you to instantly turn on-off your internet connection. In case you get stuck with something, do let us know through the comments below.