Windows 11 launched with many new features over Windows 10. One of the many accessibility-related features is Windows 11 live captions. This lets you convert any audio into text when you are playing any media, thus making it easy to understand meetings, movies, and podcasts for anyone with hearing impairment.
Let’s see what are the new live captions on Windows 11 and how to use them?
Content
What are Live Captions on Windows 11?
Windows 11 Live captions is a new accessibility feature that converts audio playing on the device into readable text. It’s basically the same thing as Live captions on Chrome, except it works system-wide and isn’t limited to your browser. Windows 11 will generate and provide you with live captions for any video being played in any app or website.
You can also use the feature for video calls. The captions are generated locally, and the data is not shared with Microsoft, according to Microsoft. Once the required package is downloaded, you don’t even have the internet for Windows 11 live captions to work.
Related: How to Change Cursor Color and Size in Windows 11
How to Enable Windows 11 Live Captions
For now, Windows 11 only supports English (US) but support for other languages may arrive in the future. To enable Windows 11 live captions, follow the steps below.
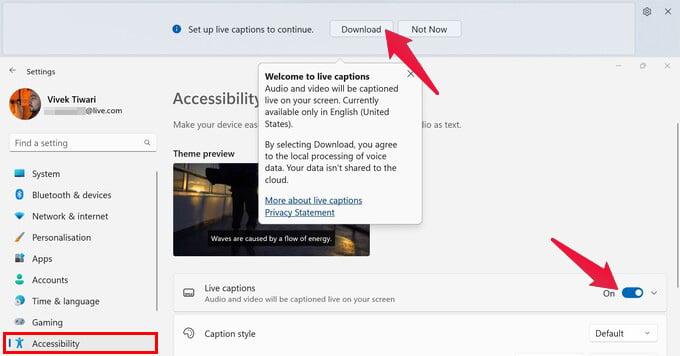
- Press Windows + I on the keyboard to open the Windows 11 Settings app.
- Navigate to the Accessibility section from the left column.
- Next, head over to Captions, under Hearing.
- Turn on the toggle for Live captions.
- Click on the Download button in the Live Caption box to download the required language pack.

As soon as the language pack is downloaded, you’re good to go. When you play any video or audio on your device, you will see the live captions. You can change the position by clicking on the gear icon in the caption box and going to Caption position. It can be at the top, bottom, or a floating window that stays on top of everything else.
Related: How to Simplify Android for Elderly People and Make Into a Senior-Friendly Phone
Customize Live Captions for Windows 11
Live captions for Windows 11 use a Default style which includes Medium-sized fonts. These can still seem a bit too big for some, while too small for others. You can change the font size and many other things as well.
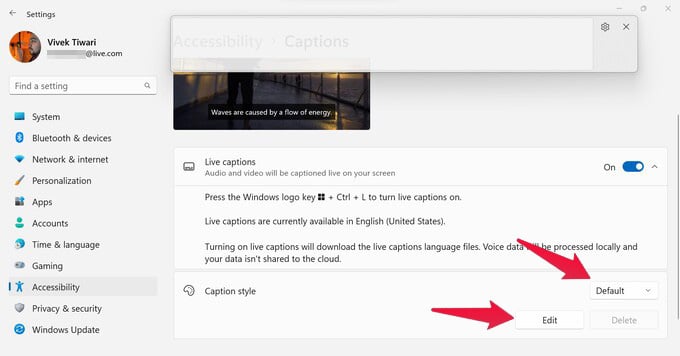
- Press Windows + I on the keyboard to open the Windows 11 Settings app.
- Navigate to Accessibility > Captions.
- Click on the drop-down next to Caption style and select a built-in style.
- Alternatively, you can also create your own style by clicking the Edit button.
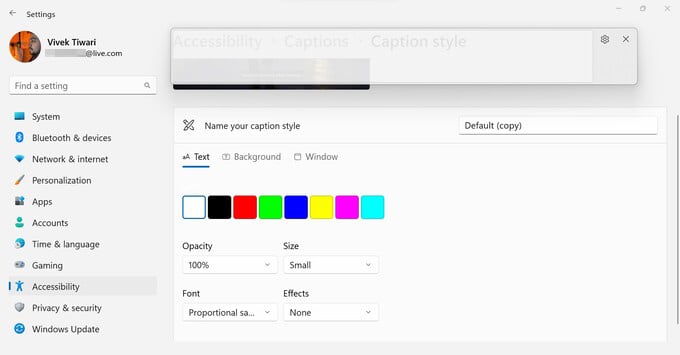
Windows 11 lets you change the font style, size, color, and opacity of the text as well as apply font effects. Not only that, but you can also change the color and opacity of the background and the window.
Related: How to Automatically Switch Windows 11 Dark Mode Like macOS
Add Live Captions Quick Settings
Since Live captions do take up a considerable amount of screen space, having them on all the time might not be convenient for many people. If you only need captions occasionally, it might be a good idea to add them to the quick settings.
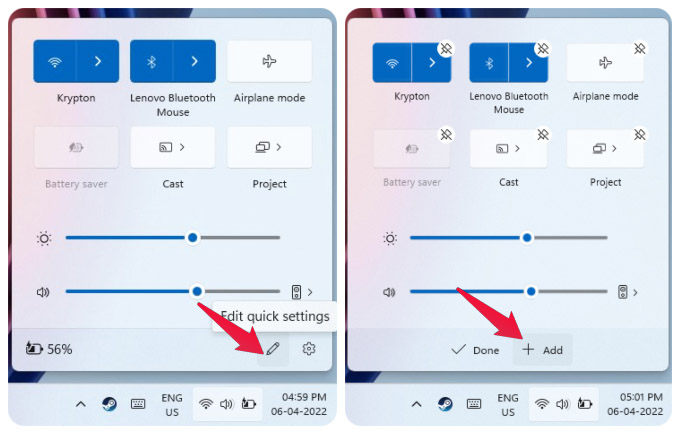
- Open quick settings by clicking on the Wi-Fi, Sound, or Battery icon in the taskbar.
- Click on the Pencil icon in the quick settings panel to edit it.
- Next, click on +Add and select Accessibility from the list.
The Accessibility quick setting is added to the panel. You can click on it to access all the related settings that can be toggled on or off, including Live captions.
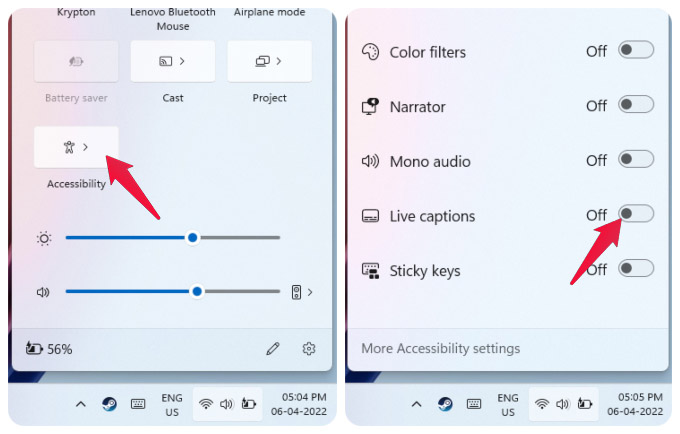
If you don’t want to add all the Accessibility features in your quick settings, you can simply use a keyboard shortcut as well. To enable Live captions for Windows 11, you can use Windows + Ctrl + L keyboard shortcut. To turn it off, simply close the Live captions window.
