The Continuity Camera allows you to capture photos using iPhone or iPad and get the picture instantly on your Mac. When you want to take a picture or scan a document to include in a mail, the continuity camera is beneficial. You can seamlessly transfer the captured image from iPhone to Mac without any delay.
Here we discuss how to use the continuity camera between your Mac and iPhone.
Content
- What is Continuity Camera?
- How to Use Continuity Camera on Mac with iPhone?
- How to Scan a Document on Mac Using iPhone Camera?
- Which Mac Apps Support Continuity Camera?
- Continuity Camera Not Working? Troubleshoot Now
What is Continuity Camera?
The Continuity Camera is one of the “Continuity” features available for macOS. It allows a connection between your Apple devices when they are nearby. Thus, you can share data, transfer photos, and can even scan documents. The continuity camera feature can help you scan documents using an iPhone camera, or take a picture of an object and get it on to your MacBook without any delay. You can import the captured photos and documents to many apps.
You will find how to use the continuity camera and get the max out of it below.
How to Use Continuity Camera on Mac with iPhone?
As mentioned above, you can use the iPhone camera to capture pictures from your Mac. Photos will get imported to the app you are working on the Mac. With a pair of Continuity supported iPhone and Mac devices, it is easier to use the continuity camera. Here is how to use the continuity camera between your Mac and iPhone.
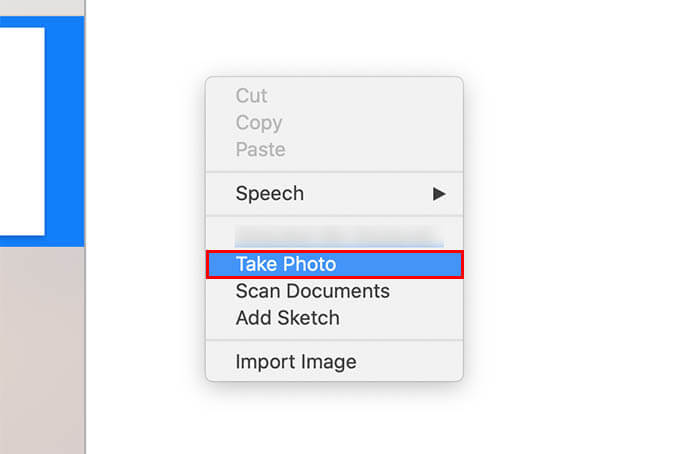
- Enable Wi-Fi and Bluetooth on your Mac and iPhone.
- Open any supported app on your Mac (Mail, Finder, Messages, etc.).
- Right-click on where you want to insert a picture.
- Choose “Take Photo” from the right-click menu.
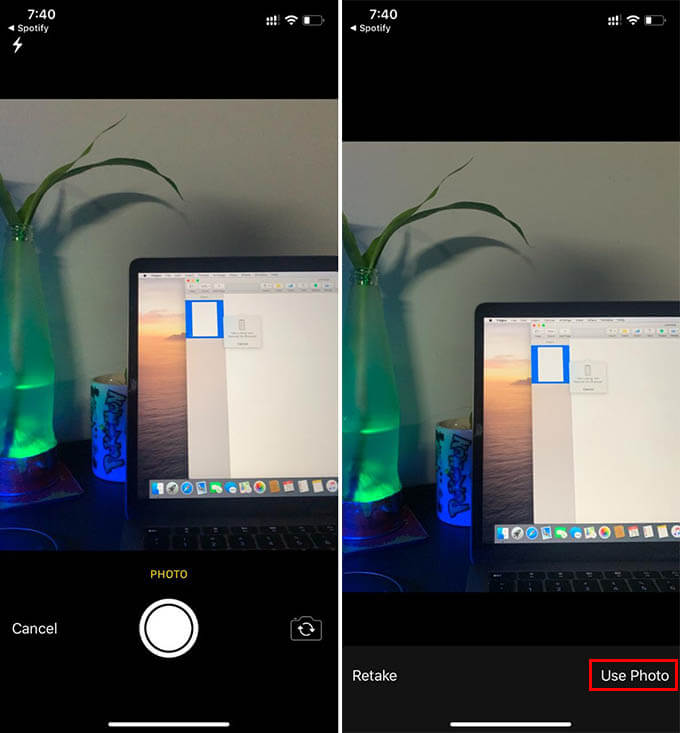
- Now capture the photo on your iPhone.
- Tap “Use Photo” after capturing your desired picture.
- You can now find the image appearing automatically on your Mac.
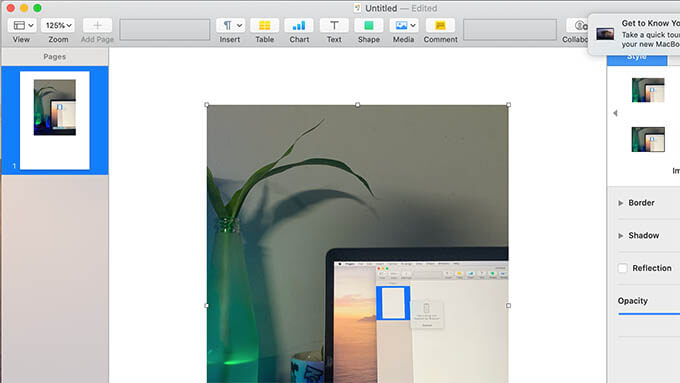
Choosing to “Take Photo” using your iPhone can vary between different apps on Mac. Therefore, below are the methods for different Mac apps to capture photos using your iPhone with the continuity feature.
- Pages: Right Click on document > Take Photo.
- Desktop: Right Click > Insert from iPhone > Take Photo.
- Mail (and many other apps): Insert > Insert from iPhone > Take Photo.
The continuity camera can import images captured using your iPhone. You can even do more with your iPhone camera with your Mac nearby. One of them is the document scanning, and below are the details.
Related: How to Fix Auto Dark Mode in Mac
How to Scan a Document on Mac Using iPhone Camera?
The Continuity Camera lets you import original quality pictures to the Mac documents and emails. Yet, taking a regular photo does not work well when you want a scanned copy of a document. The document scanning on the iPhone improves the image quality for readability. You can use the same to scan a document on your Mac as well, with the Continuity Camera. Follow the steps below to use the continuity camera feature to scan a document on Mac.
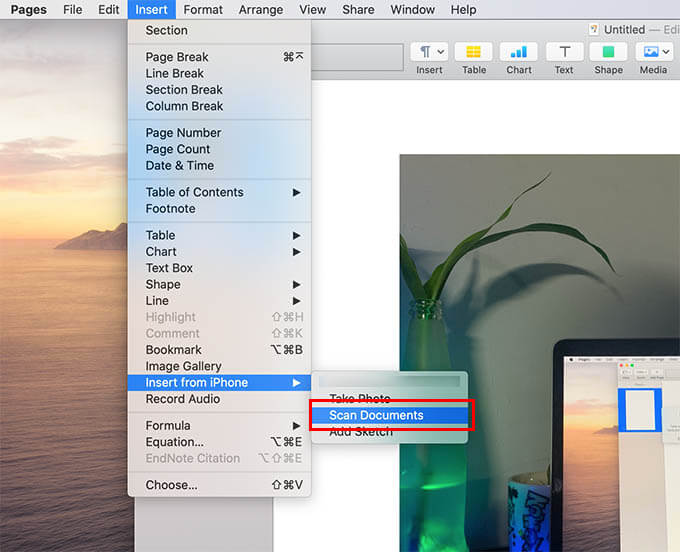
- Open any Continuity Camera supported app on your Mac.
- Right-click on the window. You can also go to Insert > Insert from iPhone.
- Click on Scan Documents.
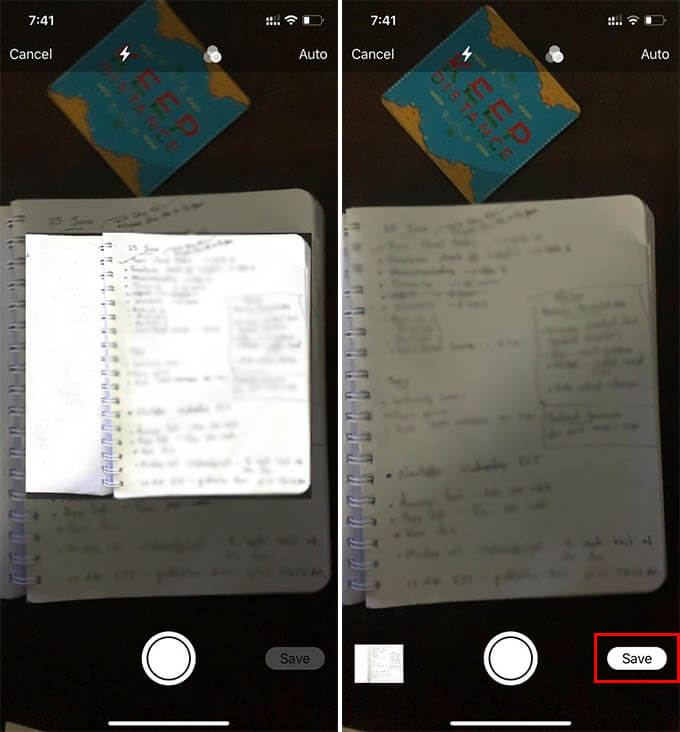
- The document scanning window will open on your iPhone.
- Capture the pages to scan the document.
- Tap “Save” when you finish scanning the entire pages.
The scanned document will then instantly appear on your Mac. You can either include it in your mail or document. Also, you can directly save the document as a PDF. The macOS continuity can help you add the scanned copy of your files and documents in your mail in a single click.
Related: How to Sync Mac Folders with Dropbox and Google Drive
Which Mac Apps Support Continuity Camera?
You can use the macOS Continuity feature with the supported apps. However, most of the continuity features, including the Continuity Camera, only support a limited range of Mac apps. If you are looking for all the Mac apps that support the continuity camera, here are they.
- Finder
- TextEdit
- Keynote
- Numbers
- Pages
- Messages
- Notes
Continuity Camera Not Working? Troubleshoot Now
You have come down here to find solutions to the problems that the continuity camera not working. So, first off, let us look at the basic things you need before using the Continuity Camera feature on your Mac and iPhone.
- Continuity supported iPhone and Mac models.
- Use the same Apple ID on both the devices.
- Update OS to the latest version.
- Enable Bluetooth and Wi-Fi for both of the devices.
- Connect Mac and iPhone to the same Wi-Fi network.
- Enable Handoff on both of the devices
Are you still facing issues with the continuity camera feature on your iPhone and Mac, even after going through the checklist above? Let us look at some common problems and see how to fix them.
Mac Not Showing “Insert from iPhone/iPad” Option
- Enable Handoff on Mac and iPhone. See how to use the Handoff feature between your Mac and iPhone.
- Use the same Apple ID on both the devices.
- Make sure both the iPhone and Mac are nearby.
Continuity Camera Options Grayed Out in Mac
- Turn on Wi-Fi and Bluetooth for both the iPhone and Mac.
- Connect the iPhone and Mac to the same Wi-Fi network.
- Make sure the iPhone and Mac are near to each other.
Continuity Camera Not Opening Automatically on iPhone
- Restart both iPhone and Mac.
- Check for any software updates.
We hope that this guide has managed to walk you through the Continuity Camera features, leaving no doubts. If any, feel free to comment them down below. Let’s discuss them.
