
Ensuring your online privacy and protecting your personal data is of utmost importance. Google Chrome, offers various privacy settings that you can enable to safeguard your information. However, not all users may be aware of these settings or how to configure them properly. In this article, we will explore the best privacy settings you should enable on Google Chrome to enhance your online privacy and protect your sensitive data from potential threats. By taking a few simple steps, you can take control of your online privacy and browse the web with greater confidence and security.
While there’s a lot of good stuff about Google Chrome, it’s important to take utmost care of your privacy while browsing the internet. Here are the best privacy settings that you need to enable on Google Chrome right now.
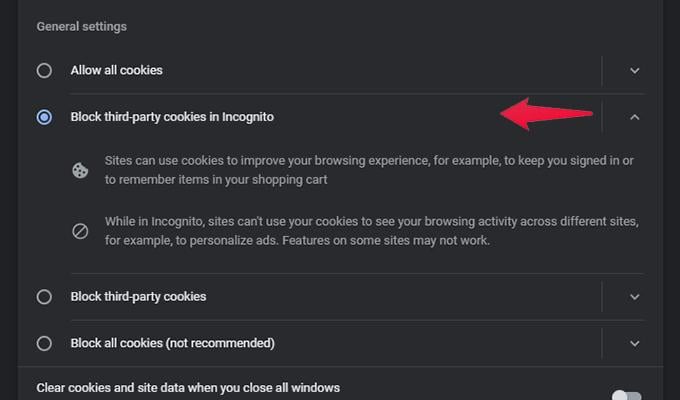
Block Third-Party Cookies In Incognito Mode
The Incognito Mode in Google Chrome or in any web browser is a mode that lets you surf the internet without using or signing into your Google Account. The Incognito Mode on Chrome is also supposed to not send any of your browsing data to Google. However, by default, third-party cookies are allowed on Chrome when browsing in incognito mode. To block third-party cookies in incognito mode, follow these steps.
- Click on the three-dot vertical menu at the top right corner of the browser.
- From the popup menu, click on the Settings option.
- On your left, click on Privacy and Security.
- Under Privacy and Security, click on Cookies and Other Data
- Finally, click on the radio button that says Block third-party cookies in incognito mode.
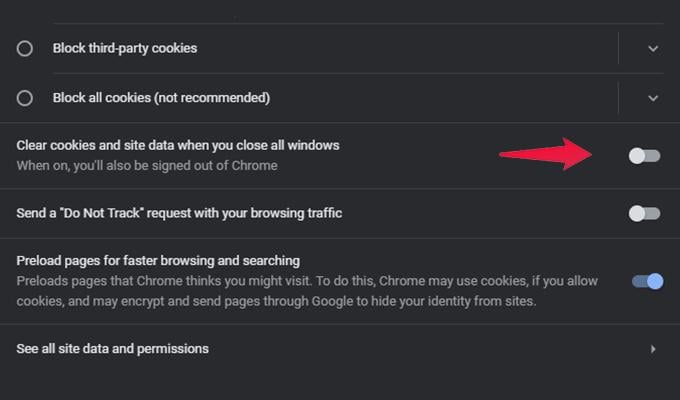
Auto Clear Cookies And Site Data
When browsing the internet on Google Chrome, a lot of websites will usually leave cookies in Chrome sot hat it can monitor your web activities and then based on the internet browsing serve you ads and other content that is tailor-made for you. With this setting, you can easily clear all the cookies and site data as and when you close all windows in Google Chrome.
- Open the Settings page in Google Chrome.
- Select the Privacy and Security tab from the left side.
- Now, click on cookies and other site data.
- You should see a toggle next to Clear cookies and Site Data when you close all Windows.
- Switch the toggle to on. Chrome will now clear all the data out as and when you close all the windows of the web browser. This ensures that the next time you browse on Chrime, the cookies won’t be able to serve you ads based on your browsing history.
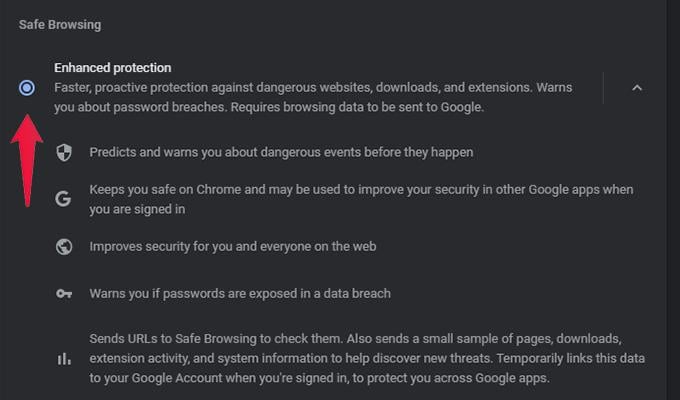
Enable Safe Browsing
The internet is a truly large place with millions of websites. In the sea of websites, you will always find a number of websites that are either misleading, scammy or potentially harmful. So, in order to stay protected and prevent any harmful things with your browser and your PC, it is best to have Safe browsing enabled on your browser. Here is how you can enable Safe browsing on Google Chrome.
- Open the Settings page and select Privacy and Security
- Click on the Security option.
- Now, you should be seeing two options.
- By default, the Standard Protection option has been selected.
- Simply click on the radio button that says Enhanced Protection.
- With Enhanced protection enabled, Chrome will now prevent the opening of dangerous websites, stop any downloads that might be malicious, and even warn you about passwords being breached.
Enable Privacy Sandbox
Privacy Sandbox is a new feature in Google Chrome. What this feature does when enabled is it provides very less information about yourself to advertisers, helps fight all types of spam and frauds, and also reduces the number of ads based on whatever information the browser and Google have collected about you. By default, the Privacy sandbox is turned off. Here are the steps you need to return the feature on.
- Launch the Settings page on Google Chrome.
- Select Privacy and Security followed by Privacy sandbox.
- Click on the toggle to switch it on.
- Every month, Chrome will automatically delete any interests that might lead to personalized ads while surfing the internet.

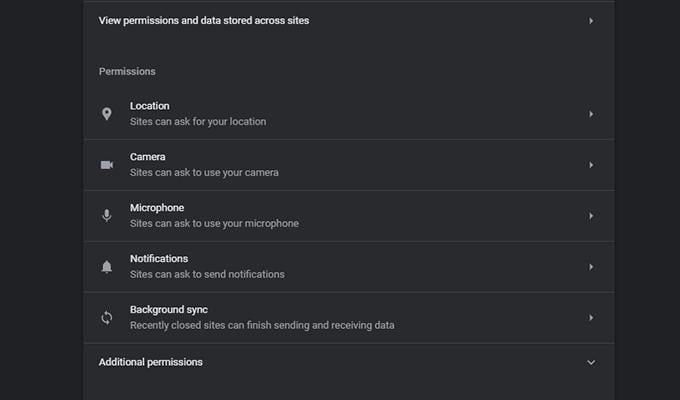
Manage Site Settings
When you browse the internet, you visit a good number of sites on a daily basis. Different sites have different permissions and settings that you can choose to allow or deny right away. If you plan to change a particular site’s permissions, you can easily do that. These settings help in preventing the browser from showing you ads or content based on your current location, notifications, and even access to the camera and microphone. You can change these settings by following these steps.
- Open Settings and choose Privacy and Security from the left pane.
- Now, click on the Site Settings option.
- Here you will see idffernt permisisosn.
- You can choose how the sites get to make use of certain permissions and which sites do not get access to certain permissions.
- Alternatively, you can choose to completely disable sites from opening up pop-up windows.
- These settings also let you choose which websites can show you images and which cant.
- The settings also let you control how you view a website as well as manage what content the website can show you.
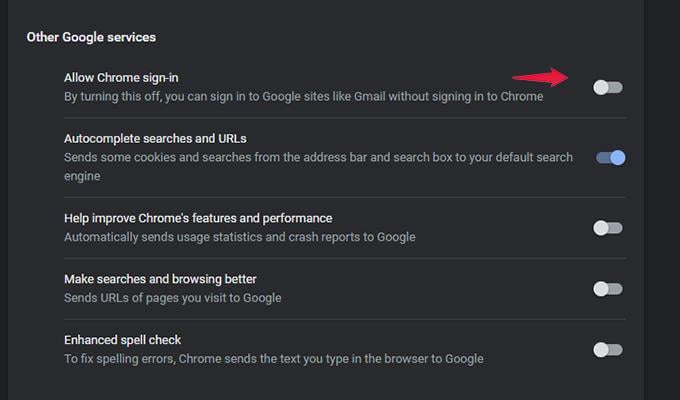
Disable Chrome Sign-In When Signing Into Google Services
Since Chrome is a Google product, Chrom will automatically sign in with the account that is being used to access certain Google Services. When this happens, your browser data is ng synced with your Google Account. If you do not want any of the browser data to be synced with your Google Account, follow these steps.
- Open the Settings page for Google Chrome.
- Click on the tab that says You and Google.
- Now, click on Sync and Services option.
- When you see the option that says allow Chrome Sign in, click on the toggle to switch it off.
- Alternatively, switch the toggle off to help Improve Chrome Features and, make searches and browsing better.
- Once you have switched the toggle off, you will be required to restart your Google Chrome web browser.
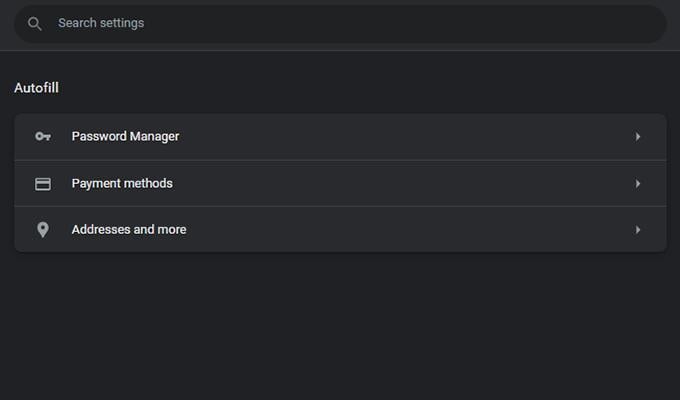
Disable Autofill
Aurtofill is a great feature that saves you time by letting the browser automatically fill in the details needed on any form or website. While it’s a great time saver, it can also pose to be a problem, especially when the browser decides to autofill the required information in a website that might be malicious. Here are the steps to disable the Autofill option.
- Open the Settings page and click on the Autofill tab.
- Now, you will see three different options ie Password Manager, Payment Methods, and addresses.
- Select each option and switch the toggles off for the auto sign-in, and autofill as well as prevent Chrome from saving your addresses automatically.
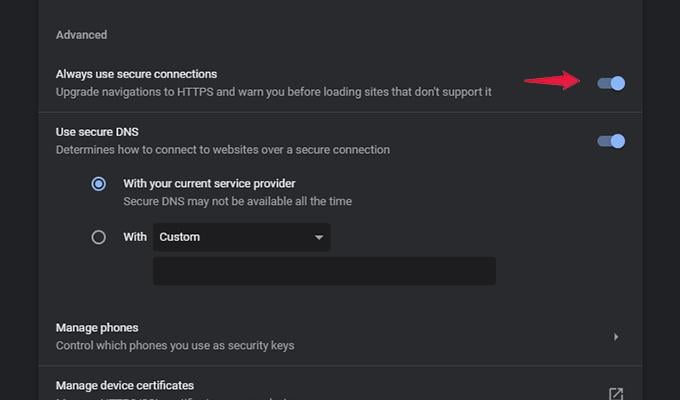
Enable Secure Connections
Connecting securely to multiple websites on the internet is important. Sites that might be lacking HTTPS secure navigation might not be secure. So, for added peace of mind, you can enable HTTPS everywhere for all websites. Here is how.
- Open the Settings page and choose Privacy and Security tab.
- Now, select Security from the list of options displayed.
- Scroll down when the Security page opens.
- Under the Advanced header, you should see an Always use a secure connection.
- Click on the toggle to switch the feature on.
Switch Your Search Engine
Now, everyone makes use of the Google Search engine no matter what the web browser is. It’s simply because people are more familiar with it and some simply feel lazy to change the search engine. However, if you do not like Google and want to reduce how much you depend on Google as well as reduce the amount of information you share with Google via Google search, it’s time to change your search engine. Here is how you can change the search engine on Google Chrome.
- Launch the Settings page in Google Chrome via the three-dot menu.
- Now, click on the Search engine tab on the left pane.
- You can now change the search engine from this page easily.
- Choose from Bing, DuckDuckGo, Yahoo, or Ecosia.
- For the highest safety, it is best to set DuckDuckGo as your search engine for every browser out there.

These are the best privacy settings you need to enable if you care a lot about Privacy. When using a web browser such as Google Chrome. Because a lot of fo people care a lot about their privacy especially when it comes to the internet simply because a lot of privacy-related issues and leaks have been going on for quite some time. Stay secure and avoid visiting websites that seem sketchy or misleading and never enter any sensitive information into such websites that might not seem legitimate.