
Google announced the Google Tez, a UPI (Unified Payment Interface) transaction gateway app, for India back in 2017. Recently, the company also renamed the app to Google Pay (Tez) but with no change to the app’s functions and structure. The all-new Google Pay has no connection with the old Google Pay service which later renamed to be Android Pay. The service is available only in India as the UPI is an instant paying system developed by National Payments Corporation of India.
Here is an in-depth guide on how to use the Google Pay (Tez) app. Please note that the service is only effective for Indian users.
- How to set up Google Pay (Tez)?
- How to add the bank account(s)?
- How to send or receive payments?
- How to send or receive payments using Tez mode?
- How to pay bills using Google Pay?
- How to view all transactions and account balance?
- How to change mobile number?
- How to turn off discoverability?
- How to change the screen lock method?
- How to close the Google Pay/Tez account?
- Rewards and offers
How to Set up Google Pay (Tez)
As mentioned above, the Google Pay (Tez) works based on the UPI service by the Indian government. It works simply based on the mobile number connected to your bank account. So, all you need is a bank account connected to a working mobile number. Make sure that you are using the same number on your smartphone which you want to use the Google Pay or Tez. Here is how to set up the Google Pay.
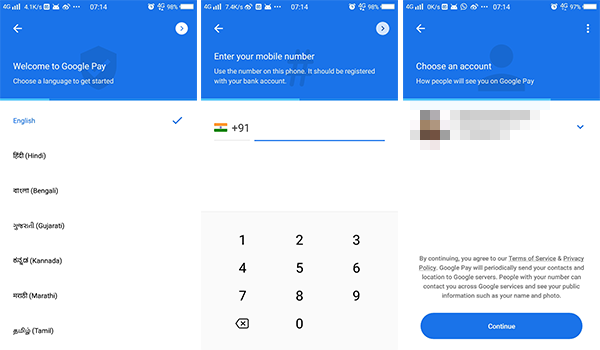
- Install & open the Google Pay (Tez) app from Google Play Store.
- Choose the app language.
- Enter your mobile number (which you connected to your bank account) and wait for OTP verification. The same number should be the one in use on your smartphone.
- Choose your Google account to continue with Google Pay.
- Select any of the Google Pay security locking methods. You can either choose smartphone lock screen passcode or a custom Google PIN.
- Now you are all set and you will see the app interface.
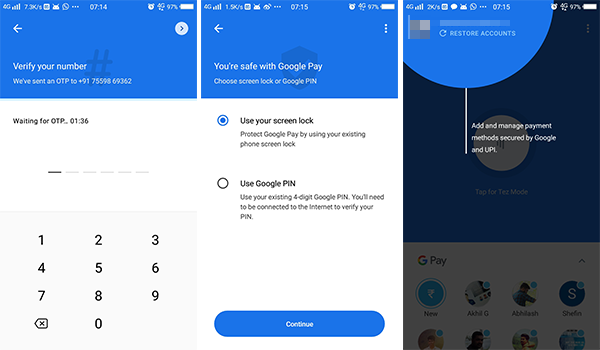
You are only halfway there. The app is only set up for your smartphone and service provider number. The next step involves adding bank accounts that are connected to the currently added mobile number.
Related: 12 Best Mobile Wallet Payment Apps for India
How to Add the Bank Account in Google Pay
If you are new to the Google Tez, you will see the bank account adding options right after the initial set up. It is very easier if you were an existing user and wants to recover the old accounts. Either way, you need to go through the mobile number and UPI PIN verification processes. Check out how to add bank accounts to a new Tez account.

- Open Google Pay app on your Android smartphone.
- Tap on the New button on the screen or go to Three dots button > Settings > Bank accounts > Add bank account.
- Choose your bank from the list.
- If you are using Dual-SIM, make sure you choose the right SIM (with the bank account connected number) to proceed further.
- Grant permission to send SMS, also maintain enough balance to send text messages for verification.
- Choose your account and create your UPI PIN. If you were using a UPI PIN before on any other services like BHIM, PhonePe, enter the existing one to continue.
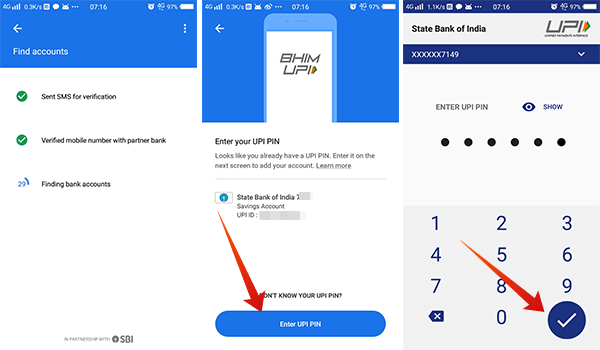
Now your bank account is added to the Google Pay (Tez) account and you only need the UPI PIN to make transactions anymore. Also, any received payments will be automatically transferred to your connected bank account.
Well, if you were an existing user and want to recover the “temporary disables” account after reinstallation, here is how to do it.
- Open Google Pay app and go to Settings > Bank Accounts.
- Tap on the disabled bank account (in gray).
- Follow the mobile number and UPI PIN verification procedures.
Also Read: How to Set up UPI and Pay Through WhatsApp?
How to Send or Receive Payments with Google Pay
Once you have set up the bank account with the Google Pay (Tez) app, it is very quick for sending or receiving money. As each Tez account exists based on the registered mobile number, you only the number of the recipient for sending money. You need to save it in your smartphone contacts list.
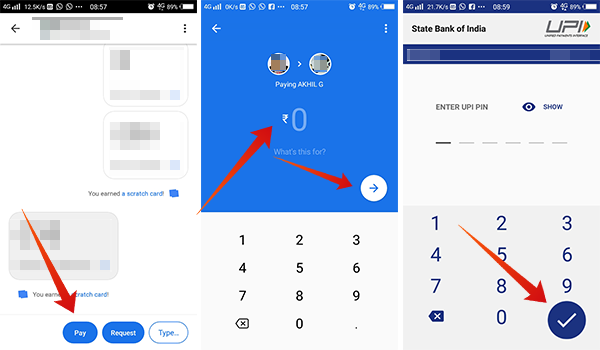
- Open Google Pay (Tez) app.
- Tap on New button under the G Pay tab.
- Search for your contact to pay the amount. You can also search with the mobile number, Tez display name or UPI ID to find the people who are not in your contact list.
- Tap on the contact.
- Choose the Pay button at the bottom edge.
- Enter the amount and tap next. You can also add remarks or text along with the payment.
- Choose the bank account to debit the amount from the drop-down menu below.
- Tap on Proceed to pay.
- Turn on location/GPS in your smartphone.
- Enter UPI PIN and wait for payment confirmation.
To request some amount of payment from any user, follow the methods.
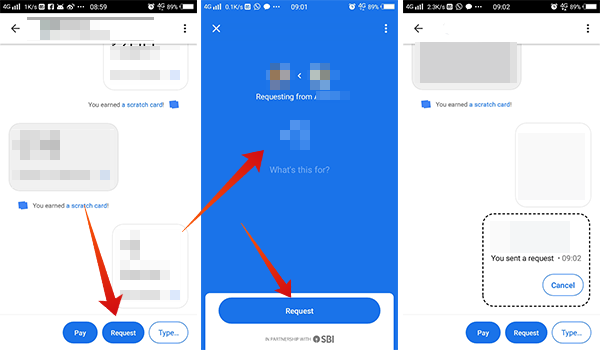
- Open the payment interface for the user you want to request.
- Tap on Request button.
- Enter the amount, note and tap on next.
- Wait for the sender to see the payment request and accept or decline.
There are many ways to receive payments without even requesting. Anyone can send you any amount up to INR 100,000 (USD 1,387) a day. You can share your contact number, profile name, UPI ID, QR Code, etc, to get payments.
Related: Gmail Money Transfer: A Complete Guide to Transfer Money with Email
How to Send or Receive Payments using Tez Mode?
Apart from the normal payment method, the Google Pay (Tez) also has a Tez mode (previously cash mode) which does not require the phone number of sender or recipient. You can easily connect between two smartphones and send or receive payments to each other by just using sound. The smartphones connect together using a particular audio which the speakers produce. It is very quick and safer.
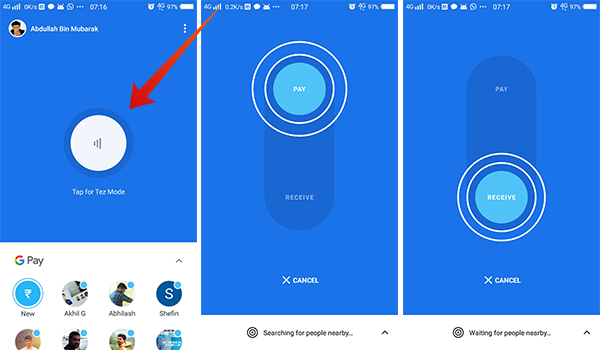
- Open Google Pay (Tez) app and touch on the Tez Mode button at the middle.
- Swipe up for paying and swipe down for receiving the money.
- Wait for the nearby device to do the same.
- When the devices detect each other and connect, pay or receive the money.
This will not reveal the mobile number of either of the sender or the recipient. Although, you need to keep the internet and location settings on.
How to Pay Bills using Google Pay?
With the introduction of the UPI (Unified Payments Interface) in India, money transactions have become much quicker than ever before, from sending money to your friends to paying the restaurant bills. The Google Pay associates with many vendors across the country to make the bill payments easier. The company also offers rewards and cash back for the payments through the app. Here is a demo guide to pay some bills online.
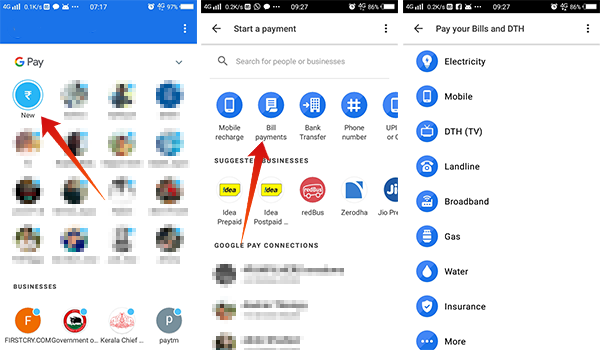
- Open Google Pay (Tez) app and tap New.
- Tap on the Bill payments.
- Choose the type of bill you want to close (electricity, mobile, DTH (TV), landline, broadband, gas, water, insurance, etc.). You can also repay your Bajaj Auto Finance loan amount from More option.
- Choose your service provider and add the associated accounts.
- Pay the pending bill amount easily.
How to View All Transactions & Account Balance?
The Google Pay app keeps all the record of your complete transaction. It also shows you the transactions sorted upon the mode of transfer. You can easily find out the complete transaction history right within the app itself. After opening the app, scroll down to the bottom where you can see the options to find transaction details.
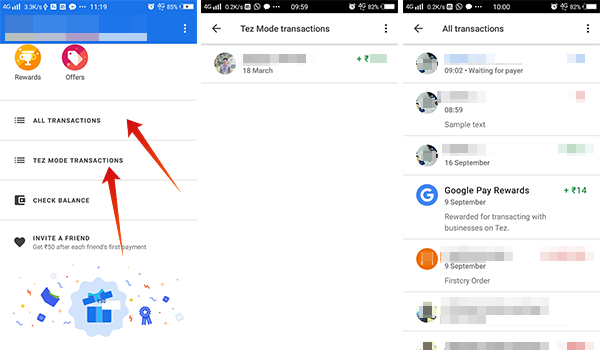
Tap on All transactions to find out every money transfers on your account. You can also expand each transaction to find the process time and date, other information.
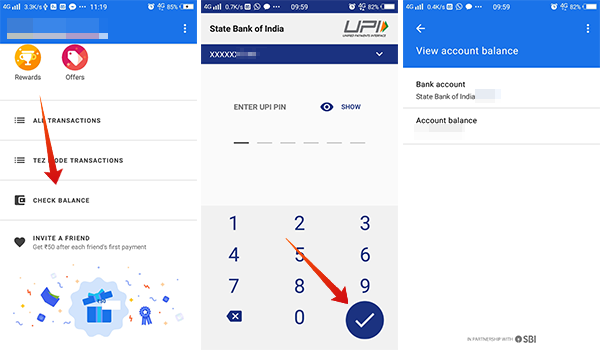
Use the Tez Mode Transactions to find all money you paid or received through the Cash mode or Tez mode. The app also has a Check balance option. Simply enter the UPI PIN and you can see the account balance.
How to Change Mobile Number Linked to Google Pay?
As the account Google Pay (Tez) works based on the mobile number linked to the bank account, it is crucial to keep your number live and connected to the account always. In case you lost your SIM Card or changed the mobile number assigned to the bank account, you must also change the number in the G Pay app.
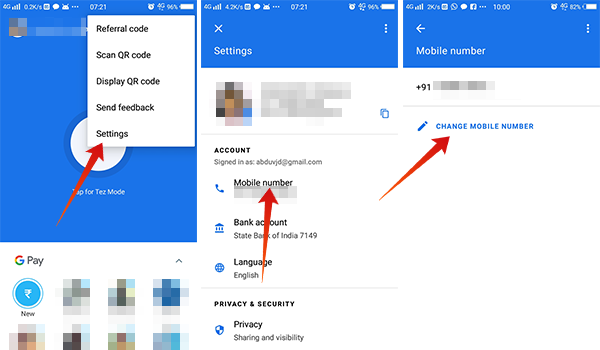
- Open Google Pay app on your smartphone.
- Tap on the three dots button at the top right corner and go to Settings.
- Touch the Mobile number and choose Change mobile number.
- Enter your new mobile number and verify with your bank account.
How to Turn off Visibility on Google Pay Profile?
Everyone with your mobile number saved on heir contacts can find you on Google Pay (Tez). So, they can send money or request for payments easily. In case you want to turn off the visibility of your Tez profile in others contacts, follow these steps.
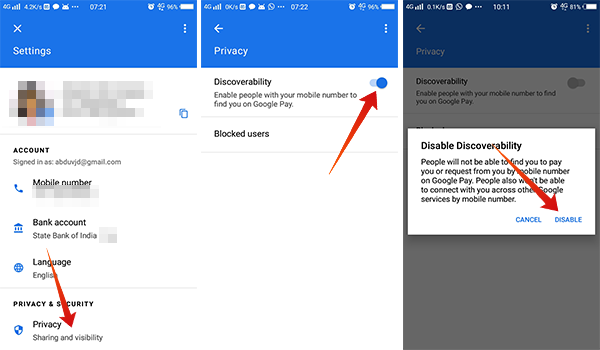
- Open the Google Pay app and go to Settings.
- Tap on Privacy and toggle off the Discoverability.
Turning off the discoverability will block other from finding you on the Google Tez and other services using your mobile number. No one will be able to send you money just by using your mobile number.
How to Change the Screen Lock Method?
The app security method will be asked during the initial setup itself. Google Pay also allows users to change the lock screen method.
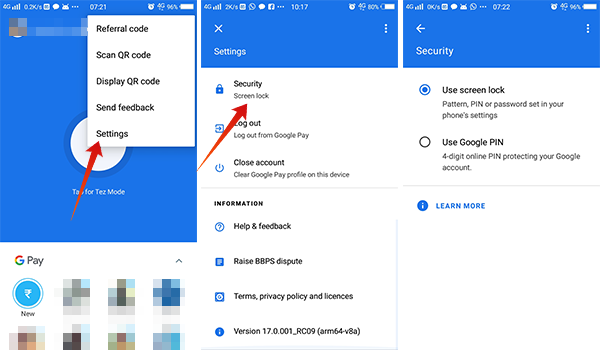
- Navigate to Settings > Security on Google Pay app.
- Choose any of the methods — Use lock screen or Use Google PIN.
The Google PIN method is universal and is secure than your smartphone’s lock screen passcode. You can set it online and can be accessed throughout the devices.
How to Close the Google Pay/Tez Account?
Are you no more using the Google Pay (Tez) account? Have you been done using the app? You can easily delete the account and associated data easily. Here is how.
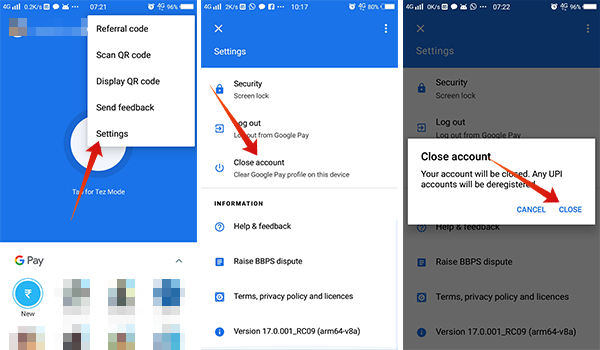
- Open the app and go to Settings.
- Scroll down and tap on the Close account.
- Again tap on Close in the confirmation window.
Editor’s Note: Deleting a Google Pay (Tez) account will delete every UPI IDs and transaction details associated with your mobile number. Any of your UPI IDs will exist no longer and you will need to start from the beginning if you want to add your account again. Also, any payments sent to you over the UPI will get declined until you set it up again.
Google Pay (Tez) Rewards & Offers
One of the hot factors that attracted a lot of users within India is the rewards and offers Google provides. Even though there are many other services like PhonePe and BHIM exist, the Google’s service stands unique with its consistent rewards for the users. Here are some of the most frequent methods to get rewards.
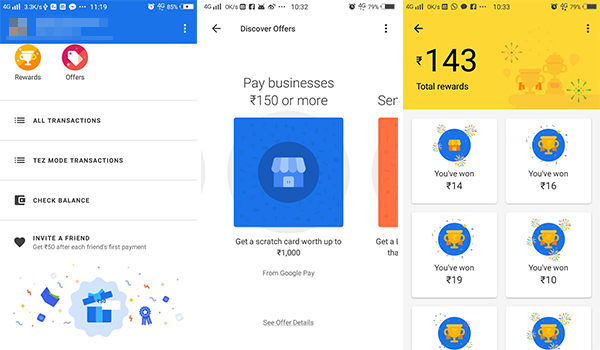
- Send or receive over INR 150 to get a scratch card worth up to INR 1,000.
- Send INR 500 or more to get a weekly lucky scratch card worth up to INR 100,000.
- Invite friends using referral code/link to get INR 50 on their first transactions or INR 51 to INR 500 worth scratch card.
- Scratch card up to INR 300 while booking movie tickets using BookMyShow.
- Get the scratch card on mobile recharge.
- Scratch card on electricity and other monthly bill payments.
- Win a scratch card worth up to INR 400 when you order from FreshMenu.
- Get scratch cards while buying goods from mi.com on Fridays.
Google Pay (Tez) is a great cash transfer companion to use within India. To use the app, you should possess an Indian bank account with a working Indian mobile number linked to it. There is no chance for the app to get out of the country as the UPI is exclusively available for India only.