Office….!! It’s one place every single person is busy. Often than not, you miss out on few things you should’ve done in the first place. What if there is a quick fix for this, to all tasks related to your smartphone.
You can save the embarrassment of a loud ring, respect your co-workers’ space and not miss to tell your loved one that you do care, all in a split second! Check out our all about NFC Tags article to know how a small plastic disc will save your valuable time.
We use the NFC Tasks application from the Google Play Store to complete NFC Tag writing. In this tutorial, a continuation of our series on NFC Tags, we will walk you through setting up an NFC Tag which will automate the following tasks based on the time of your tapping the NFC Tag:
- Toggle WiFi
- Adjust Brightness
- Adjust Volume
- Send an SMS
In this tutorial, we are going one level advanced to our previous tutorial on Car Automation. We are introducing the conditional statement, based on which the actions to be executed are decided. There are two sets of actions, and one will execute if the condition is found true and another set if the conditions are false.
In this demo, our condition is the time of NFC tapping being between 9:30 AM and 10:30 AM, if it’s true, sound and brightness will be lowered, WiFi turned on an SMS send to the number you choose with the text you require to be sent.
If the statement is false, that is time doesn’t fall in the said interval, tapping on the NFC Tag will result in turning off the WiFi, setting brightness to auto-brightness, setting the volume to ‘high’ and another SMS send with a different text, as programmed.
The idea is to execute a set group of activities when you reach the office, say between 9:30 AM to 10:30 AM and another set of activities when you’re leaving the office.
Step 1: Prepare the NFC Tag to Program
First of all, prepare your NFC Tag to program the tasks that we need to automate. To start, open the NFC Tasks app. The first screen that displays in this app will be ‘Read’ tab. Navigate to the ‘Other’ tab and select ‘Format Memory’ to prepare your NFC Tag to write.
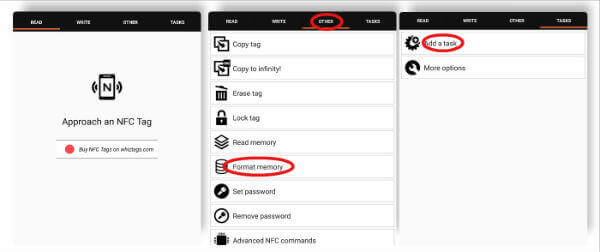
Upon selection of this option, please make sure you keep your smartphone close enough to the NFC Tag to detect and complete formatting. Once you complete the formatting, please move on to ‘Tasks’ tab to start adding the tasks you want to automate.
Step 2: Conditional Statement
Choose ‘Conditional blocks’ from the listed tasks. Select ‘Condition: Schedule’ from the sub-menu and set the time to 9:30 Am to 10:30 AM by clicking on the times. Select OK.
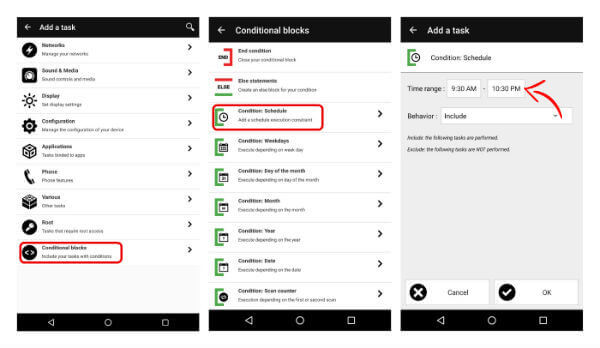
Leave the Behaviour to ‘Include’ as we require the following actions to be executed when the schedule is true.
Step 3: Program NFC to Enable Wi-Fi
Choose ‘Networks’ from the tasks. Select ‘Wi-Fi from the sub-menu and opt to ‘Enable’ it from the drop-down list.
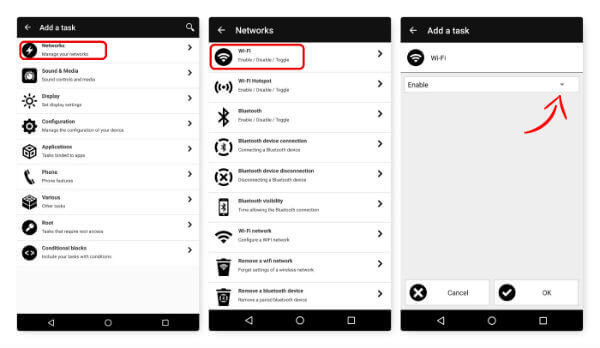
Step 4: Setting Screen Brightness to Low Level with NFC
Select ‘Display’ from the list of tasks. You can select ‘Brightness’ from the next menu and then adjust the slider to set a brightness( Level:55 in the example).
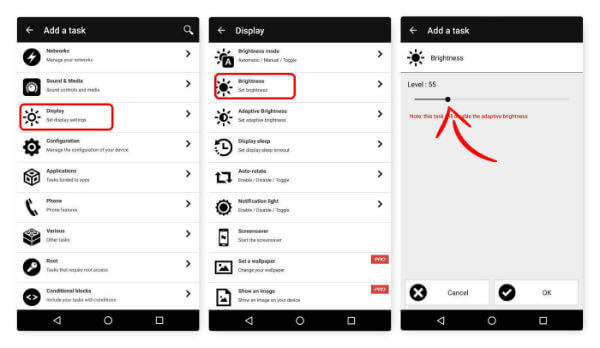
The idea is that you’re going to be indoors and you don’t require high levels of lighting.
Step 5: Setting the Android Volume to Low Level with NFC
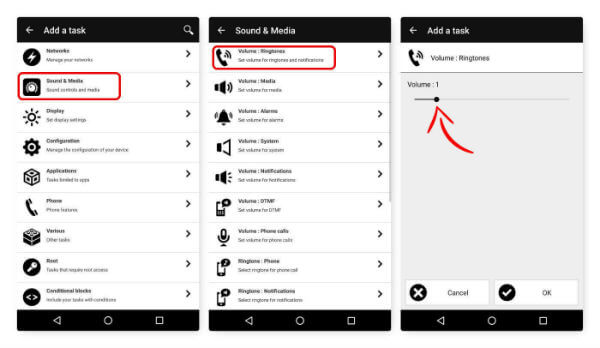
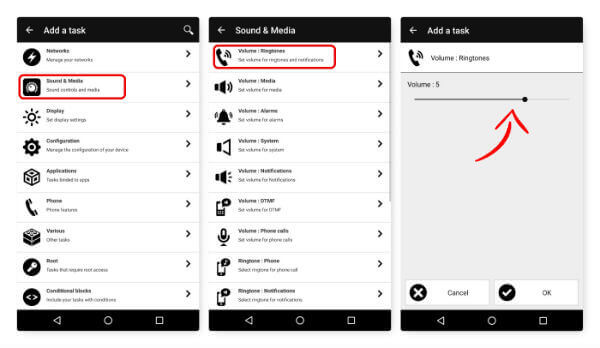
Select ‘Sound & Media’ from the tasks. Opt for ‘Volume: Ringtone’ and then use the slider to set volume of your phone to the low level, say 1. You don’t want your phone to be too loud and disturbing your colleagues.
Step 6: Sending an Auto SMS with NFC, Notifying You’ve Arrived
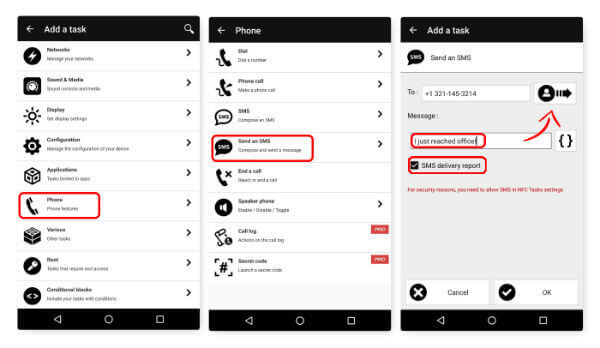
Select ‘Phone’ from the tasks. Opt ‘Send an SMS’from the sub-menu. Next page is where you fill in the details of SMS you want to send. In the ‘To’ column, you can either type in the phone number or select from your contacts from the adjacent contact button.
In the ‘Message’ box, compose your message, like,”I just reached office”. You can opt for an SMS delivery report by ticking the tick box adjacent to it.
The true condition ends here. We’re moving on to the else condition, which is designed for actions on leaving your office. The following actions will be executed -WiFi turned off, set your volume high, set brightness to auto mode and send an exit SMS.
Also read: How to Auto Turn Off iPhone WiFi When You Away from Home
Step 7: Else Condition
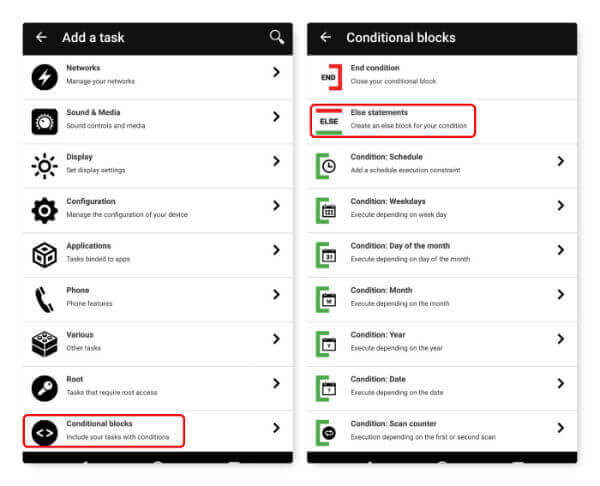
Select ‘Conditional blocks’ from tasks. Choose ‘Else statements’. The actions stated after this will be part of the ‘else’ condition.
Step 8: Turn off Android WiFi with NFC
To automate Wi-Fi Turn Off, choose ‘Networks’ from the list of tasks on the NFC Android App. Select ‘Wi-Fi’ in the sub-menu to turn off.
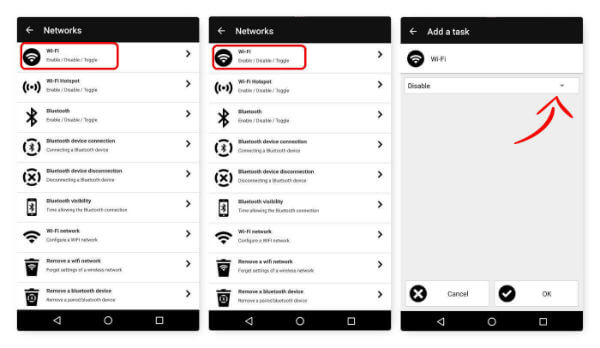
From the drop-down list for various actions available for the Wi-Fi radio, select ‘Disable’ from ‘Disable/ Enable/ Toggle’ as you want to disable your Wi-Fi while you step out of office.
Step 9: Increasing the Phone Volume with NFC
From NFC Tasks App, choose ‘Sound & Media’ from the list of tasks. Select ‘Volume: Ringtones’ from sub-menu. Using the slider, set the volume you prefer. Ideally, set the volume higher for outdoors.
Step 10: Setting the Brightness Auto-Mode with NFC
Select ‘Display’ from the tasks. Opt ‘Adaptive Brightness’. From the subsequent menu, you can choose ‘Automatic’ from the drop-down menu. 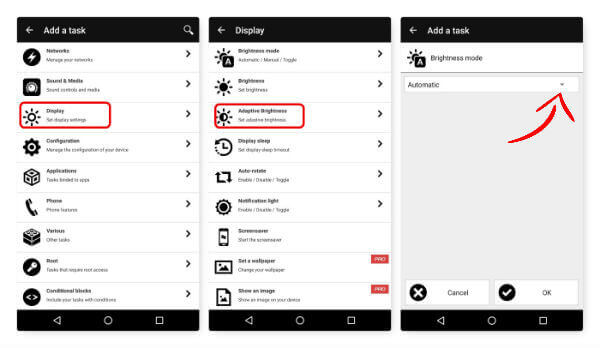
Your phone will adjust its brightness automatically, based on the outdoor conditions.
Step 11: Sending an SMS notifying you’re returning from work
Select ‘Phone’ from the tasks. Opt ‘Send an SMS’from the sub-menu. Next page is where you fill in the details of SMS you want to send.
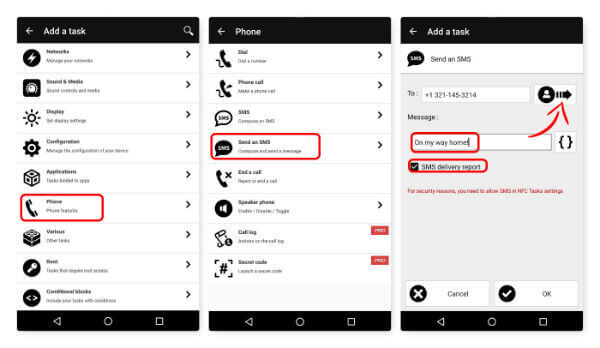
In the ‘To’ column, you can either type in the phone number or select from your contacts from the adjacent contact button.
Step 12: Writing the List of Activities to NFC Tag.
You can see the added tasks listed in the ‘Tasks’ tab. You can re-order the order of execution of your tasks using the sorting button available for each task. With the NFC Tasks App, you can change the order of exclusion of these listed apps on Android phone. Just move the tasks up or down by holding and sliding to change these execution order.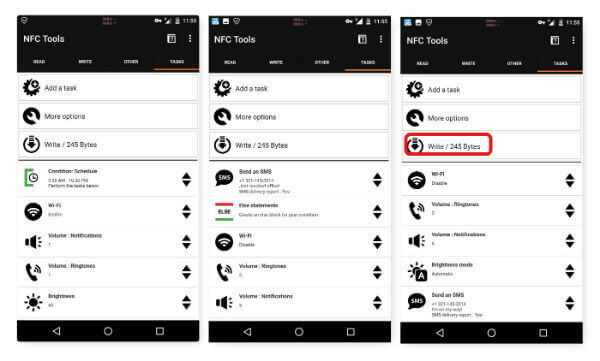
Once all tasks are in order, it’s time to write the tasks. Press the ‘Write’ option. You’ll be prompted to ‘Approach an NFC Tag.’
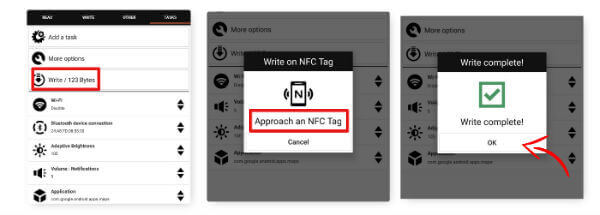
Bring the NFC Tag close to your smartphone NFC Reader, usually in the back part. Once you approach the NFC Tag, you will get a pop-up confirming write completion as ‘Write Complete.’
Hope the office NFC Tag will save you time and let you be efficient. We hope that you have a fair idea about NFC Tag Writing and you’ll venture out to write your activities for a personalized NFC experience.
