
Family Sharing is an interesting feature of the iOS which allows you to share a lot of things. With Family Sharing, you can share iCloud storage, Apple music, iTunes purchases etc with your family. Maximum, you can add up to 6 members per family group. With the release of iOS 12, the concept of family sharing has reached a new level. Now, you can use this feature along with the Screen Time to effectively monitor and control your kids’ iOS usage.
- What can be shared with Family Sharing?
- How to Set up Family Sharing on your iPhone?
- How to create Apple ID for your child?
- How to use Family Sharing for Screen Time?
- Limitations of Family Sharing
What can be Shared with Family Sharing?
Family Sharing allows you to share Apple Books, iTunes/App Store purchases, Apple Music and even your iCloud Storage. The organizer of the family group is responsible for sending invites, adding/removing members and controlling the shared services. You can also share reminders, calendar and photo albums with the other members of your group. Using Family Sharing, you can even locate the missing devices by sharing your live location with other members of your family.
How to Set up Family Sharing on iPhone?
A family group will have an organizer/creator (adult) who has the responsibility to invite new members to the group. All the purchases will be billed only to the organizer’s account. Family Sharing can be enabled in iPhone, iPad or iPod Touch.
Now, let’s see how to set up family sharing on iPhone.
- Tap Settings icon on your Home screen.
- Tap on your Name/profile icon.
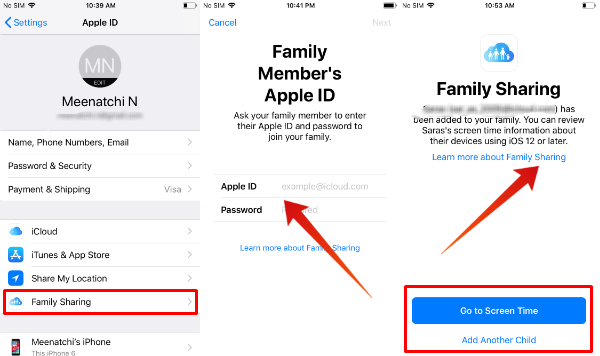
- Select Family Sharing from the list.
- Tap Add Family Member.
- Now, you will see three options to send the invite :
– Invite via iMessage – To send invites to family members who are residing in a
different location.
– Invite in Person – You can use this option if you know the Apple ID and password
of your family member. (parent/spouse/teen who lives with you )
– Create a Child Account – To create an Apple ID for kids under 13 years. - Let’s assume that you would like to add your teen to your group who has an Apple ID. Hence, you can choose the option Invite in Person.
- Now, the screen will prompt you to enter the Apple ID and Password of the member. Enter those details and tap the Next button.
- Finally, you will have to enter the 6 digit authentication code received on your teen’s iPhone.
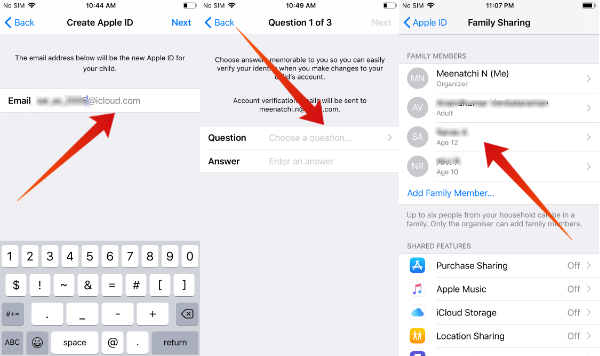
Now, you have successfully added a member to your family group. For verification, navigate to Settings -> tap your name/profile icon -> Family Sharing. You should be to able to see the name of the person you had added under FAMILY MEMBERS.
How to Create Apple ID for your Child?
Would you like to add your smaller kid (under 13 years) to the family group and monitor their Screen Time? You can do that easily by creating a separate Apple ID under his/her name and use that to set restrictions on your iPhone. Before that, you need to make sure that you had set up a payment method on your Apple account.
- Tap Settings -> tap on your name/profile icon.
- Tap Family Sharing -> Add Family Member.
- Select Create a Child Account from the options.
- Now, you will a screen with title Create Apple ID for a child followed by some informational text. Tap the Next button located on the right side of your screen.
- Select your Child’s Birthday and tap the Next button.
- Follow the on-screen instructions related to Parent Privacy Disclosure and verify your identity by authenticating your payment method.
- Enter the First Name & Last Name of your child, iCloud email address and tap the Next button.
- Now, you will see a confirmation pop with the message “Create [email protected]” with two buttons Cancel and Create. (xyz is the iCloud email you chose in the previous
step). - Tap Create and enter a strong password of at least 8 characters in length by following the on-screen instructions. Tap Next button
- Now, follow the on-screen instructions to set the security questions & answers. And, go through the Terms & Conditions before agreeing.
- Finally, you will see a screen with the title Family Sharing and a success message about the creation of the new account. Now, from you can either go to the Screen Time menu to set Parental Control or go back to Settings-> tap on your name/profile icon to verify the newly added member under the title FAMILY MEMBERS.
(Related: How to Set up iPad for Your Child)
How to use Family Sharing for Screen Time?
From the above sections, we have learned how to create an Apple ID for the child and add him/her to your family group. Now, we need to know how to use the Screen Time to restrict the content and usage of iPhone by your kids/teens.
- Tap Settings icon on your Home screen
- Scroll down to the section titled FAMILY. Here you will see the list of all the family members in your group.
- Tap on your kid’s name.
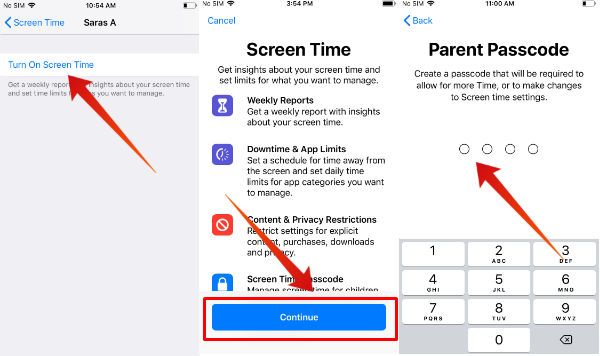
- Tap Turn On Screen Time -> Continue.
- Set the Downtime schedule and tap the button titled Set Downtime. Alternatively, you can skip this step by tapping on Not now button.
- Set daily time limits for the app categories and tap Set App Limit button. If you wish to do this later, tap Not now.
- Tap Continue.
- Finally, you will be prompted to create a 4-digit Parent Passcode. (In case, if you need the settings of Screen Time, then you should use this passcode).
This is good for your kid’s profile. Now you can follow the above procedure to set the Screen Time for your other kids as well.
Not a Perfect Solution, Limitations of Family Sharing
Even though family sharing is a handy feature, it has some limitations, that you may feel while you deal with the real scenarios. Anyway, still there are a few things I wish I can take control:
- You cannot restrict or set any purchase limits on your kids if they are over 18 years old (well, old enough to make decisions and they are not kids anymore!). However, you will have full control over the purchases made by your smaller kids.
(< 13 years ) - You can create/delete only 2 family groups per year.
- Only the family organizer can approve the sharing services.
Obviously, Kids are smarter than us and they will find out solutions to overcome the restrictions that you imposed. However, family sharing on iOS is an excellent feature and don’t forget to set up for your family.