
Not so long ago, there was a security threat issue that could hoard data in our computer and it tensed the whole world. Yes guessed right, it’s the ransomware. The crypto-virology blackmailed/threatened to pay a demanded amount or else to publish the victim’s data. Everyone was in search of a shield from such attacks and Microsoft has introduced their solution to the problem.
Ransomware was a virus that could get access to files/folders on a computer. What if users could block any apps from accessing folders in their systems! It would be better if the Windows users have a dedicated safe vault or folder where they can keep all personal files. That is what Microsoft exactly did with its Controlled Folder Access feature.
If you are a Windows 10 Creator Update user you are blessed with this feature. There are several ways to set up Controlled Folder Access such as through Windows Defender Security Center app, Powershell and Group Policy. Let’s jump into each of the methods.
Controlled Access Folder
According to Microsoft, “Controlled folder access helps you protect valuable data from malicious apps and threats, such as ransomware“. When you use Controlled Access Folder, Microsoft is offering “All apps (any executable file, including .exe, .scr, .dll files and others) are assessed by Windows Defender Antivirus, which then determines if the app is malicious or safe. If the app is determined to be malicious or suspicious, then it will not be allowed to make changes to any files in any protected folder”. By default, Microsoft adding the system files under this controlled Access Folder, but you can add your own files and folder to this protected folder to secure from hackers.
Setup Controlled Folder Access
The Controlled Folder Access is protected under the layer of Windows Defender Antivirus. The first step you have to make sure you set Windows Defender Security Center properly.
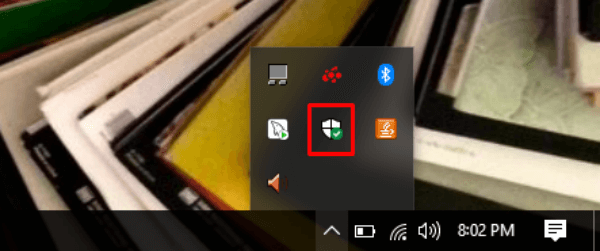
The first thing to do is to open the Windows Defender Security Center app. Go ahead and click on the shield icon in the taskbar.
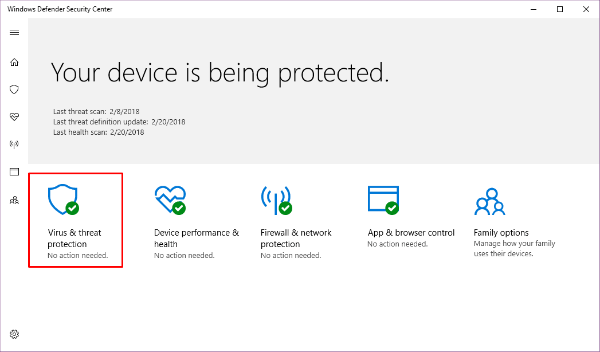
Now you have Windows Defender Security Center and from the screen, select the Virus & threat protection option that appears.
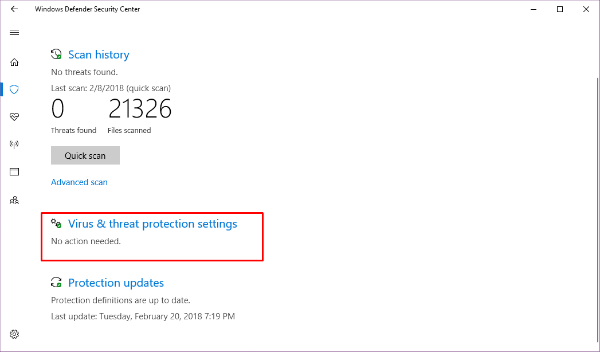
Look for the Virus & threat protection settings option in the subsequent window and click on it.
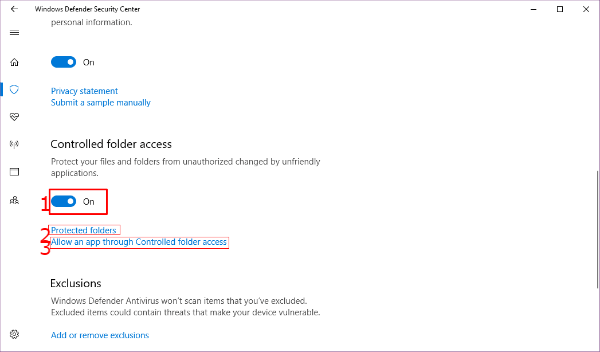
Scroll down until you see the option Controlled Folder Access and when you do find it toggle on the option. Now you have two more steps to do. One is to choose which all folders to be included in Controlled Access and the other is to select which all apps can access these folders
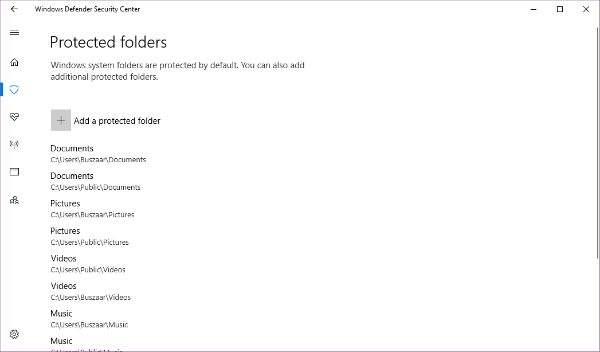
To select the folders click on the Protected folders option and then add the folders that you wish to protect. Here you can add your personal folders like the word files that have some critical information or any other files or folders you want to keep secure.
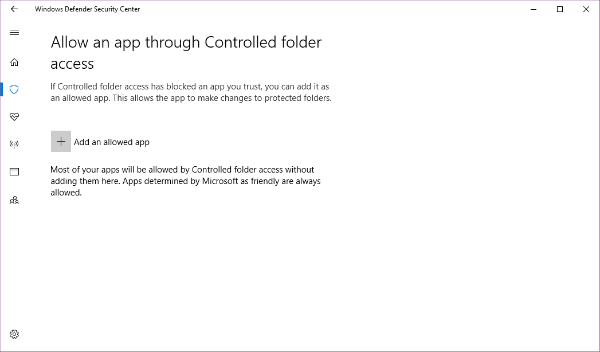
To give an app access to these folders select the Allow an app through Controlled folder access option and then add the apps that you trust is safe. When you allow an app to go through this controlled folder access, you are allowing an app to make changes to your files that you kept secure. So you have to be careful, what apps you select and allowed to make changes to Controlled Folder files.
Setup Controlled Folder Access through Windows Powershell
Another way to setup Controlled Folder Access is via Windows Powershell.To do that, firstly search for Powershell in Cortana search then right click the Powershell option and select Run as administrator.
Set-MpPreference -EnableControlledFolderAccess Enabled
In the Powershell window type in the above command. In Windows Powershell we can enable as well as disable the Control Folder Access.
Set-MpPreference -EnableControlledFolderAccess Disabled
To disable the same we use Disabled as the argument at the end of above cmdlet.
Set-MpPreference -EnableControlledFolderAccess AuditMode
Apart from these two options Powershell give you the power to use a third mode called Audit, for which we use AuditMode instead of Enabled/Disabled. If you wish to test how the Controlled Folder Access work, without any impact on your computer you can depend on Audit mode.
Check Controlled Access Folder
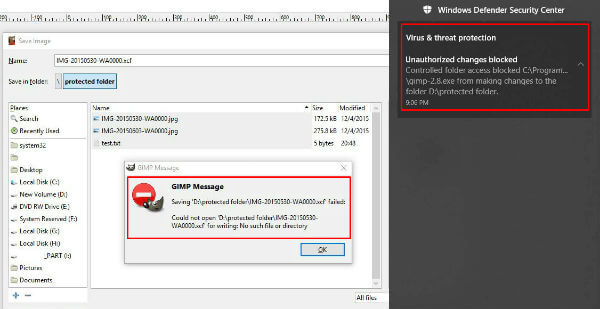
You could make use of either of the methods to protect your folders. Once you have restricted the access to a folder, any app trying to get access to that folder will be denied the access to it. For example, you can open a file with an app that is not included in Controlled Folder Access and try to save a file on Controlled Access Folder location. You will immediately get an error message state that Unauthorised changes blocked.
We tested a file with GIMP image editor and try to save to a protected folder, we have got as seen in the image below and now you know your folders are safe.
If you trust this app and want to allow access, you can do the same and give access to the corresponding app using the procedure above mentioned in “Allow an App through controlled folder access” section.
Protect Files on Windows with Controlled Access Folder
Microsoft has a powerful inbuilt tool which can help protect your folders from threats like ransomware. Use the same and don’t fail to make your computer secure from possible threats. Make use of the power to grant access (or not to grant) access to your folders. Stay secure.