Even though AirDrop was launched by Apple on iOS and Mac long ago, it is less known among the iPhone users. AirDrop is a handy feature to share your content instantly with other iOS devices or Mac. With AirDrop, you can send high-resolution images without compromising the quality, large video files and even share WiFi password with iOS and Mac users.
AirDrop feature is easy to use on iPhone and does not require any additional steps to enable. Let’s take a detailed look on how to set up and use AirDrop on your iPhone.
What is AirDrop?
AirDrop is a cool feature that allows you to send any kind of content like photos, videos, documents from one Apple device to another wirelessly. And, the best thing about AirDrop is that it doesn’t impose any restrictions or limits on the file size. For example, you can send a 2 GB folder from your iPhone to your MacBook Air within few minutes. It is available on iPhone (iPhone 5 or later), iPad, iPod Touch and Mac (OS X Lion and up).
How does AirDrop work?
AirDrop makes use of the Bluetooth technology to detect and pair with other Apple devices which are located within the range of Wi-Fi and Bluetooth. To share files, both the sender and receiver should have enabled Bluetooth and Wi-Fi on their devices. However, it doesn’t require the devices to be in the same Wi-Fi network. Plus, personal hotspot should be turned off on the devices.
Is AirDrop Secure To Transfer Files?
Yes, it is. Before establishing the connection, a firewall is created around each device and the files are sent only after encrypting them. Hence, you need not to worry about the security of the files which are shared using AirDrop. As it makes use of Bluetooth and Wi-Fi to establish the connection, you will have full control over the selection of devices involved in the file transfer. Also, there is no risk of sending/receiving information to/from an anonymous device without your consent.
Related: iOS Voice Memos: How to use on iPhone?
How to Turn ON AirDrop?
It is highly recommended to turn ON AirDrop only during file transfer. At all other times, you can just turn off that feature to avoid receiving files from unknown contacts. Check out this post on how to enable AirDrop on your iPhone.
How to Send Files Using AirDrop?
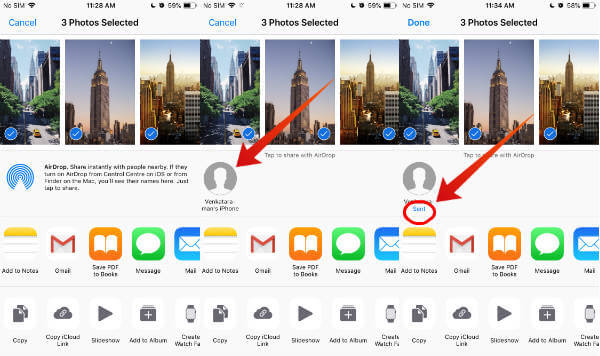
Let’s imagine that you would like to send some vacation photos and videos from your iPhone either to your spouse or your own another Apple device. Before starting the transfer, make sure that the devices are kept nearby and the AirDrop, Bluetooth, and Wi-Fi in both the devices are turned ON.

- First, tap Photos on your iPhone.
- Next, tap Select on the top right and select all the photos or videos you would like to share.
- Then, tap Share icon on the bottom left of the screen.
- Here, you will see the list of all nearby Apple devices. Go ahead and tap the device to which you would like to send the photos.
- Next, a notification with two options Decline and Accept will be shown on the receiving device. If the receiver taps the Accept button, then the files will be sent instantly and you will see the text Sent below the name of the device. In case the receiver taps the Decline button, then the text Declined will be displayed.
By following the above steps, you can send any content between two Apple devices instantly. Will the received files be available in a separate folder? No. The location for the received data varies based on the type of content. For example, all the images or videos received via AirDrop will get stored on the Photos folder on the iPhone.
How to Receive Files Using AirDrop?
Now, let’s assume that you would like to receive someone’s contact from your spouse’s iPhone. Of course, you can tell your spouse to share the contact via iMessage, WhatsApp, Email etc. However, you need either an internet connection or a mobile carrier plan to make use of the above options. Right? Let’s imagine that you didn’t put a SIM on the iPhone yet as you had bought the device only recently. What will you do?
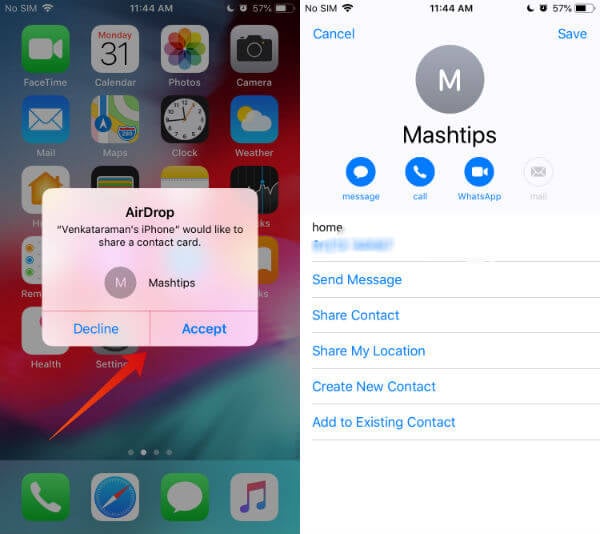
Luckily, AirDrop allows you to share contact or any other content without the need for a mobile or broadband network. Let’s see how to receive contact on your iPhone using this cool feature.

- Turn ON AirDrop on your iPhone. (If the receiver is in your contact list, then you can set AirDrop to Contacts only. Otherwise, select the option Everyone)
- Once the sender has initiated the transfer, you will receive a notification on your iPhone with two options Accept and Decline. Tap “Accept” button.
Now, your device will display the contact and you can either add that to your existing contact or create a new one. Likewise, you can receive any content from other nearby Apple devices.
How to Block AirDrop on your Child’s Device?
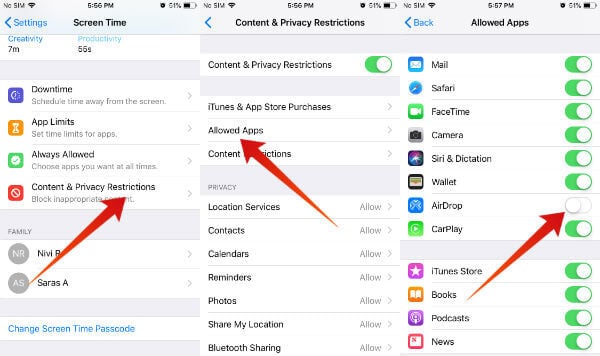
Are you sharing your device with your kids? Or do they have their own iPhone or iPad? Whatever it may be, don’t forget to block or disable AirDrop on your kid’s device to avoid sharing personal photos or sensitive information by mistake. Thanks to iOS 12, you can do that easily by disabling the feature from ScreenTime settings on your kid’s device.

- First, tap Settings->ScreenTime
- Then, tap Content & Privacy Restrictions
- Next, enter your ScreenTime passcode
- Then, tap Allowed Apps and toggle the position of AirDrop to the left.
Now, AirDrop will be disabled on your child’s iPhone and it cannot be accessed from the Control Center anymore. And, the AirDrop menu will not be visible on Settings->General as well.
Sharing Passwords Using AirDrop
Do you know? Besides documents, images, and videos, AirDrop also allows you to share passwords. For example, if you would like to share Amazon or Netflix credentials with someone in your home, then you can easily do that using AirDrop. However, we don’t recommend the users to share a bank account or credit card information through AirDrop, even if it is 100% safe. Check out this article on how to share passwords using AirDrop.
Sharing Large Files Using AirDrop
Do you need to send a big file/folder with size in 1 GB or more? Or would you like to transfer a lot of videos from your iPhone to your MacBook? Then, AirDrop will be the best option as you need not depend on Google Drive or any other storage option for file transfer. Just you need to keep the devices closer and send the files within minutes.
How to Turn OFF AirDrop?
When you are not sending files to someone, then you can turn off the AirDrop either from the Control Center or from the Settings menu. If not needed, you can also turn off Bluetooth to save your iPhone battery.
Troubleshooting AirDrop
Are you unable to connect your iPhone with another device using AirDrop? Then, here is the list of things you need to check out:
AirDrop is Not Connecting
Please check and make sure you are turned on iPhone or Mac Bluetooth. To start work and sending or receiving files via AirDrop, you need to make sure that both Bluetooth and Wi-Fi is turned ON. Goto iPhone Settings and Turn on WiFi and Bluetooth to work with AirDrop.
iPhone User is Not on Available AirDrop List
When you try to Airdrop to a particular phone, the phone should appear in the available list of Airdrop devices. Sometime, you may not see the iPhone or Mac to send the file to them. In that case, make sure the receiver phone number is added to your contact list. Plus, if it was set to Contacts Only, then you can receive files only from your contacts. Sometime, the Airdrop setting may be in Receiving off mode. In case the setting for AirDrop was set to Receiving off, then you will not be able to receive files. Hence, the best option is to change the setting as AirDrop to Everyone. Go to iPhone Settings > General > AirDrop > Everyone.
Don’t forget to turn off the AirDrop as well as Bluetooth, once you the AirDrop file transfer has been completed.
Even though AirDrop is a cool feature to share files across Apple devices, we highly recommend the users to turn on AirDrop only during file transfer. It will not only help to avoid receiving files from strangers but also to improve your iPhone battery life as well.
Have you ever used AirDrop to transfer files? What was the file size? How long it had taken to complete the transfer? Please share your comments.
