
Windows 11 is getting into more PCs and Laptops. Whether you purchased a new Windows 11 laptop or tablet, or just updated your laptop to Windows 11, battery life must be something you always will want to be vigilant about. When you are operating your PC laptop in battery, there are methods to save battery life. The Battery Saver in Windows 11 helps you save a few more hours in battery on your laptop.
Let’s see how to configure and use the Windows 11 Battery Saver option.
Change Power Modes in Windows 11
Like Windows 10 laptops, the Windows 11 also comes with a handful of battery modes for better performance and better battery life. If you have been using Windows 10 on your laptop, you must have noticed the power modes that come up when you click the battery icon on the taskbar. First off, you will not see those power modes in Windows 11. Where do you get these?
Windows 11 still has the battery performance modes but buried in the Settings. Unlike in Windows 10, you cannot simply click on the Battery icon and choose a mode. To change Windows 11 power mode, follow the steps.
Right-click on the battery icon on the Windows 11 taskbar and go to “Power and sleep settings.“
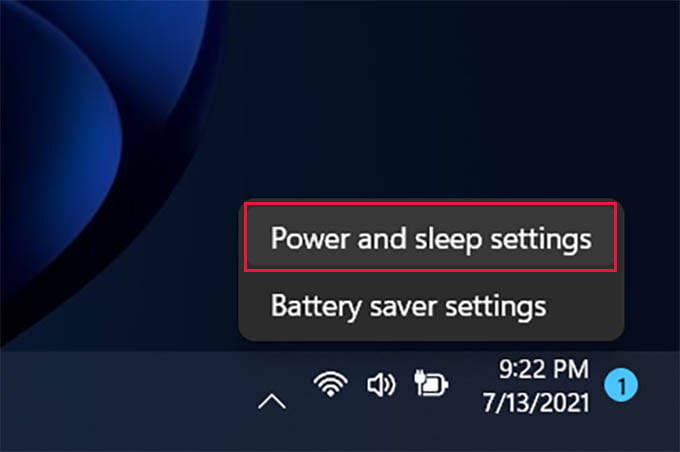
Find “Power Modes” under the Power section. Click on the dropdown menu against the Power Modes option and choose any of the below power modes:
- Best Performance
- Balanced
- Best Power Efficiency
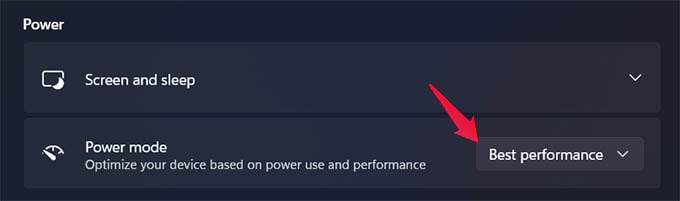
Depends on your usage, choose a suitable power mode for you. If your laptop is not plugged into power and you are using it only to browse the internet or read ebooks, then choose Best power efficiency. This will save battery life on your Windows 11 laptop or tablet.
Related: You Can Still Use the Classic Right-Click Menu in Windows 11; Here’s How
Turn On Battery Saver in Windows 11
Instead of putting the battery saver mode in the Battery tray icon, Microsoft took out all such quick options and clubbed them into the new action center in Windows 11. If you have just started using Windows 11 on your PC, you must have noticed that clicking on WiFi, Sound, and Battery icons from the taskbar icon opens the same menu. That’s where we are going to find the new Battery saver options in Windows 11.
To put your laptop or Windows 11 device in Battery saver mode, click on the WiFi/sound/battery icons on the taskbar to open the Action Center. You can instead press Windows Key + A to open the action center or quick settings menu.
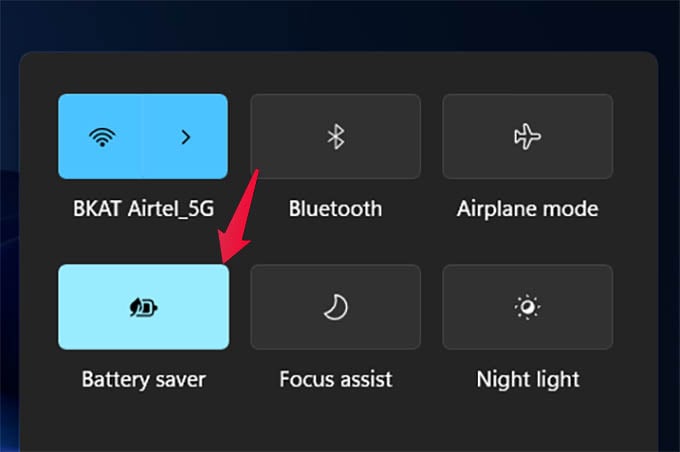
From there, click on the “Battery Saver” option to enable it. The button will turn the theme color when enabled and the battery icon will turn into a “battery with leaf” icon. Click on the Battery Saver icon again to disable low power mode in Windows 11.
If the Battery saver option is greyed out and you cannot click on it, it means that your laptop or tablet is plugged into the charger. You need to unplug the charger to enable low power mode in Windows 11. On the other hand, you will not see such an option at all if you are using a PC and not a laptop or tablet.
Related: Move Windows 11 Taskbar Icons to Left or Center
Automatically Enable Battery Saver in Windows 11
Like in previous Windows versions, you can enable the battery saver mode automatically at a certain battery level. Say you want your laptop to go into low power mode once the battery dips below 30%. Let’s see how you can do it.
To do this, right-click on the battery icon located on the taskbar at the bottom right corner of your laptop.
Click on Power and sleep settings option.
From the settings window, click and expand the “Battery saver” menu. Just below that, you will an option named “Turn battery saver on automatically at.” Click the dropdown menu with a number against it and choose the battery limit in which you want to enable battery saver mode automatically on Windows 11.

In case you want to keep the laptop in battery saver mode always, choose the option “Always” from the menu. Once you choose the battery limit, you are all set.
Apart from settings the battery limit to automatically turn on battery saver mode, you can also choose whether you want to dim the screen during the power-saving mode. Disabling it will just keep the same brightness when the laptop goes power saver mode. It is better to enable the option since you will know when the battery is low and it will save some marginal power from the battery as well.
Related: How to Enable Windows God Mode to Access All Windows Settings in One Place
Apart from setting that battery into battery saver mode, there are plenty of other ways you can save battery life on your Windows 11 PC. However, the power-saving mode on the PC is the basic thing you can do to make your laptop run a few more hours without tweaking anything.