Autocorrect is quite popular on smartphones and is mostly blamed for typos. Some people still find it incredibly useful, however. If you ever wished you could have autocorrect for PC too, Microsoft has heard you. Windows 11 comes with autocorrect, not only for the touch keyboard, but also for the physical keyboard. The Windows 11 autocorrect feature is turned off by default for physical keyboards, but you can turn it on.
If you’d like to give it a go, here’s how to use autocorrect for a PC with a physical keyboard.
Enable Windows 11 Autocorrect for PC with Physical Keyboard
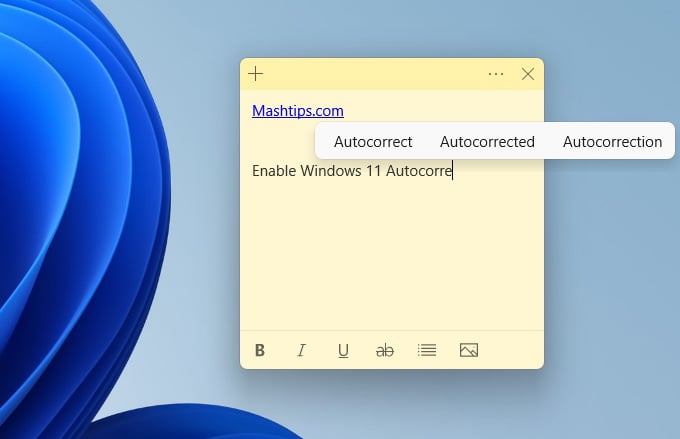
Normally, autocorrect suggestions are displayed on top of the touch keyboard. When you enable Windows 11 autocorrect for the physical keyboard, however, the same placement is not possible. Therefore, Windows 11 autocorrect suggestions are displayed right above your cursor, as you type.
Related: How to Find Mouse Pointer in Windows 10 If It Goes Missing
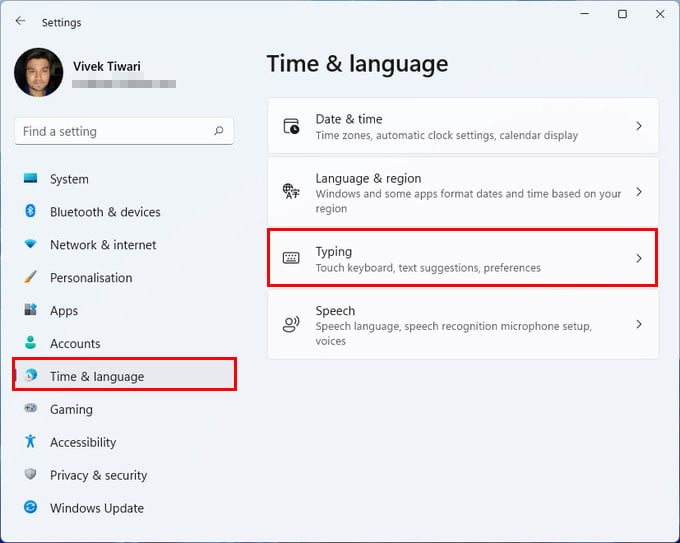
The autocorrect feature on Windows 11 has been buried into the Time & language settings. So it can be a bit difficult to stumble upon it. Follow the steps below to enable Windows 11 autocorrect for PC with a physical keyboard.
- Press Windows + I on the keyboard to open the Windows 11 Settings app or use the icon in the action center.
- From the left navigation column, select Time & language.

- From there, on the right, click on Typing.
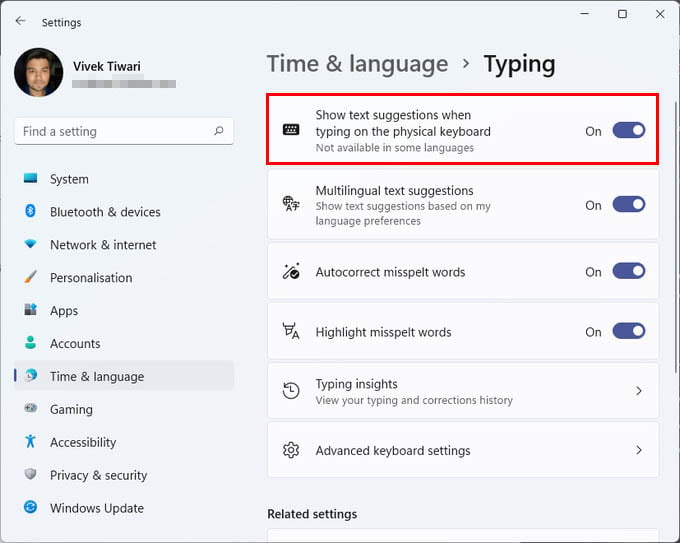
- Turn on the toggles that say Show text suggestions when typing on the physical keyboard.

You can turn on the other three toggles as well if you need those. Multilingual text suggestions will be helpful for those who type in at least two languages often. Autocorrect misspelled words only works with the on-screen keyboard.

If the suggestions as you type seem distracting, you can turn off Show text suggestions when typing on the physical keyboard. It might be counterintuitive to use the mouse and click on the suggested autocorrect texts. Fortunately, you can quickly access the suggestions by pressing the Up arrow key and then navigate using the left and right arrow keys. To select a suggestion, simply press Enter.
Related: How to Enable Predictive Text and Autocorrect in Windows 10
Autocorrect for PC can be a very useful feature, especially if you struggle with spellings. And now you know how to turn it on. When the autocorrect is turned on on your PC, it will keep correcting your typing mistakes and save you from trouble.
