The Windows OS has had a feature to hide files, folders, and even entire drives for as long as I can remember. And I have been using it for a long time. Initially, the feature was built to hide system files so that users wouldn’t delete them by mistake. Some savvy users started using it to hide sensitive and private files and folders from prying eyes.
So, how do you hide, unhide, and view hidden files, folders, and drives in Windows 10? What to do when one of the default ways to do so fails to work? Let’s take a look at all the ways you can hide or unhide any file, folder, and drive on your computer.
1. File Explorer Shortcut
Press Windows key+E to open File Explorer and under the View tab, you will see Hidden items checkbox. Select that to view a list of all hidden files and folders inside that particular folder.
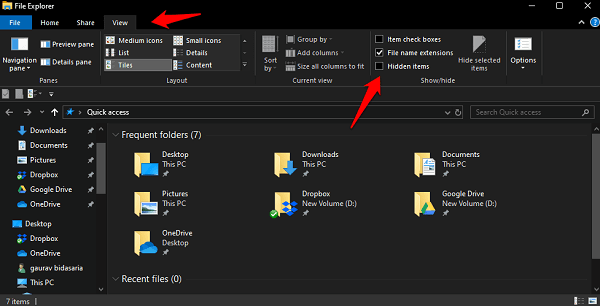
The shortcut was added to Windows 10. Before that, you had to dive into folder properties to unhide files and folders. You can uncheck it when done to hide everything again.
Noticed the Hide selected items button on the right side in the above screenshot. Select all the files and folders that you want to hide and click on that button to hide them. Press the same button to unhide files and folders.
Also Read: 6 Easy Solutions to Transfer Files between Android and Windows
2. Folder Properties Menu
This is how things worked in Windows 8.1 and previous versions of Windows. Open File Explorer again and this time, right-click on any folder inside which you want to hide files and folders to select the Properties option.
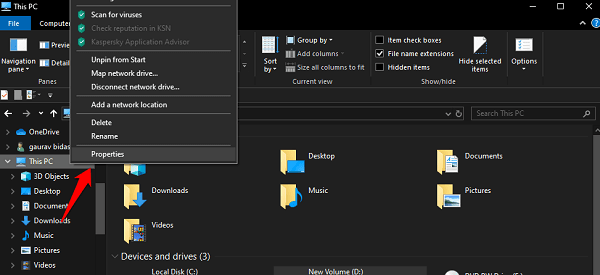
Under the General tab, you will find the Hidden attribute. Click on that to hide the selected files and folders.
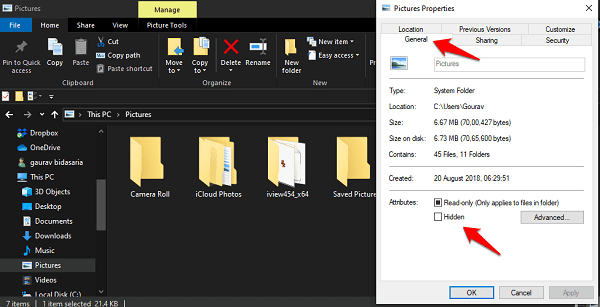
Repeat the same process and uncheck the Hidden checkbox to unhide the selected files and folders you had hidden.
Also Read: 10 Best Windows 10 Search Tools for Efficient File Searching
3. Control Panel
If for some reason, the above two methods are not working for you, there is another way. Press Windows key+S to open the search menu, find Control Panel, and open it.
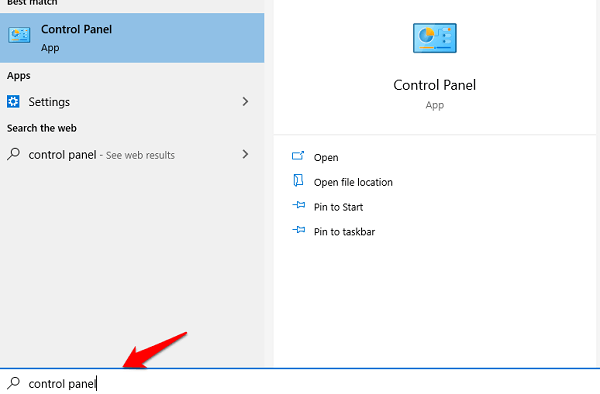
Search for and open the File Explorer option in the Control Panel.

Under the View tab, you will find an option to Show hidden files, folders, and drives option. Select that and click on Apply to save changes to view all hidden items.
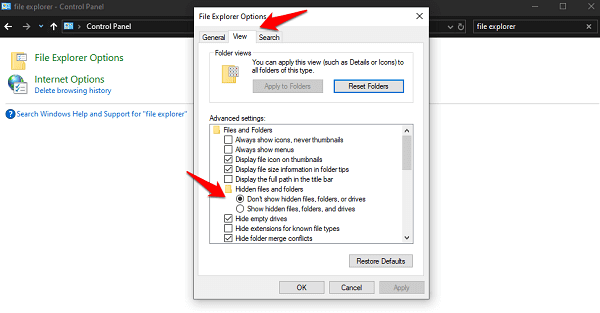
Note that this is a universal setting meaning you will now see hidden files, folders, and drives everywhere and not just the folder you were looking at. If you want folder specific actions, follow method 1 above.
4. Registry Hack
I don’t recommend this option until you have tried everything else and nothing seems to be working. You can either search for and open the Registry Editor or press Windows key+R to open Run prompt and type regedit and hit Enter to launch it from there.
Now drill down to the below folder structure.
Computer\HKEY_CURRENT_USER\Software\Microsoft\Windows\CurrentVersion\Explorer\Advanced
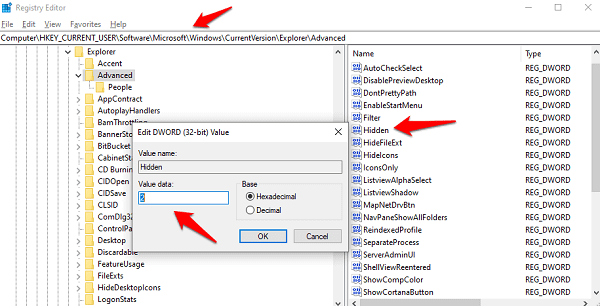
Double-click on Hidden file name in the right window-pane and set the Value to 1 to show hidden files, folders, and drives, and set it to 2 in order to hide them.
Related: How to Sign in Windows 10 with Phone number (No Password)
5. Command Prompt
Pay attention. This is not a regular trick. Hiding a file or a folder using below CMD command will hide it more securely. That means no user will be able to view the hidden file or folder even when changing the hidden attribute from the folder options. This gives you an added layer of security because anyone with access to your computer can unhide files and folders using the properties and attributes feature.
Note the path of the file you want to hide in the first place. You can copy it from the file explorer search bar.
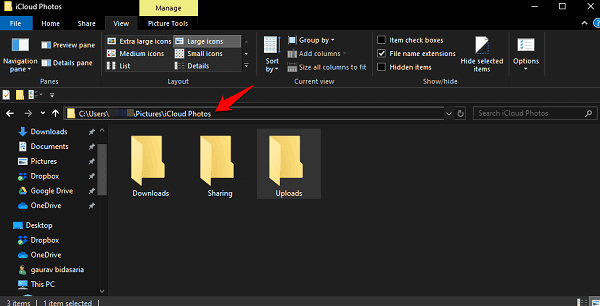
Now open CMD with admin rights and give the below command.
attrib C:\Users\username\Pictures\Downloads\filename.png +s +h
Make sure to change the username with your computer name and filename.png with the file in question with its correct extension or format. The +s attribute will tell the OS that it is a system file that needs to be protected and +h will tell it to hide the file for good.
You can use the same command to hide a folder also. In order to unhide a file or folder, use the minus sign (-s -h) instead. I suggest you create a dummy file and folder to first try it out. You don’t want to lose access to an important file/folder.
6. Hide Entire Drive Using Registry Editor
You can hide the entire drive using Registry Editor. That’s not possible from the Control Panel or Folder Options menu.
Open the Registry Editor as you did before and drill down to the below folder structure.
HKEY_LOCAL_MACHINE\Software\Microsoft\Windows\CurrentVersion\Policies\Explorer
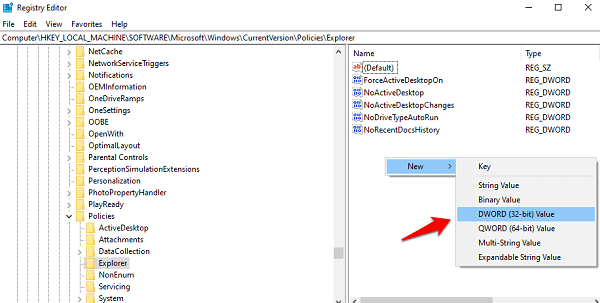
Name the file as NoDrives, save it, and double-click on it to open it.
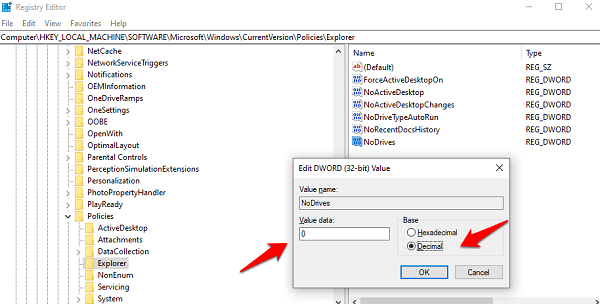
Select the Base as Decimal here and then enter the Value data as the number of the corresponding drive that you want to hide. Wait, how to find the drive number because they are usually represented by alphabets like C and D?
Easy. A is 1, B is 2, C is 4, D is 8 and so on. Each drive letter is the square of the previous drive letter. That means drive E is 16. Now, you will enter the drive number above to hide it. But what if you want to hide two different drives? Then you will add their respective numbers and input that. For example, if you want to hide drive A and D, you will add 1+8 which comes to 9. Enter 9.
Don’t forget to save the registry value. To unhide the drive/s, simply delete the NoDrives entry you created above.
Also Read: How to Clean up Windows 10 to Gain Disk Space?
7. Hide Entire Drive Using Disk Management Utility
You can hide both internal and external drive using the Disk Management utility tool. The tool itself is not visible in the search which is why you will have to open the Run prompt (Windows key+R) and type diskmgmt.msc to open it.
Right-click on the drive that you want to hide and select Change Drive Letter and Paths.
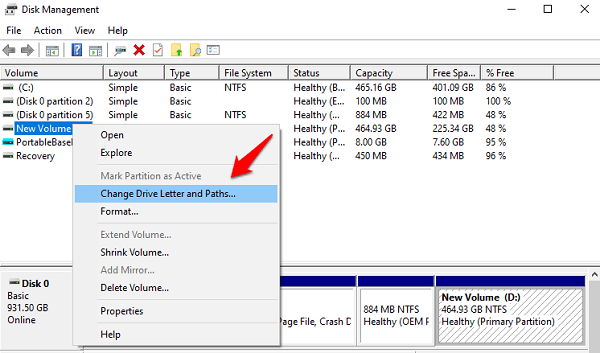
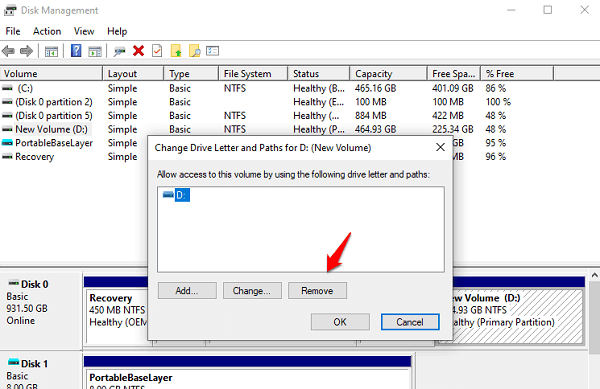
Select the drive here and click on Remove to hide the drive completely from view in the File Explorer for good.
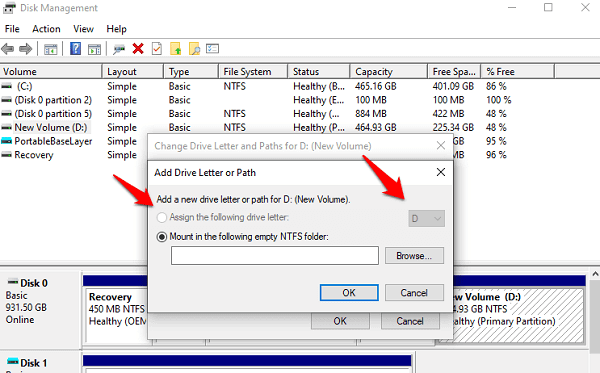
If you want to unhide it in the future, repeat the same process but this time, click on Add instead of remove and assign the correct drive letter in the drop-down menu.
Related: How to Change Windows Folder Color Easily and Organize Them Better
8. Third-Party Apps
There are a number of third-party apps available in the market that will help you manage and hide or unhide files, folders, and drives on Windows 10 Computer easily. These apps come with additional features that we will discuss below.
The first one is the Secret Disk which will create a hidden, password-protected virtual disk on your computer to save sensitive files and folders. The base version is free and should be enough for most users.
The second app is My Lockbox which will add an app icon on the desktop that you can use to quickly hide or unhide files and folders anywhere. It comes with keyboard shortcuts. The free version will lock one primary folder with unlimited sub-folders and files inside.
There are other apps that can help hide files, folders, and drives on Windows 10, but these should be enough to get you started.
Also Read: How to Hide a File in Google Drive?
There are a number of ways to go about this and depending on what kind of files and folders or drives are you trying to hide, how sensitive they are, and how important it is for you, you may go for one of the above methods. Make sure you understand the steps clearly and the shortcomings they have if any.
